Week 0 - Week 1

A showcase of my work utilising internal study materials, taking notes, participating in quizzes and challenging my own study style.
Week 0 - Week 1
2nd October 2022 - 16th October 2022
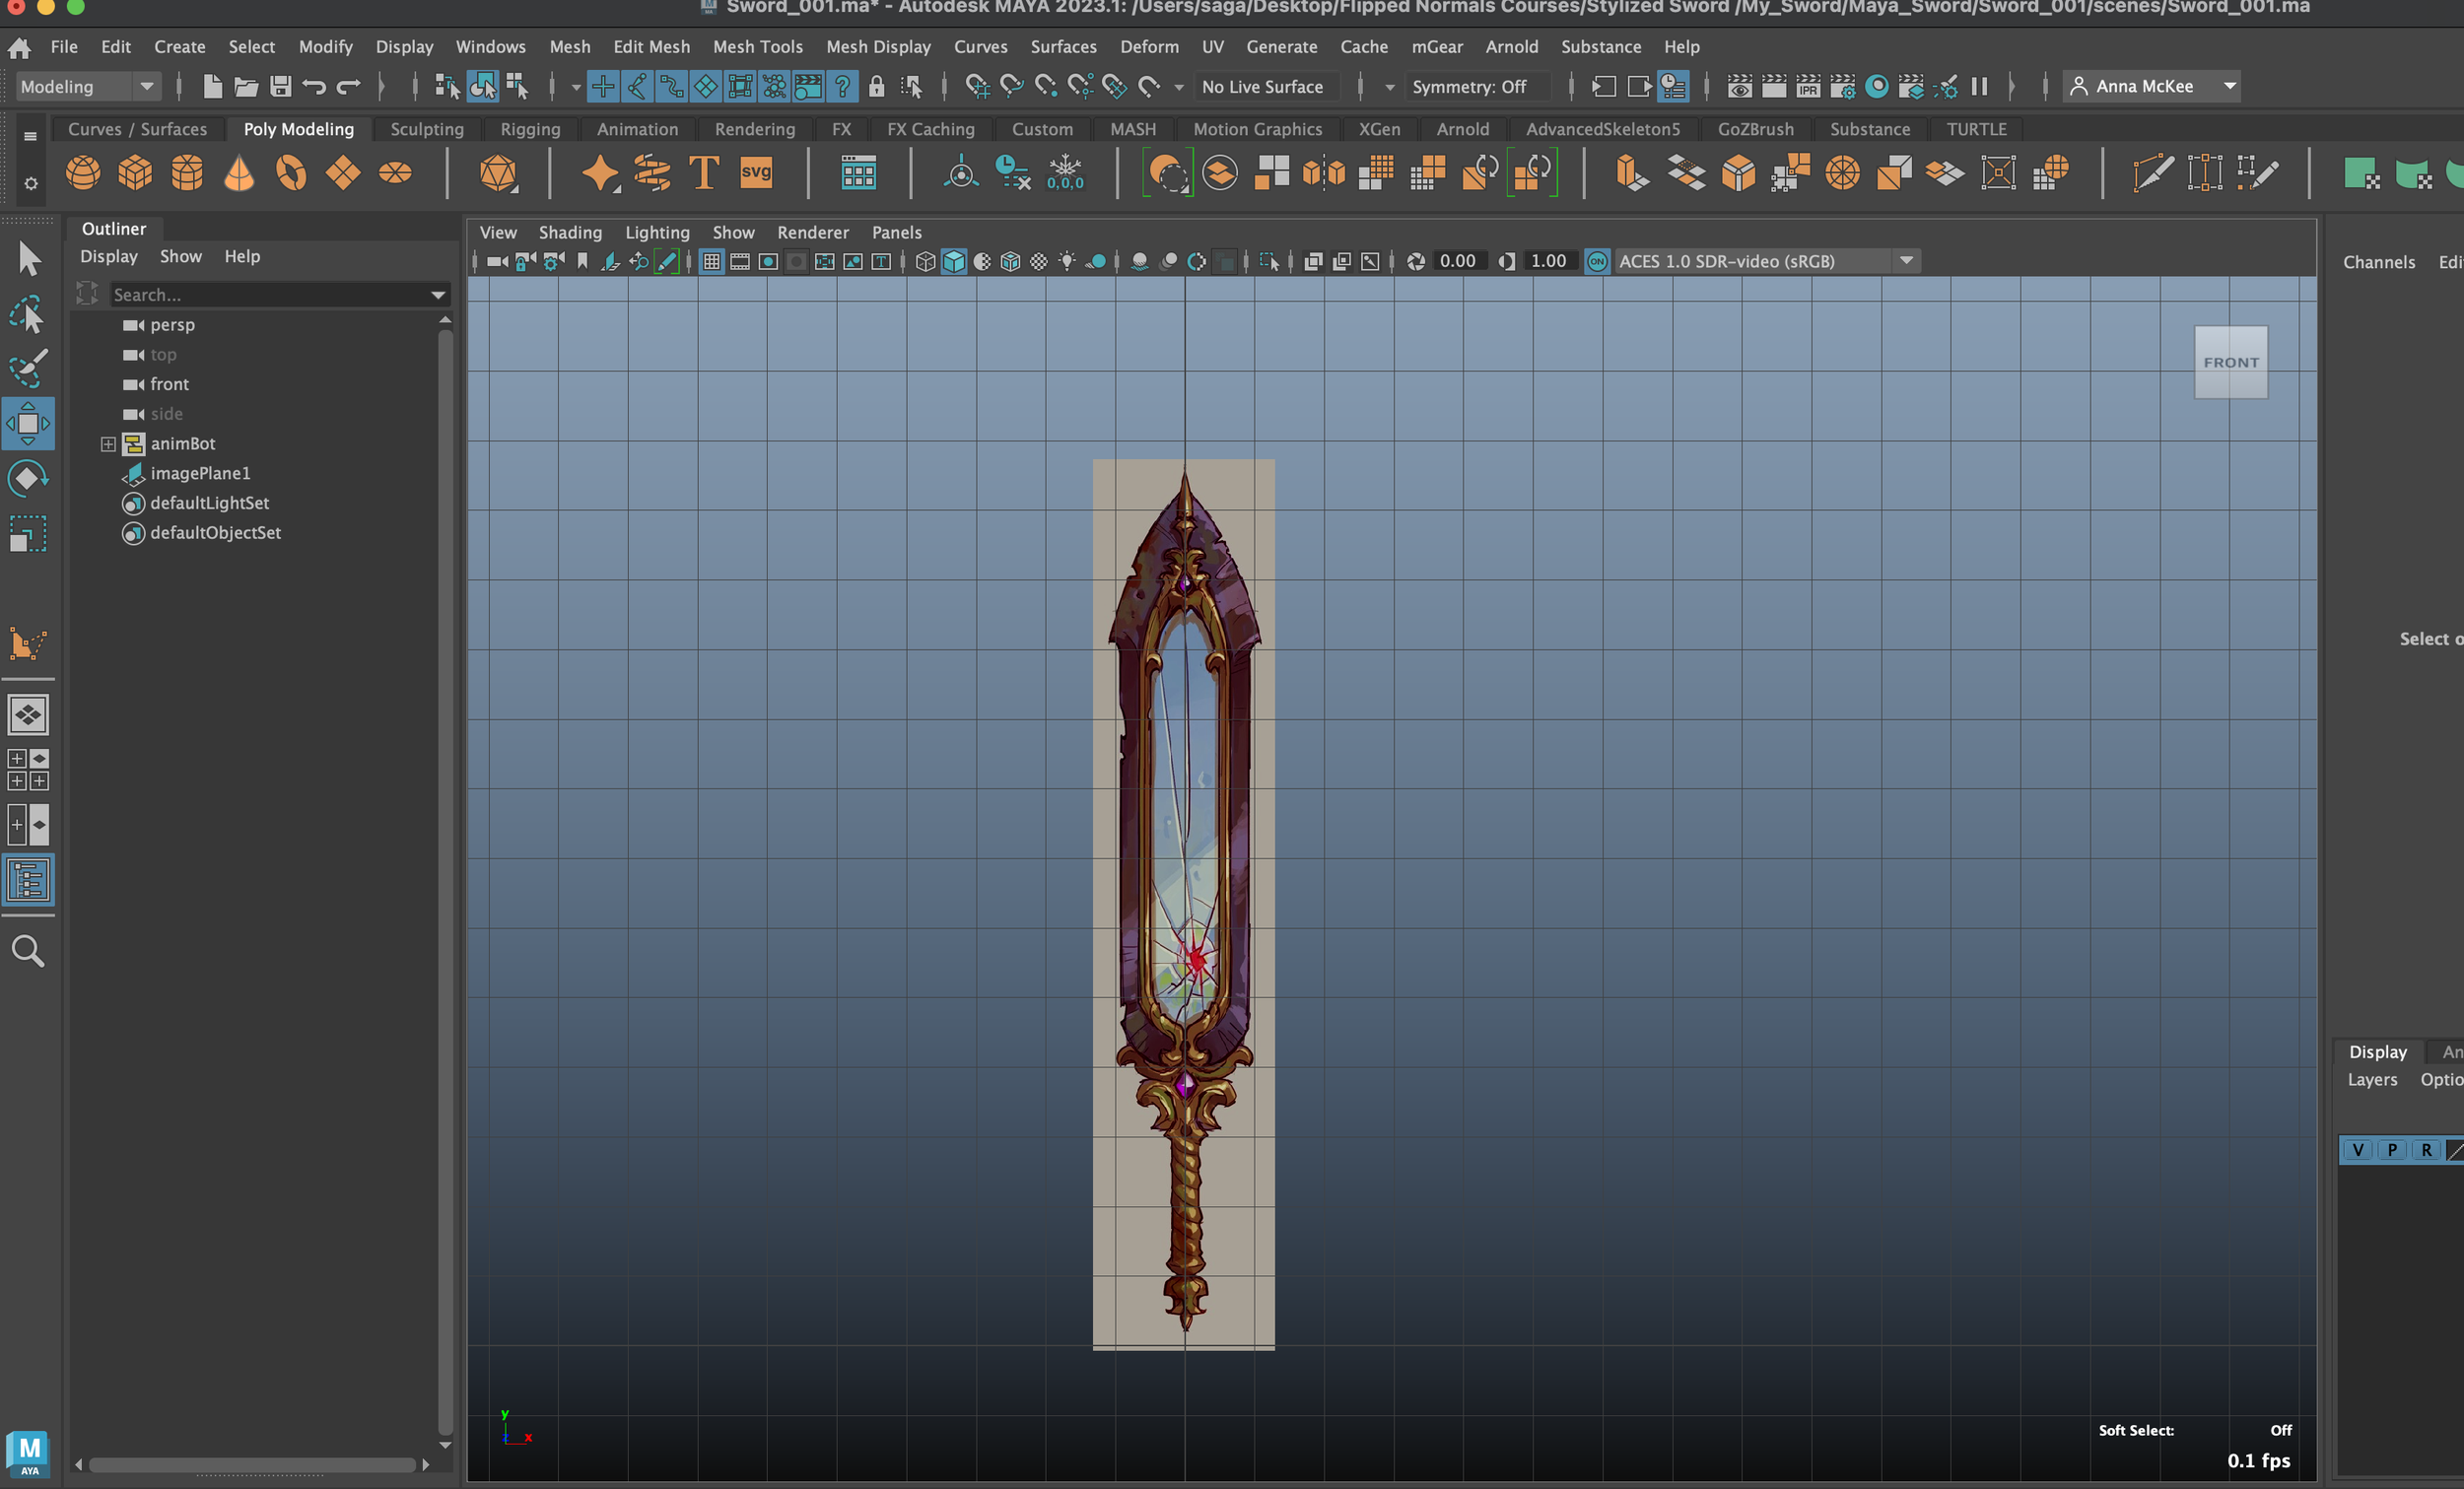
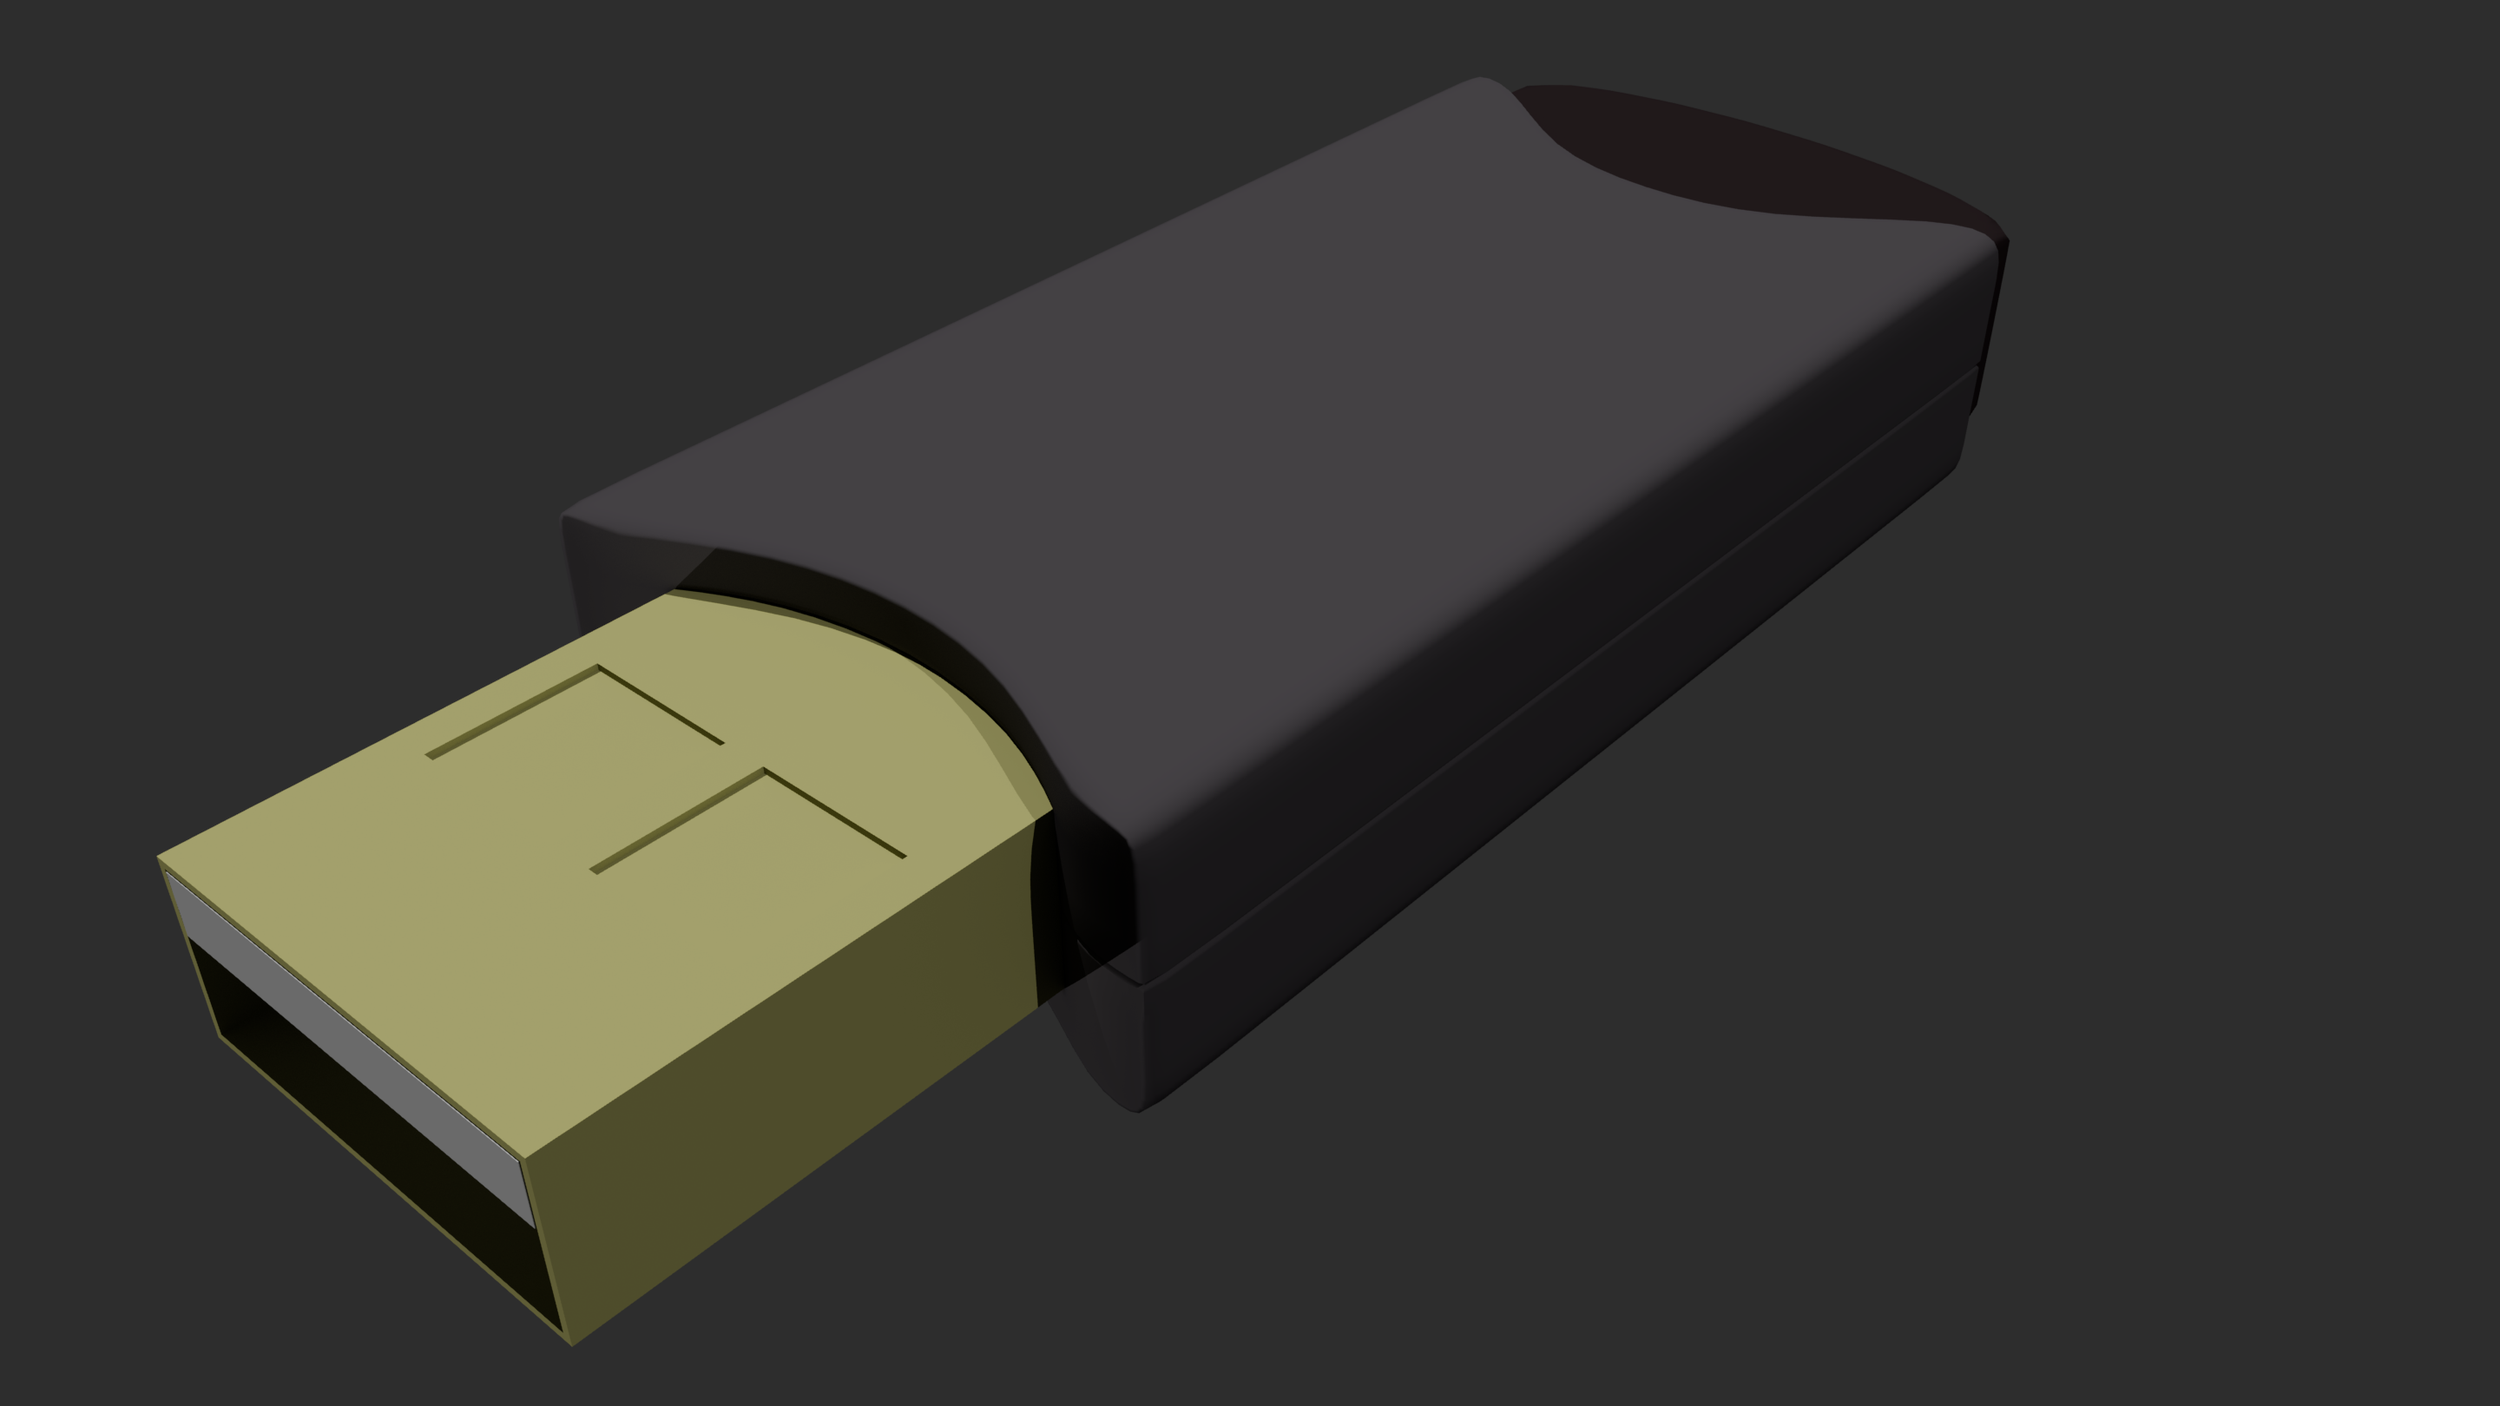
A final render of my “USB Drive” Internal tutorial.
An introduction-
Week 0
Hello, my name is Anna and I am an Illustrator from Northern Ireland, United Kingdom.
I have a Bachelor of Design with Honours in Graphic Design & Illustration from Ulster University, Belfast, Northern ireland.
After graduating in 2021 I began working as a Freelance Illustrator and Multimedia Designer within the UK, whilst also running an online Etsy shop where I sell my traditional artworks.
During January 2022, I became interested in expanding my skill set, which encouraged me to apply for a Masters in “Computer Animation” at Kingston University.
Before the commencement of this course I was able to secure a summer internship working as a 3D Artist within the Film and Game Industry. This experience was challenging as I was still very new to the specialism of 3D sculpting, although as an Illustrator I do feel that there are some ‘transfer’ of skills between traditional drawing and 3D sculpting.
My specialism is mainly human portraiture, flora and fauna ( specifically birds).
These artworks are almost exclusively painted within a traditional medium such as watercolour, acrylic gouache, wax-based colouring pencils or Pentel brush pens.
My most precious medium that I work with is my Schmincke 48 Half Pan Watercolour set. This is my most prized possession and I enjoy painting with it the most, (Arches hot-pressed watercolour paper is also a great combination with this paint).
Although I have not had much time to paint since the commencement of this course (3D Computer Animation), I still occasionally create rough watercolour sketches within my Moleskine A5 Cold Pressed Sketchbook.
I feel it is important as an artist to keep you skills sharp and try to step away from the computer screen every once in a while to draw / paint in a traditional manner, as the process can be refreshing and help to inspire new creative ideas for 3D models.
This blog will record my student journey throughout my masters course in “Computer Animation” at Kingston University, London. (September intake 2022-2023)


Instagram Art account - @annamckeeart
Painting shown above - “Scream” - Watercolour, Ink and Acrylic Gouache on 300gsm Cold-Pressed Watercolour paper - A3
Further information regarding my background and goals for the future can be found within the “About” link below.
Gantt Chart-
Week 0

Timetable displays: 2nd October 2022 ( Week 0 ) - 12th December 2022 ( Week 10 )
Due to the large quantity of preparation needing to take place before the start of the course, I made a Gantt Chart depicting the timetabling of my Masters course in Animation. Creating this visual timetable allowed me to gain a heightened sense of what activities were planned within my course. Completing this “Gantt Chart” allowed me to visualise my own timetable in a creative manner, while using colour-codes and shapes to definitively match the title of each category / classification.
Personally, I feel that displaying this colourful Gantt Chart would allow me to ‘take control’ of my future tasks and perceive time management in a more positive light.
Gantt Chart Conclusion:
Although I feel that the Gantt chart encouraged me to ‘check-in’ frequently with my future workload (due to it’s easy to read colour-scheme), I am still consistently behind schedule within my timetabled workload. I believe that issue is currently related to my own ‘study-style’.
Improvements and adjustments regarding the topic of ‘study-style’ will be discussed throughout increments of this blog.
Before my Masters in “Computer Animation” officially started on the 10th of October 2022, there was much to complete in preparation for the course:
Further Reading - 3D Animation Books / 2D Animation Books / Human Anatomy Books
Watch and follow-along Internal / External Tutorials
Revise topics such as the maya Interface, Retopology, Hard-Surface Modeling tips, Edge flow, etc
Study a range of areas within 3D Animation / 3D Modelling, decide what to specialise in
Summer Assigned Recommended Reading Books-
Week 0 -


“Personally, I enjoy the visual aspect of these animation books, as there are many detailed illustrations within each chapter”
I am slowly working my way through each of these Recommended Reading books which I purchased during August 2022.
The book that I am currently reading is part of my own personal literature list, titled “Cartoon Character Animation With Maya” (Written by Keith Osborn). Although I am realising that this book is quite advanced, I do feel that the industry-related interviews portrayed within the guide help to present careful insight into the successful career of a 3D Animator.


Class Prep Notes - Week 0
Internal Tutorial Notebook
During Week 0 (the week before class offically started), we were assigned a range of Internal videos to watch via “Canvas”.
I decided to complete these view these videos whilst writing detailed notes within my “Internal Tutorial Notebook” (Images shown above and to the left).
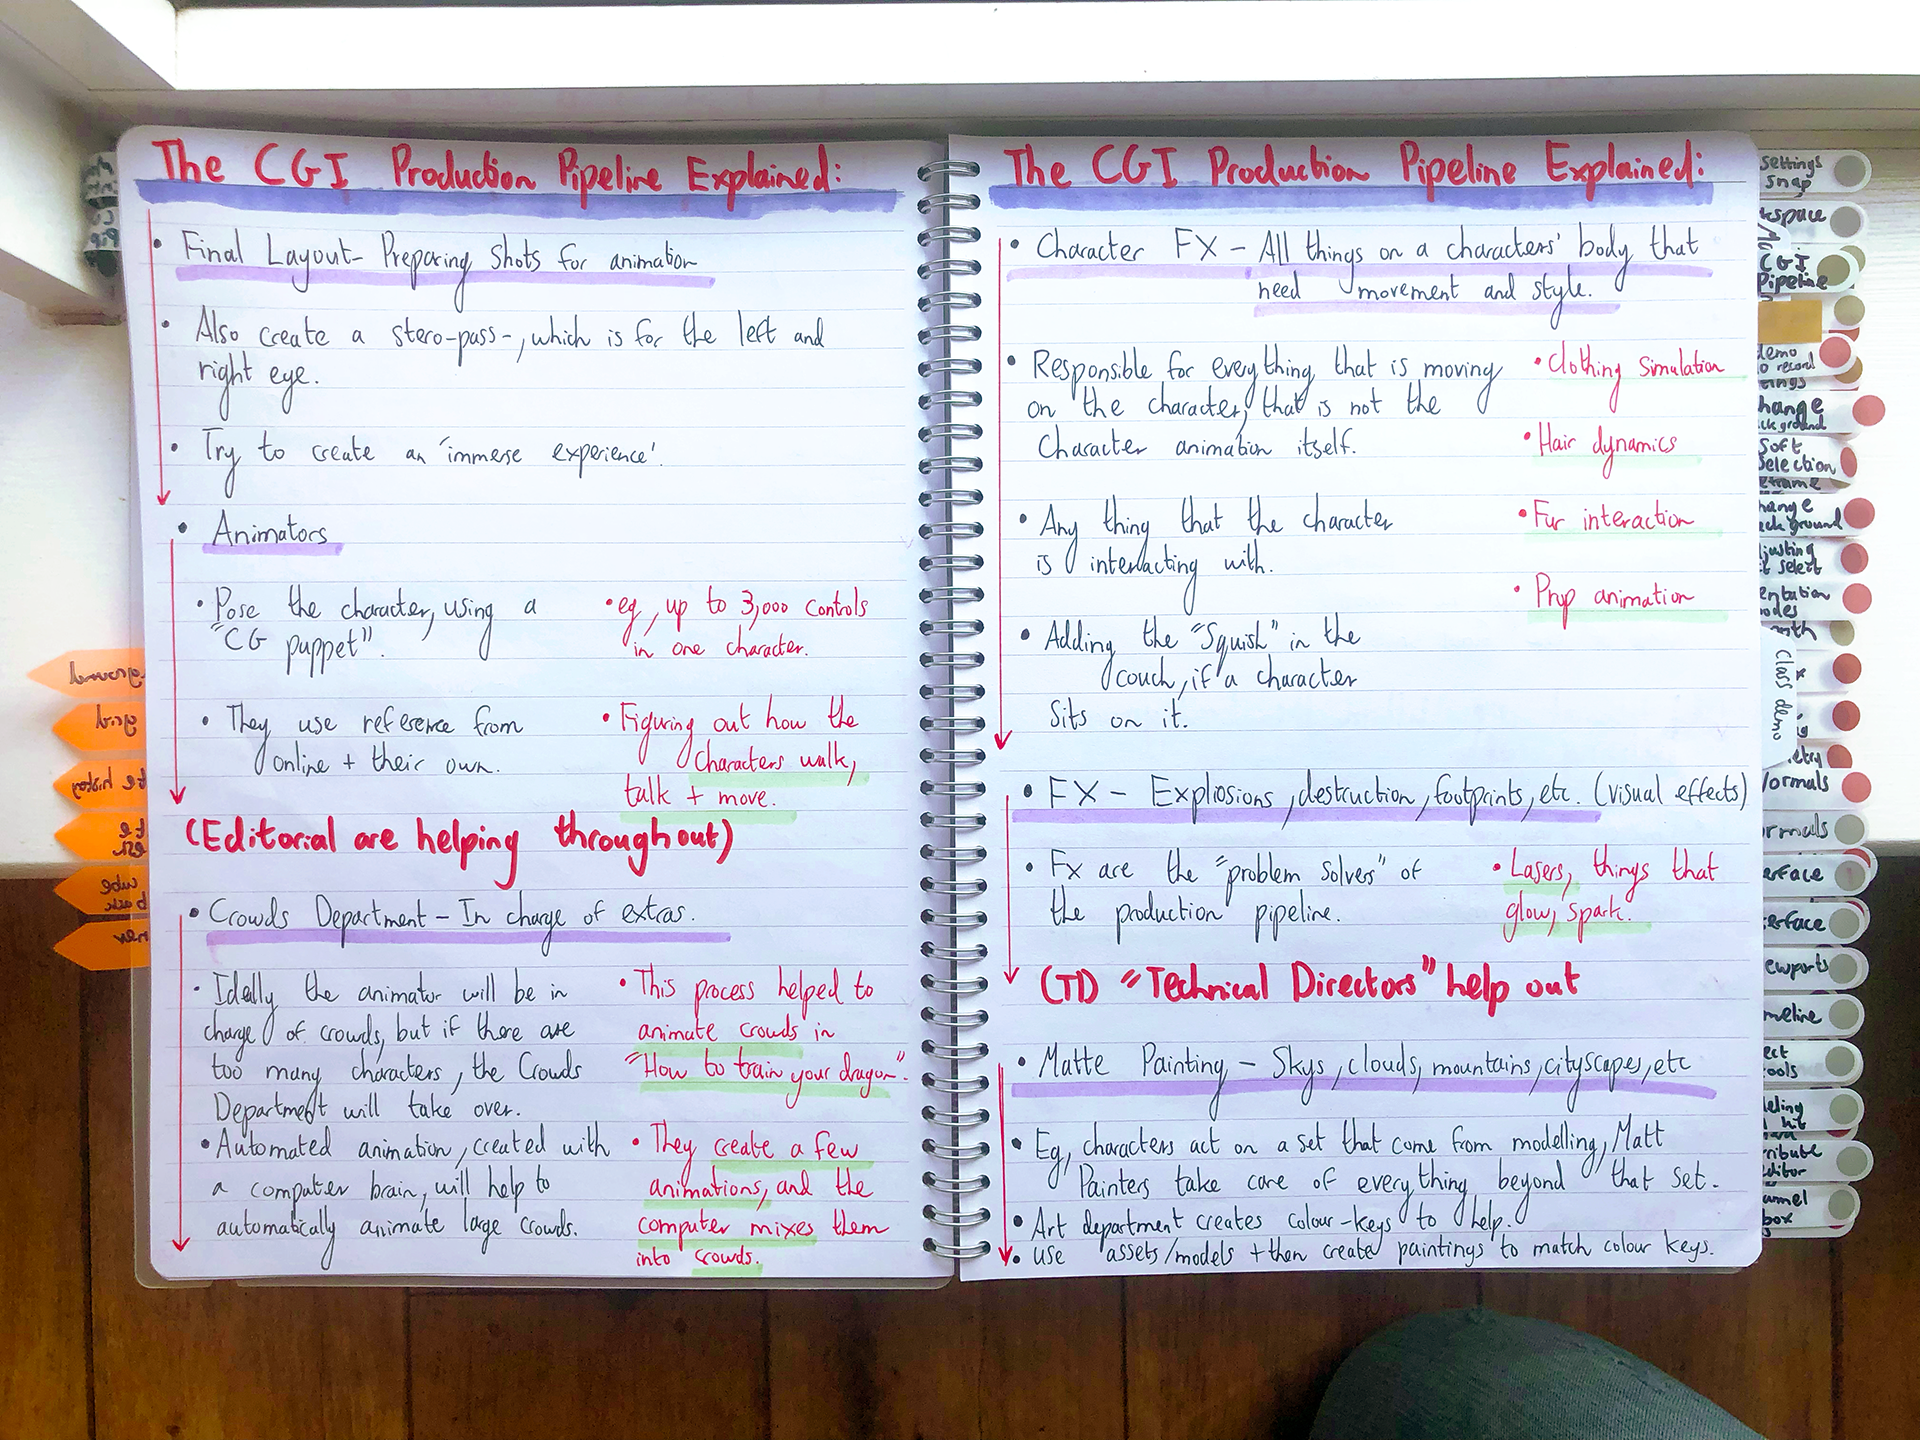


These images shown above display my own notes that I recorded during “Week 0”, which help to notes my progress within the Canvas “T01 Maya Fundamentals Internal Tutorials”.
I decided to write many notes regarding the “Maya Basics” category within the learning materials of Canvas. During the time writing these notes and diagrams, I felt that I was heading in the right direction, as within the past this is the same study method that would have used when previously learning a new programme. I also felt more comfortable writing these notes while following-along within the video tutorial. The notes also allowed me to easily refer back to them as soon as I feel lost or confused when using Maya.
Some of the topics that are referred to within these notes are:
“The CGI Production Pipelines Explained” - Dreamworks Animation
“T01 Maya Fundamentals Internal Tutorials” - Interface, Navigation, Display Settings, Toolbox and Viewport Toolbar
Positive Development:
Easy-to-read, colour coded notes that clearly refer to assigned video topic
Notes are categorised / displayed with regards to their video order
I am able to refer back to these notes when overwhelmed with a topic
Negative Development:
Slowing my workflow down as I was writing too many notes
Being unable to replicate many processes within Maya, due to the reliance on notes instead of ‘intuitive learning’
Not realising how far behind schedule I became as I was hyper fixated on the note taking process
Self reflection:
During Week 0 I thought that I had made good progress with my notes, although I soon realised how slow my study methods were, as I was unable to complete watching all of the recommended introductory videos on Maya.
This resulted with me feeling extremely behind and quite lost during the commencement of Week 1’s in-person class on Monday 10th of October 2022. Although I had not realised it yet, I would have to drastically change my study-style soon if I wanted to catch-up with the rest of the class.
In spite of this issue, I decided to keep pursing to write as many notes as I could, only the goal this time was to attempt to ‘write them more quickly’. I feel that I did this because I was still ‘stuck in my ways’ using an outdated study method that had previously worked for me within a different learning environment.
T01 Maya Fundamentals Internal Tutorials-
Week 0


Recreating / following along internal tutorials -
My screen recordings
Week 0
The screen recording shown above portrays my own attempt following along the “Viewport Toolbar” from the internal “T01 Maya Fundamentals Internal Tutorials” video.
Within this video I display the effects of creating a live shadow (as the “Cast Shadow” icon has been activated), whilst rotating a Point Light. While the Point Light is being rotated, the shadows created from the rectangular meshes change shape.
After downloading my own HDRI (High Dynamic Range Image) image of a rocky mountainscape, I continued to follow the “Viewport Toolbar” tutorial.
The next stage of the internal tutorial guided me through the stage of implementing my HDRI image within the SkyDomeLight, then partly rendering out the image using Arnold.
This process within the tutorial was dedicated to show the viewer how effective it is to render using a cropped preview viewing window, as this creates less lag in comparison with rendering the entire scene. I feel that this could be of use within future renders / Maya sessions.
Conclusion:
Overall I feel that completing these “T01 Maya Fundamentals Internal Tutorials” really helped me to generate a beginner’s level understanding of Maya’s interface, covering topics such as:
Maya’s interface / Navigation / Hotkeys
The Toolbox
Viewport Toolbar
Setting a project
Transforming, aligning and duplicating an object
Pivot Points
Snapping / Step Snap
Normals
Display Layers and Selection Masks
Installing MEL and Python Scripts to Shelf
Custom Scripts and the Hotkey Editor
Redirecting Edge Flow
In conclusion, I still feel unsure about some of the topics shown in the list above, therefore I do plan to revisit these topics after I have completed some of the Hard-Surface internal tutorials. This is because I would like to see where my skills are strongest and the areas that I still need to improve on.

Week 1 - Class Quiz
10/10/2022 - During our very first day of in-person class we were assigned a fun class quiz to partake in. The topic of the quiz was “Introduction to Modelling in Maya”.
Overall I found that the quiz was a fun way to begin such an intensive class session, as it was multiple choice and anonymous, meaning that there was less pressure to complete it with all of the correct answers.
In conclusion I thought my overall grade was satisfactory, as I already knew some of the topics regarding Vertices and N-Gones, as I had previously covered the basics of these areas within a previous “Flipped Normals” external tutorial covering the basics of manual retopology. Although I still knew that I had massive knowledge gaps within certain area of the 3D pipeline.
Using Reference
Week 1 -

10/10/2022 -
The image shown above portrays my own interpretation of a River salmon and Goldfish, hand-drawn without the use of a reference.
Both of these sketches were part of an exercise bestowed upon us by our tutor during the Monday morning “3D Creation Pipeline for Film and Games” class. For this task we were encouraged to quickly create a traditional drawing of a fish without using a reference.
The goal of this task was to encourage students to realise the importance of obtaining and using a reference image/images when they work, as the reference itself can be a main point of inspiration either from the view of styleisation or even anatomical purposes.
Conclusion:
Overall I found this exercise to be quite challenging (but also fun as well), as I very rarely draw or create any piece of artwork without the use of many references (displayed via an iPad screen and attached to my drawing desk via a Gooseneck Clamp).
I feel that this class exercise helped to prove a point that every great artist must a reference, as it not only provides an image image-plane showing correct form, it can also help the artist to successfully express their own style/stylisation within their chosen artistic division.
As an illustrator I thoroughly enjoy collecting reference images (sometimes up to 100 for a complex painting), as it allows me to explore how other artists create their own features such as: eyes, hair, fingers, birds, linework and colour palettes.
Before the commencement of this masters course, I would gather many of my own references via Pinterest, Copyright free photos from Facebook groups, art books, my own photography and life drawing classes.

Using PureRef
After finishing the previous drawing exercise as a class, our tutor then explained to us the importance of always using a reference and how it is key to the success of any 3D Artist / 3D Animator.
We were then recommended to download a programme titled “PureRef”. PureRef is a free programme that easily displays your chosen reference images within a tool box on your screen.
This box can be expanded and moved around your desktop, allowing to ease of navigation. Images can also be directly dragged from the internet and will be displayed within the PureRef image box.
Although my previous method when displaying reference images was using my iPad, I do feel that I will take PureRef in to consideration and utilise it within my own 3D modelling work, as it is more portable than using an external tablet.
Planning the blog-
Week 1


10/10/2022 - Notes recorded during first day of in-person class
During our first day of class our tutor explained to us the importance of referencing the “Marking Scheme” within our assignment sheet regarding our blogs.
As a class, Richard (our tutor) reminded us that if we aspired to create a balanced and efficient blog, we would need to follow the marking criteria shown within our blog assignment sheet. I then decided to record some handwritten notes during class time regarding this issue, as I personally feel that the blog could be overwhelming if not correctly formatted / written on a biweekly basis.
Conclusion:
Personally I feel that my “Blog Notes - Page 1” sheet provides the most relevant information for me regarding my blog. I also prefer how I have visually introduced many of the points within a Spider Diagram, as this colourful presentation of words helps to break down and simplify more complex areas of the blog’s marking criteria.
I felt that recording these notes during class-time helped me to grasp the concept a professional blog layout, such as the importance of participating in internal university (Canvas) material / tutorials, giving credit and linking all external resources correctly. I also predict that further progress will be made within my blog as it continuously updated throughout the course (such as an improvement in writing-style, formatting and workload performance).
Class Introduction to Maya-
Week 1

Credit - Anna McKee
This image shown above portrays a labelled and colour coded diagram of Maya’s interface.
I created this image using a screenshot from my computer device, then opening the image within photoshop (which I used to add low-opacity coloured boxes), then afterwards adding descriptive text. I then exported this image as a PNG into “Canva”, which I then added the arrows to help display where each part of the menus can be found.
10/10/2022 -
As a class we began studying the basics of Maya’s interface, which included areas such as:
Channel Box - Displays attributes for the last object, allows you to change the position of mesh
Tool Shelf (and how to customise them) - Allows you to access tools as a clickable button
Menu Set - Shows specific categories of tools related to different workflows
Shelves - Tools / settings regarding viewport display can be found here
Outliner - Shows all meshes, lights, models etc. (You can also rearrange, hide, group and parent objects here)
Panel Layout - Displays a range of viewing modes, such as Orthographic view, 4 panel layouts, 2 panel layouts, etc
Previous Command - Shows the last used tool for ease-of-use
Rotate, Move, Scale, Selection - These tools allow you to translate the mesh (making it smaller / bigger, rorating, moving). Selection tool engages the basic select tool function.
Timeline - Allows for keyframing animations
Layers - Shows what layer are present, you can turn them off and on (Similar to photoshop)
Viewport - Main display area for Maya
N-Gones, Tris, Quads and stars -
Week 1

A Face with more than 4 edges / more than 4 vertices
It is important to not have any N-Gones present within a model especially if you want to create an animation with the mesh
Cannot use N-Gones when creating a Subdivided Modell

A face with 3 edges / 3 vertices.
Acceptable to use within model made for game.
Cannot use Tris when creating a Subdivided Modell

A face with 4 edges / 4 vertices.
Quads are the most stable type of polygon to use within modelling or animation as they deform well and do not pinch.
Commonly used within the film industry.
The best choice for modelling overall.
I created these simple illustrations showing N-Gones, Tris and Quads using Canva - Credit: Anna McKee
Examples of different selection modes in Maya-
Week 1


Credit - Anna McKee
Shown above are some of my annotated screenshots from Maya showing different selection modes.
(Text and arrows added within Adobe Photoshop)
10/10/2022 -
During class time (whilst also using internal Maya explainer videos on CANVAS), I re-learned some of the basics of Maya’s interface and 3D in general.
From these learning sessions I understood that within 3D / Maya, when modelling or creating any mesh it is important to understand the differences between Edges, faces and vertices.
Edges - Lines that join a Vertex to another and also that separate 2 Faces
Faces - Curved or flat surfaces
Vertices - Points / corners where Edges meet
week 1 - Examples of Move, Scale and Rotate Tools-
Week 1


Credit - Anna McKee
These screenshots shown above portray my Maya scene, showing a range of translation tools that will allow the user to move, scale and rotate the mesh.
(Text and arrows added within Adobe Photoshop)
10/10/2022 -
Also within Monday’s class (including internal CANVAS material), we discussed with the tutor how to access simple translation tools such as the Move, Rotate and Scale tool.
Overall I felt that I understood this area of the class, as I have had some previous experience with using similar tool in Blender (although the hotkeys were different).
Move Tool - Moves the mesh along the X, Y and Z axis (You can also drag it anywhere on the viewport)
Rotate Tool - Rotates the mesh (using “World Mode” and Object Mode” will deliver completely different results related to rotation)
Scale Tool - Increases / Decreases size of mesh
Class Notes - Addressing / Changing my Study style
Week 1 - Class Notes
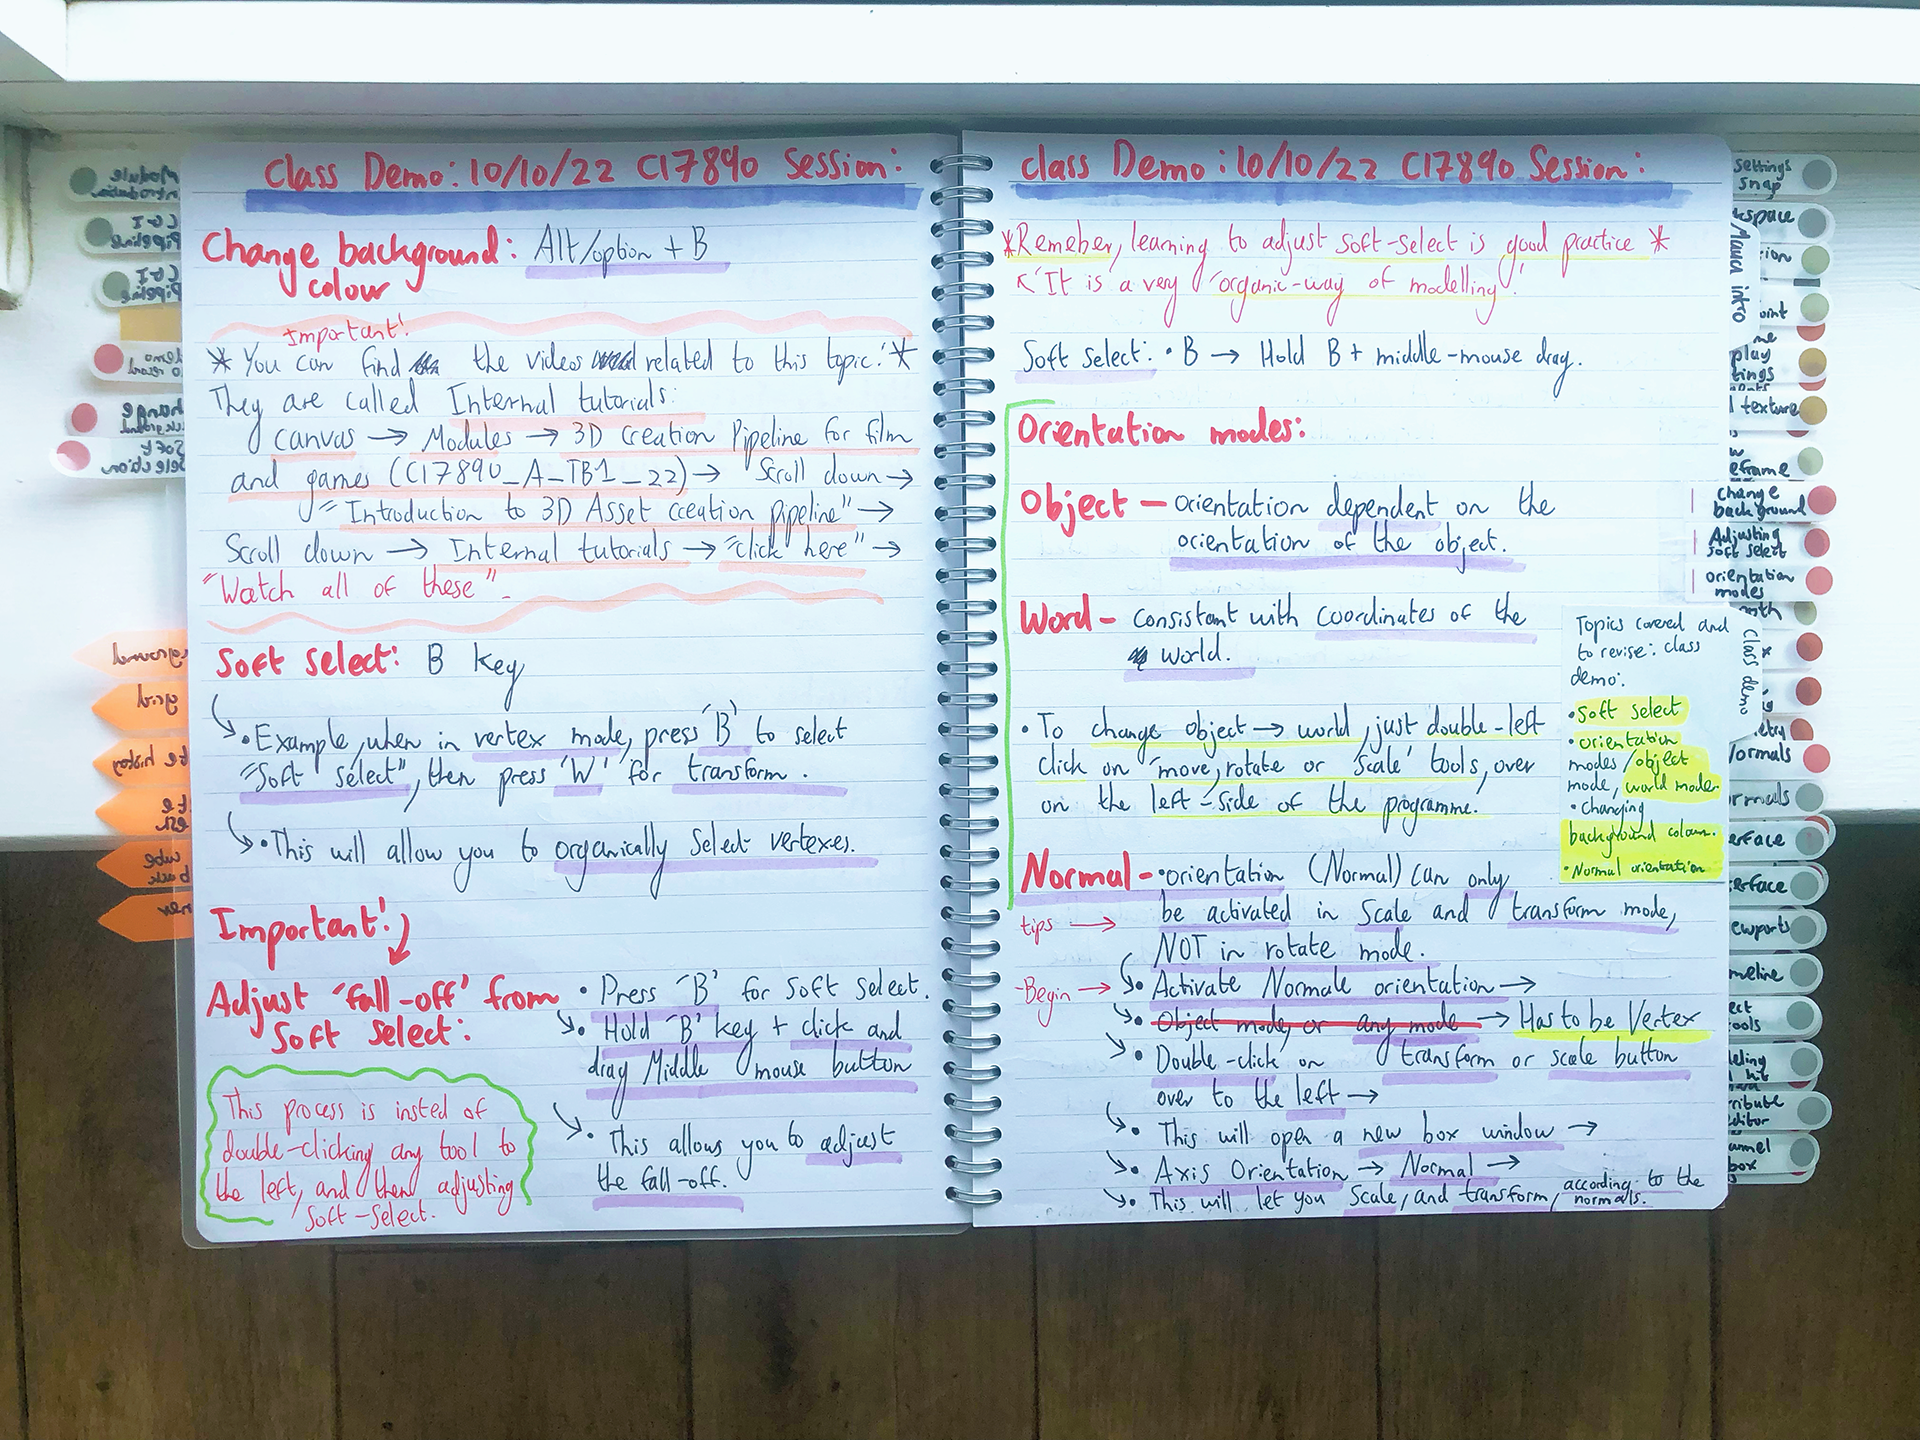


The images shown above portray some of my notes that I recorded during my Week 1 class. These notes cover a large range of topics that we mentioned during Monday the 10th of october 2022.
Some of the topics that are referred to within these notes are:
Class demos - Maya Interface, soft select, changing orientation modes, what are Normals, adjusting fall-off, background colour in Maya
Production blog - additional information, tips and tricks, marking scheme, recommended talking points
Module learning outcomes - Coursework 2: 3D Assets
What is Baking
Twisted Pipe Tutorial notes
Positive Development:
Tagged and titled clearly, showing the date the note was written, allows for easy referral
Utilisation of ‘colour-coded’ stickers -
Red = Difficult topics, will need to revise with immediate action,
Yellow = Intermediate topics, will need to revise in my own time,
Green = Simple topics, happy to move on
Negative Development:
Falling behind in class, being unable to keep-up with the lecturer as I was too busy taking notes
Missing out on valuable verbal information as I was too ‘zoned’ in to my own note taking process
Self reflection: (regarding my note-taking)
After speaking with peers during this Week 1 of class, I soon discovered that I was drastically behind the recommended pace that each student should be within. This worried me drastically and I decided to be proactive and take action by deciding to finally change my study style.
Although difficult at first, I began only writing the most significant and important notes, such as hotkeys, obscure / hidden buttons, tutorial-related notes and beneficial notes for future reference. I was also inspired to change my study method after receiving constructive feedback from MA Computer Animation lecturer, “Richard Cunningham”.
Overall embracing a mixture of peer feedback and constructive criticism from a professional lecturer helped to inspire me to review my own study-style and take the action I needed to make a change.


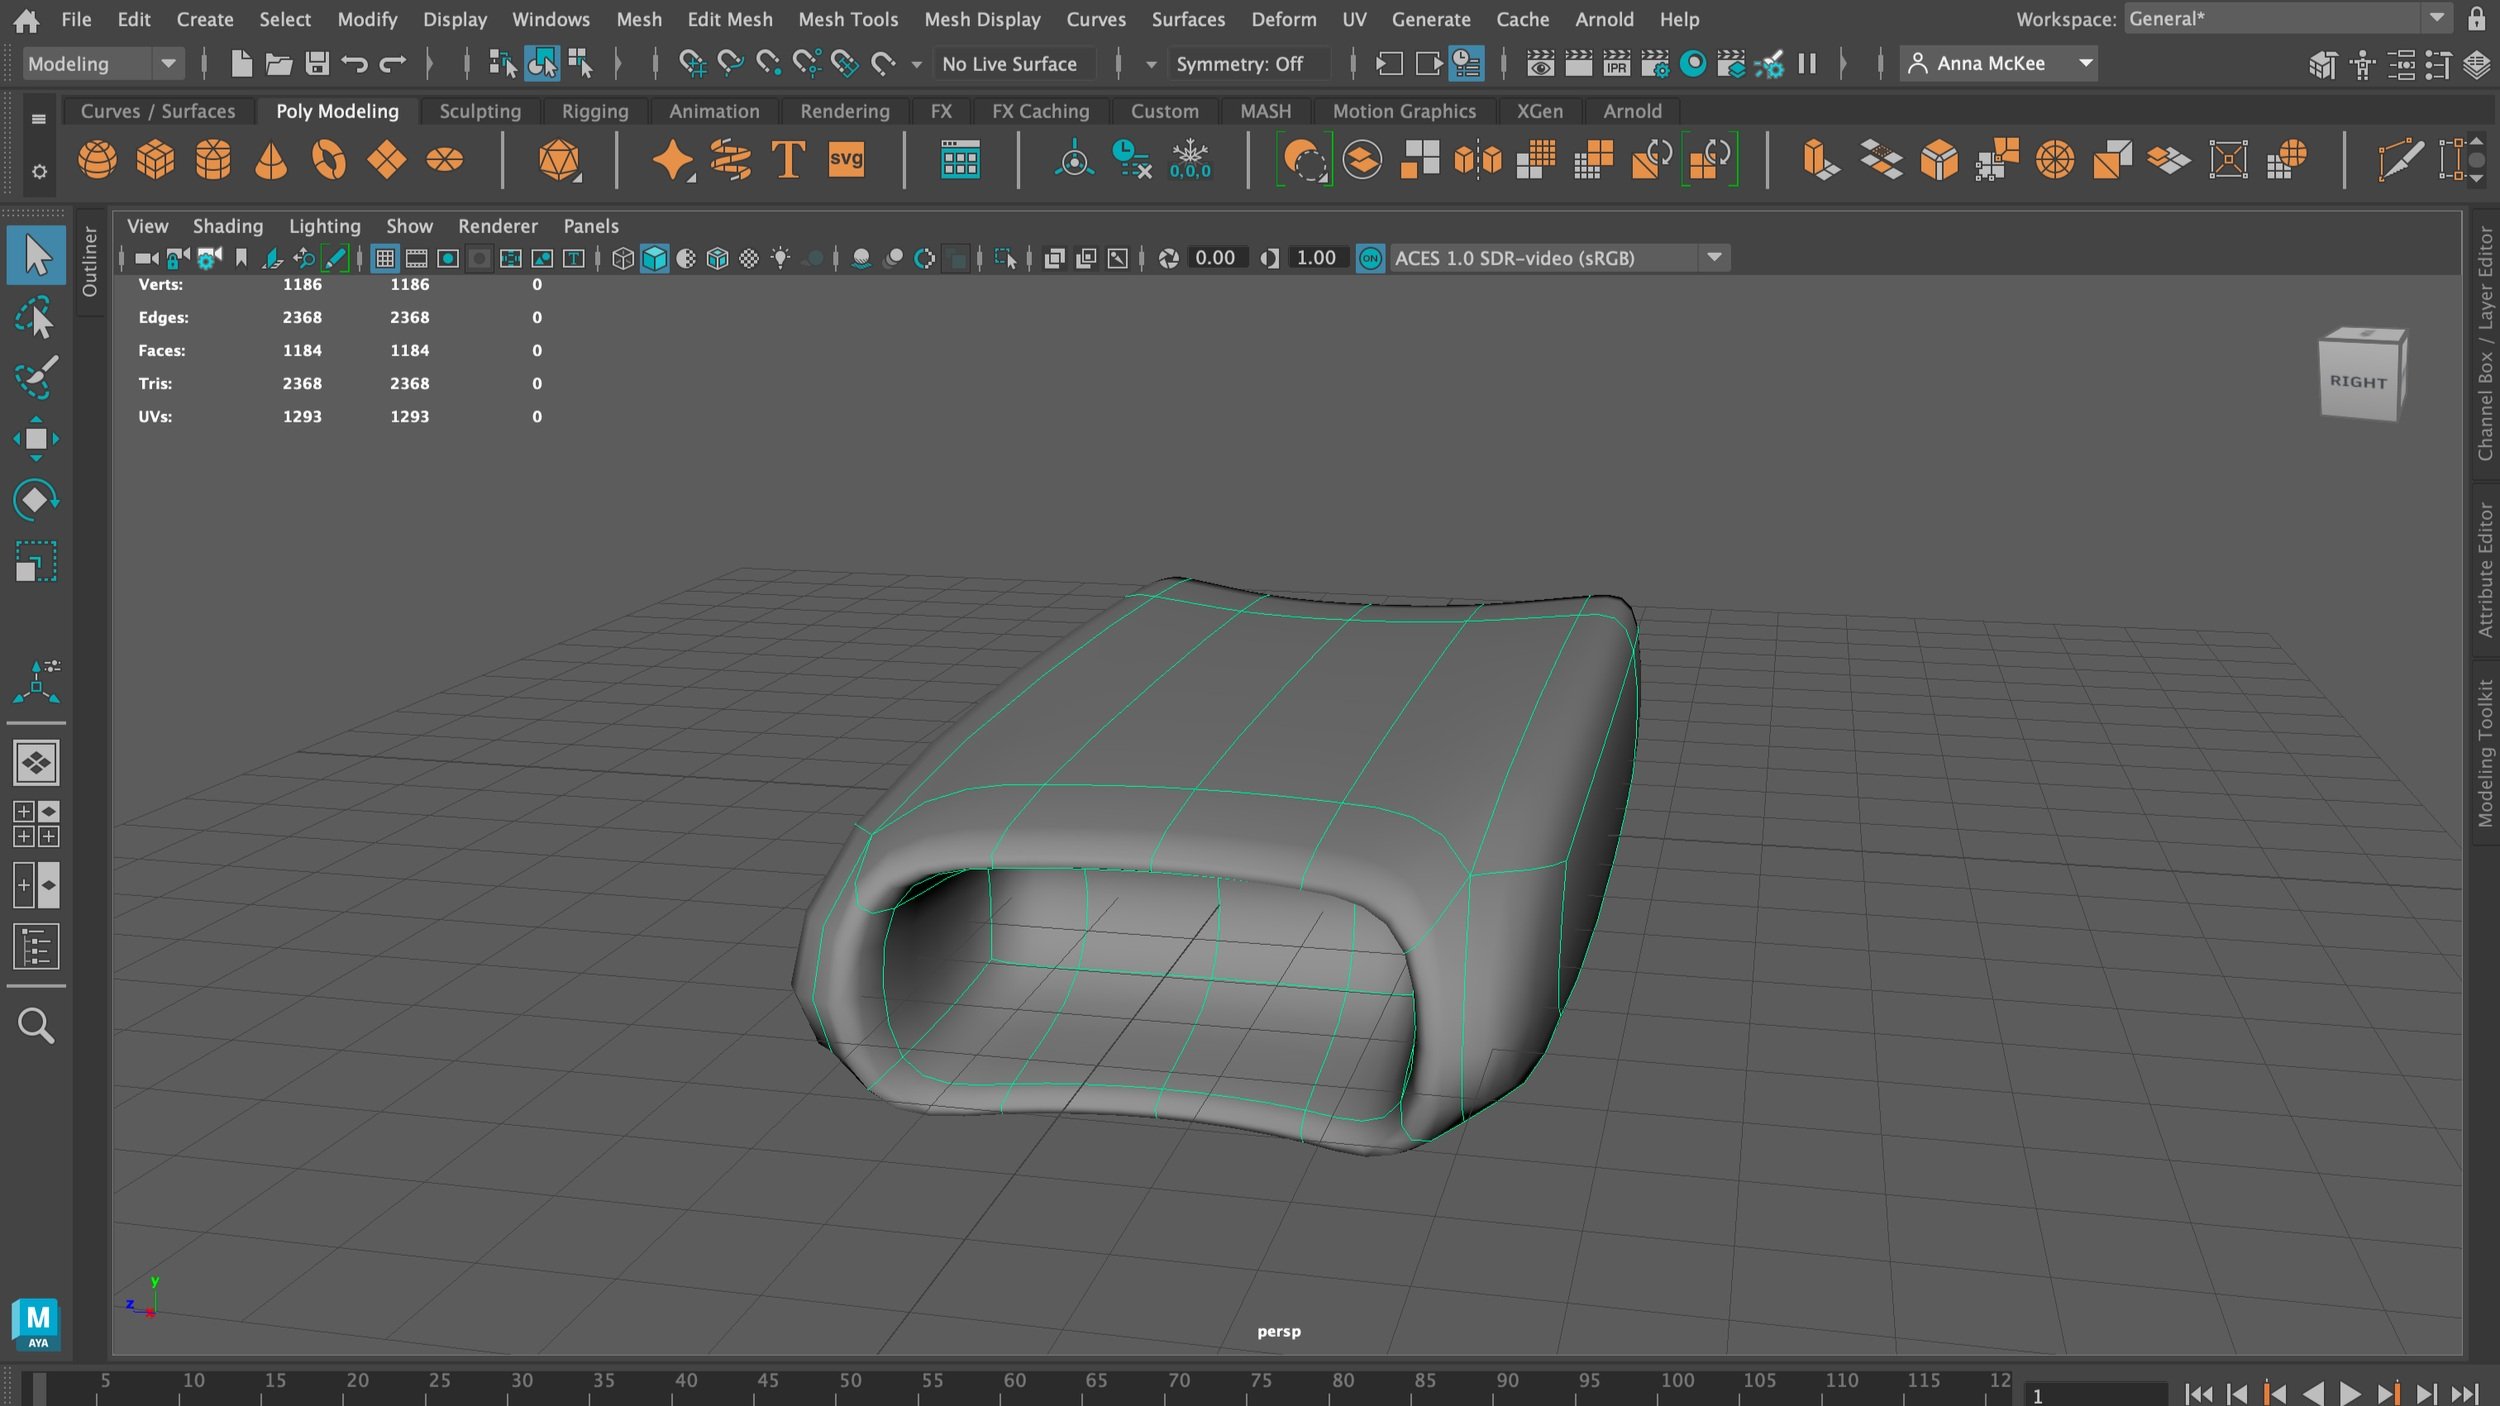
week 1 - “USB Drive” - Internal Tutorial
Introduction to 3D Modelling video lecture series - Modelling in Maya
A Beginner's Hard-Surface Modelling Workshop
Tutorial - Completed
Rendered: Arnold
Software used: Maya
Personal Difficulty Level: 10/10
This “USB Drive” tutorial was my very first internal University tutorial that I participated within during my time at as a master’s student at Kingston University.
I decided to select this tutorial to complete as it was recommended as 'a ‘beginners’ video, therefore introducing the viewer to simple concepts such as Bevelling, Extruding and Deleting Faces.
Although this was “USB Drive” tutorial was highly recommended as an easy internal tutorial to recreate, I found that I kept getting stuck on the sections of the video when it came to using the “Smooth Preview” button. This is because when I activated this “Smooth preview” I found that my own USB Drive mesh topology / edge-flow did not match-up correctly with the video tutorials mesh.
This worried me as I thought that if my topology was not matching the instructors / video tutorial, it would mean that further steps within the video would not adjust well to my workflow, (meaning that i would get more stuck later on in the process).
After many hours of experimenting with different modelling methods and research to fix this edge-flow issue, I finally found my answer within the “Vertex faces” button. Using this selection mode allowed me to easily view each of my edges and faces throughout the entirety of the model. I then discovered that I had multiple faces facing inwards within my mesh along with duplicated of edges, which is why I was unable to achieve correct edge-flow matching with the video tutorial.
Once discovered, I then began deleting the excess edges and faces, then when I applied the Smooth Preview button, my edge-flow issue was solved.
There were also many important functions and tools used within this modelling process such as the “Bridge” tool (which allowed me to connect faces in the mesh) and also the "Snap to Pivot Point” function / process (which allowed me to correctly align any vertices within X-Ray mode / Orthographic Mode).


“I decided to revisit this project to create a wireframe render. ”
Topics covered within the tutorial:
Bevel Tool
Extrude
Snapping Pivot Points
Utilisation of Marking Menus - Orthographic mode, X-Ray mode, Perspective
Bridge tool (connecting the faces)
Multicut tool / adding Edge Loops
Isolate Select tool - Only shows objects that are currently selected
Smooth Preview
Deleting faces
Topics covered myself when pushing the tutorial further:
Using “Vertex Faces” to navigate / find a problematic duplicated edge or face
Creating a Wireframe render
Lighting setup (3 Point Lighting)
Adding materials / colour
Assign Blinn shaders
Cleaning up your scene, deleting history
Pureref - A screen display reference programme (Utilised when adding the materials)
Rendering in Arnold


“I found this tutorial extremely difficult during certain steps, although I managed to push through and create a final rendered model”
Experimental Renders -
Week 1


Self Critique:
I feel that I could improve the overall look of the USB Drive by learning how to UV Unwrap the mesh and apply professional-looking textures using Substance Painter. If completed correctly this would produce a stunning result, as I would love to see how a metallic texture would appear on the metal tip of the USB Drive (especially under the correct lighting setup and rendered with Arnold)
If I were to complete this tutorial for a second time, I feel that it would be greatly improved with the addition of further detail etched in to the main body of the USB, such as a piece of text / company logo. Although I am currently unsure of how to complete this step, this is an area that I would like to become more comfortable with.
Conclusion:
Although I did struggle with this internal tutorial, I am still proud that I was able to complete it within the end as I feel that through perseverance I learned many important tools and function related to Maya’s interface / common tools.
My goal for the future is to hopefully be able to create my own hard-surface model without the need to reference any tutorial, although I do feel that this process might take a while as I am very new to Maya.
Conclusively, I feel that one of the most important elements that I have learned from completing this tutorial is understanding the importance of Edge Flow. This area can also be related to working with N-Gones (a polygon with more than 4 edges/vertices) and using the Multi Cut Tool to convert them into Quads (four sided Polygons).
Week 0-1
Self Reflection -
Personally, I feel that weeks 0-1 were extremely intense and fast-paced, especially during my Monday in-person classes for our “3D Creation Pipeline for Film and Games” assignment. (Monday the 10th October 2022 and Monday the 17th of October 2022).
After Monday’s in-person class (10th of October 2022), I decided that I would need to spend the next few days rewatching our class lecture for that day, as I could not keep up with the pace of the class.
This made me feel quite overwhelmed and stressed, as I was dreading to fall further behind in class, although I tried my best to rectify this issue by taking a proactive approach by deciding to absorb the constructive feedback I had received on my note-taking, (as I was taking too long writing notes, up to 17 pages of A4 notes a day, which then slowed my progress down in other aspects of the course, such as keeping up with internal tutorials and understanding key concepts such as the “Circularise Tool”).