C17880 Coursework 2:Walk Cycle
Creating a walk cycle for my final assessment
Semester 2
7th March 2023 - 30th April 2023
Credit: Anna McKee, image from “SWAT -Walk Cycle - Polish”
Flow Chart - Walk Cycle

Flow Chart created by Anna McKee
Flow Chart Conclusion:
Creating this Flow Chart helped me to gain a rough understanding + plan for my walk cycle animation. Although each stage was not followed within its’ exact order, the Flow Chart contained useful information regarding helpful tips on utilizing reference and advice on selecting a sufficient rig for a walk cycle animation.
In conclusion, I feel that this Flow Chart was a positive and helpful influence upon my own 3D animation process during the creation of my walk cycle.
Study and preparation -
Contact Pose - Foot (usually the heel) touching the surface
Down Pose - Body + head is usually at its lowest point, front foot placed on the surface
Passing Pose - Moment one leg passes the other
Up Pose - Highest point of the pose


Credit: Richard E.Williams, animationkolkata,

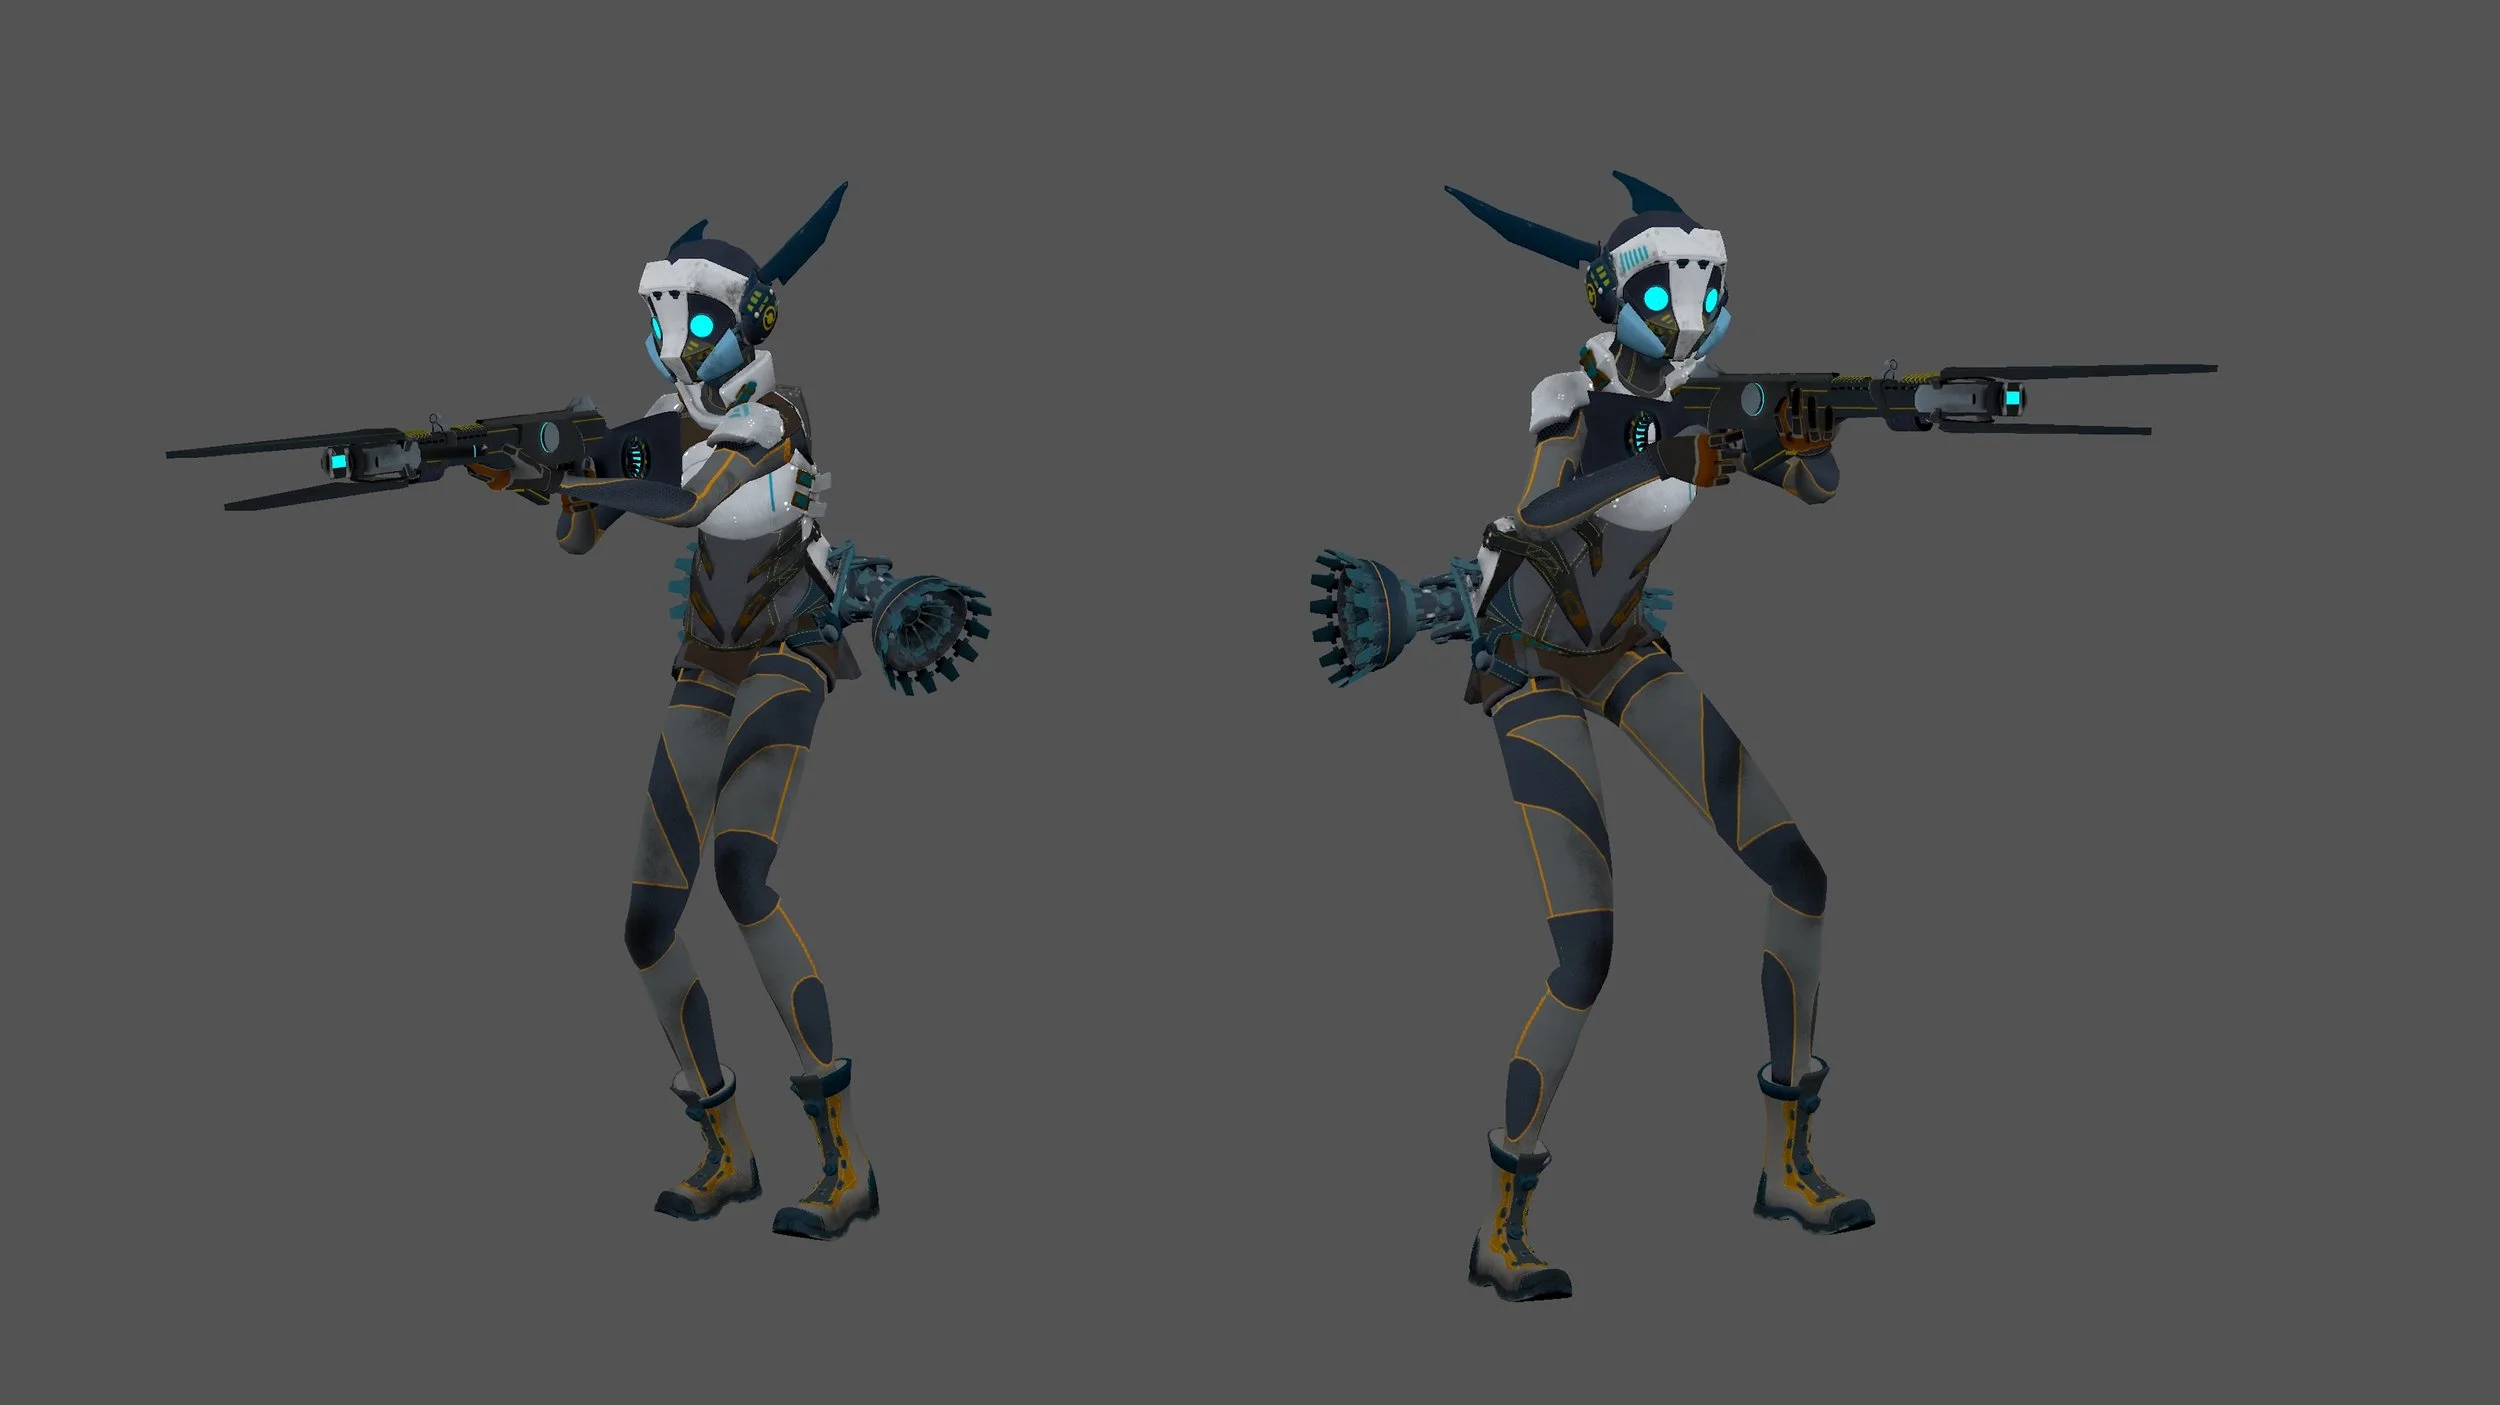
Selecting the Rig -
I wanted a rig with an interactable object available, therefore I selected this “Sniper Bat” rig created by kiel Figgins.
I really liked design of this rig due to its’ large (bunny-like) ears, which I felt that I could incorporate elements of overlap and follow-through into, making the scene more visually interesting.
Pros:
Colours of the rig are exquisite, as the blue within the rifle and eyes really help the colour-scheme ‘pop’
Large ears provide an opportunity for the animator to create beautiful overlap and follow-through
Rig is provided with a rifle prop, which the rig is built to hold
Cons:
Complex, many controls
Expensive
Credit: Rig created by Kiel Figgins
Gathering Image Reference -


Credit: offgrid - INFOGRAPHIC: CLOSE COMBAT HAND SIGNALS, SWAT team in action, Tactics for the Up and Coming SWAT Officer Part 1, The Fundamentals of Marksmanship
After the rig was selected, I decided that I wanted to create a walk cycle that would portray a character walking forward with a rifle as if they were apart of a SWAT team. Thus began my own research into related image references.
I decided to research some images of how different SWAT teams would walk, their formation, hand signals and how they hold their rifles.
These images helped me to grasp a more realistic idea of how to place the rifle / gun in my character’s hands, (finger placement / grasp).
Annotating References
Internet reference -
Credit: 100 Ways to Walk, Kevin Parry, Annotations created by Anna McKee
This video shown above portrays Kevin Parry walking as if he is a character from a SWAT team.
This reference video portrays him holding a gun/rifle, which I found incredibly useful when utilizing this video reference, this is because I wanted my own character to hold a rifle to help further portray the idea that they were a SWAT team member.
Once I had selected this reference to use from Kevin Parry, I then uploaded it to Sync Sketch and began annotating it.
Green lines = Right leg
Red lines = Left leg
These annotations also included the breakdown of a walk cycle, ie contact, down, passing, up. Placement of the shoulders, eyeline, arm, hip and shoulder movement were also annotated within this video reference.
Conclusion: Internet Reference
Overall I found that breaking down this video reference with simple annotations was extremely helpful for me when creating my final walk cycle animation. This is because I was able to upload and place this video reference within Maya as an image plane, therefore when I was animating I could create my walk cycle alongside the annotated reference, which allowed me to easily view the micro movements of the hips, shoulders and head more easily.
Personal reference -
Video 1
Conclusion: Video 1 Reference
I Created this video to record how my own feet contact the ground during a specific walking stance. I deliberately attempted to walk almost like a ‘crab’ in a sideways position, which I thought might make my walk cycle more interesting.
This video was then brought into SyncSketch and annotated, which helped me to study the stages of the contact, down, passing and up poses.
Green lines = Right leg
Red lines = Left leg
Video 2
Conclusion: Video 2 Reference
(Weight Barbell weighing 2.5kg used to simulate Rifle being held)
Within this second video reference that I recorded myself, I decided to experiment with some of the ‘12 Principles of Animation’, such as ‘Follow Through’.
This use of Follow Through can easily be seen within the action of the hair, (as when I turn suddenly, my ponytail is the last element of my person which follows through to its resting location).
I originally wanted to combine this element of turning with the rifle within my final animation, although this idea was soon scrapped during the ‘Spline’ phase of my workflow.
This is because I wanted to focus purely on a forward facing walk cycle and when I began implementing a turn, I found that the walk cycle became quite overly-complex and due to my time constraints I knew this extra process had to be removed.
Therefore I decided to remove the turn, although I was able to practice with the idea during the ‘Blocking’ stage of the animation.
Green lines = Right arm
Red lines = Left arm
Video 3
Video Credit + Annotations: Anna McKee
Conclusion: Video 1 Reference
(Weight Barbell weighing 2.5kg used to simulate Rifle being held)
Within this final reference video that I created, I decided to film myself from a front-facing position, whilst holding a barbell.
Creating and annotating this reference video helped me to gain a stronger understanding for how balance, follow-through and pacing can affect the final animation.
I also felt that annotating this reference provided me with a clearer idea of how my character rig was going to be positioned when holding the rifle, (especially the positioning of the hands + arms, including the way the shoulders turn).
We can also see that the head turns first, then the rifle follows after, (this would be an important point to note during the animation process).
Transfer of weight was also studied, this would also affect the motion of the shoulders + hips, as they are also affected by each footstep / weight transfer.
Green lines = Right legs + Right arm
Red lines = Left leg + Left arm
Screenshot Progress -
Blocking + Spline


Credit: Screenshots- Anna McKee
These screenshots shown above portray the beginning stages of creating my walk cycle.
I decided to utilise Maya Add-ons + tools such as:
Studio Library - Helped me to record selected poses
Tween Machine - Helped to create + experiment with some ‘in-between’ poses, (this was used early on to check if the animation was going forward in the right direction)
Motion paths - Created a visual path for each Keyframe, which allowed me to check if there were any sudden changes in motion
Image Plane Reference Videos - 2 reference videos were added here, both of which helped me to break down each of the key poses and motion of the animation
FCM Hider - This add on was used to select and hide certain parts of the rigs’ body when animating. This made it easier to visualise how only selected parts of the body would move during its’ walk cycle
Animbot - Animbot was used to help store the character rigs’ original ‘A-Pose’. It also allowed me to create a constraint between the character’s left hand and the rifle itself
SWAT walk Cycle - Blocking
Click below to play video
This video portrays one of my current works in progress, a walk cycle depicting influenced by SWAT reference.
Original reference video created by @kevinbparry
Credit: Video + Animation by Anna McKee, rig by Kiel Figgins
Conclusion: Blocking
Overall the Blocking stage of the animation was slightly more difficult than I thought it would be, this is due to some technical errors that were appearing within the constraints between the characters’ hands and the rifle.
This issue was ultimately solved by receiving + applying helpful feedback from Kingston Senior Lecturer, Richard Cunningham and industry professional, Kshitij Gupta.
In conclusion this Blocking stage of the animation helped me to visualise the timing and spacing of the walk cycle.
I was also able to grasp a stronger understanding of how many parts of the rig that would need to be animated in total. This included secondary-actions such as the ears and jetpack, which would both need to be considered within the future stages to create a compelling animation.
Blocking Stage - Feedback - 21/03/2023
Kshitij Gupta - Professional 3D Animator + Rigger
Constructive feedback received regarding the Blocking stage of my animated walk cycle:
Bring the Pole Vectors in the knees more inwards - they are too outstretched
Bring both feet inwards to a narrow stance - A SWAT member will walk with their feet more close together, so they are able to change direction quickly without shifting their balance too much
Keep the rotation between the ankle and knees the same - this will make your poses more natural. The knee and ankle should rotate together at the same angle
You do not need to animate the ears, jetpack or gun yet during the blocking stage - This is because these are Secondary Elements affected by the primary animations. Feel free to animate these secondary elements after all of the primary elements have been animated
Change both arms from FK (forwards kinematics) to IK mode - This will help to prevent the gun from swinging according to the spine and rotation of the body. It will also make editing in the graph editor much more easy later on. If the arms are in IK mode this will make the gun look more stable, as if it were being professionally carried by a SWAT team member
According to the reference, change the Pass pose to be your lowest pose and your Down Pose should be slightly higher - This is in regards to the reference you have selected
Your lowest pose should not be as drastically low as presented, it looks like the character is falling too much - Fix this my moving the figure up a bit on the Y Axis
SWAT Walk Cycle - Spline
Click below to play video
This video portrays my walk cycle animation (work in progress).
Tangents have been changed to Spline and some adjustments have been made.
Polish is still needed.
Original reference video created by @kevinbparry
Rig by Kiel Figgins: https://www.turbosquid.com/fr/FullPreview/1230857?referral=kielfiggins
Credit: Video + Animation by Anna McKee, rig by Kiel Figgins
Conclusion: Spline
In conclusion, I felt that transitioning from stepped to spline tangents was quite a challenge.
This was because a new issue had arisen that caused a sudden ‘jitter’ to appear within my animation during the beginning of it’s continuous loop cycle, (this error was now more visible within Spline, so I knew it had to be fixed).
Although after further peer and professional feedback I began working on removing this ‘jitter’ effect within the next stage of this animation process.
Spline First Pass - Feedback - 27/03/2023
Kshitij Gupta - Professional 3D Animator + Rigger
Constructive feedback received regarding the Spline First Pass stage of my animated walk cycle:
Keep the rifle more stable, it should not be moving upwards / downward as drastically - Create a Locator and attach it to the tip of the Rifle, then create a Motion Trail for this locator (This will allow you to accurately track the movement of the gun). Also check your video reference.
The Down Pose should be moved slightly more down -
The Passing Pose should be moved upwards slightly -
Ensure that your first and last keys have a smooth transition - Check through EVERY SINGLE tangent connecting your first and last keys within your graph editor
Create a smooth, continuous cycle - Select all controls + select all of your Graph editor, then:
Curves > Post Infinity > Cycle
Curves > Pre Infinity > Cycle
“You are dropping a lot of weight on the passing pose, move the frames a bit back, like in between down and passing” - Quote Kshitij
“Your gun is moving a lot. Make it more stable. Look at the reference you showed me last time. the video of soldiers walking” - Quote Kshitij


Credit: Screenshots by Anna McKee
Spline First Pass - Feedback - 28/04/2023
Adela Sikova - Fellow 3D Animator and peer
Constructive feedback received regarding the Spline First Pass stage of my animated walk cycle:


Credit: Screenshots by Anna McKee
This peer feedback shown above was applied during the Spline and Polish stage of the walk cycle animation.
Screenshot progress -
Adding Polish + editing the Playblast


Credit: Screenshots- Anna McKee
After the polish stage was completed, I then created 10 different playblasts from 10 different angles within Maya.
These Playblasts were then edited together within premiere pro and uploaded onto my YouTube Channel and other relevant social media.
Final Animation
Walk Cycle -
Click below to play video
This video portrays my SWAT Walk Cycle
Polish has now been added.
Original reference video created by @kevinbparry
Rig by Kiel Figgins: https://www.turbosquid.com/fr/FullPreview/1230857?referral=kielfiggins
Synsketch Link - https://syncsketch.com/sketch/NWIyNjQ2MDdk/?offlineMode=1#/17273872/17923247/f_0
Credit: Video + Animation by Anna McKee, rig by Kiel Figgins
Conclusion: Polish
Overall I am slightly pleased with my final walk cycle animation (video shown above).
I feel proud of myself in the fact that I have learned alot from completing this animation, specifically in regards animating a character holding an object (rifle) and creating the effect of ‘follow-through’ within the ears and jetpack.
If I were to go back and improve any elements of this animation, I would like to increase the amount of follow-through within the ears of the character. This is because I feel that the animation would look more smooth and realistic if the ears were able to sway more convincingly from side-to-side.
Another point that I would like to improve on within this animation, is the slight ‘jitter’ that I thought that I had removed during the polish stages of this cycle. Although I thought that I had removed the ‘jitter’, I still feel that there is a slight jump within the first few frames of the walk cycle.
In conclusion, I am happy that i was able to complete and learn alot from the walk cycle, even though there is still much room for improvement.
I feel that overall this is all part of the learning curve when becoming an animator, as we must struggle, fail and learn to improve.