Week 4 - Week 5

Character Creation, Silhouettes and an introduction to Zbrush
Week 4 - Week 5
31st October 2022 - 13th November 2022
“Harpy” Character Blockout - Zbrush
31/10/2022 -
Our in-person class today was focused on the basics of character creation within Zbrush. This class was lectured by, “Richard Cunningham” and “Carlo Bautista”, who both talked us through the beginning steps and processes of creating a character.
As an introduction we began recording notes related to the effects of shape and line work within a character design, which can help to display the overall tone / mood / personality of the character.
Week 4 -
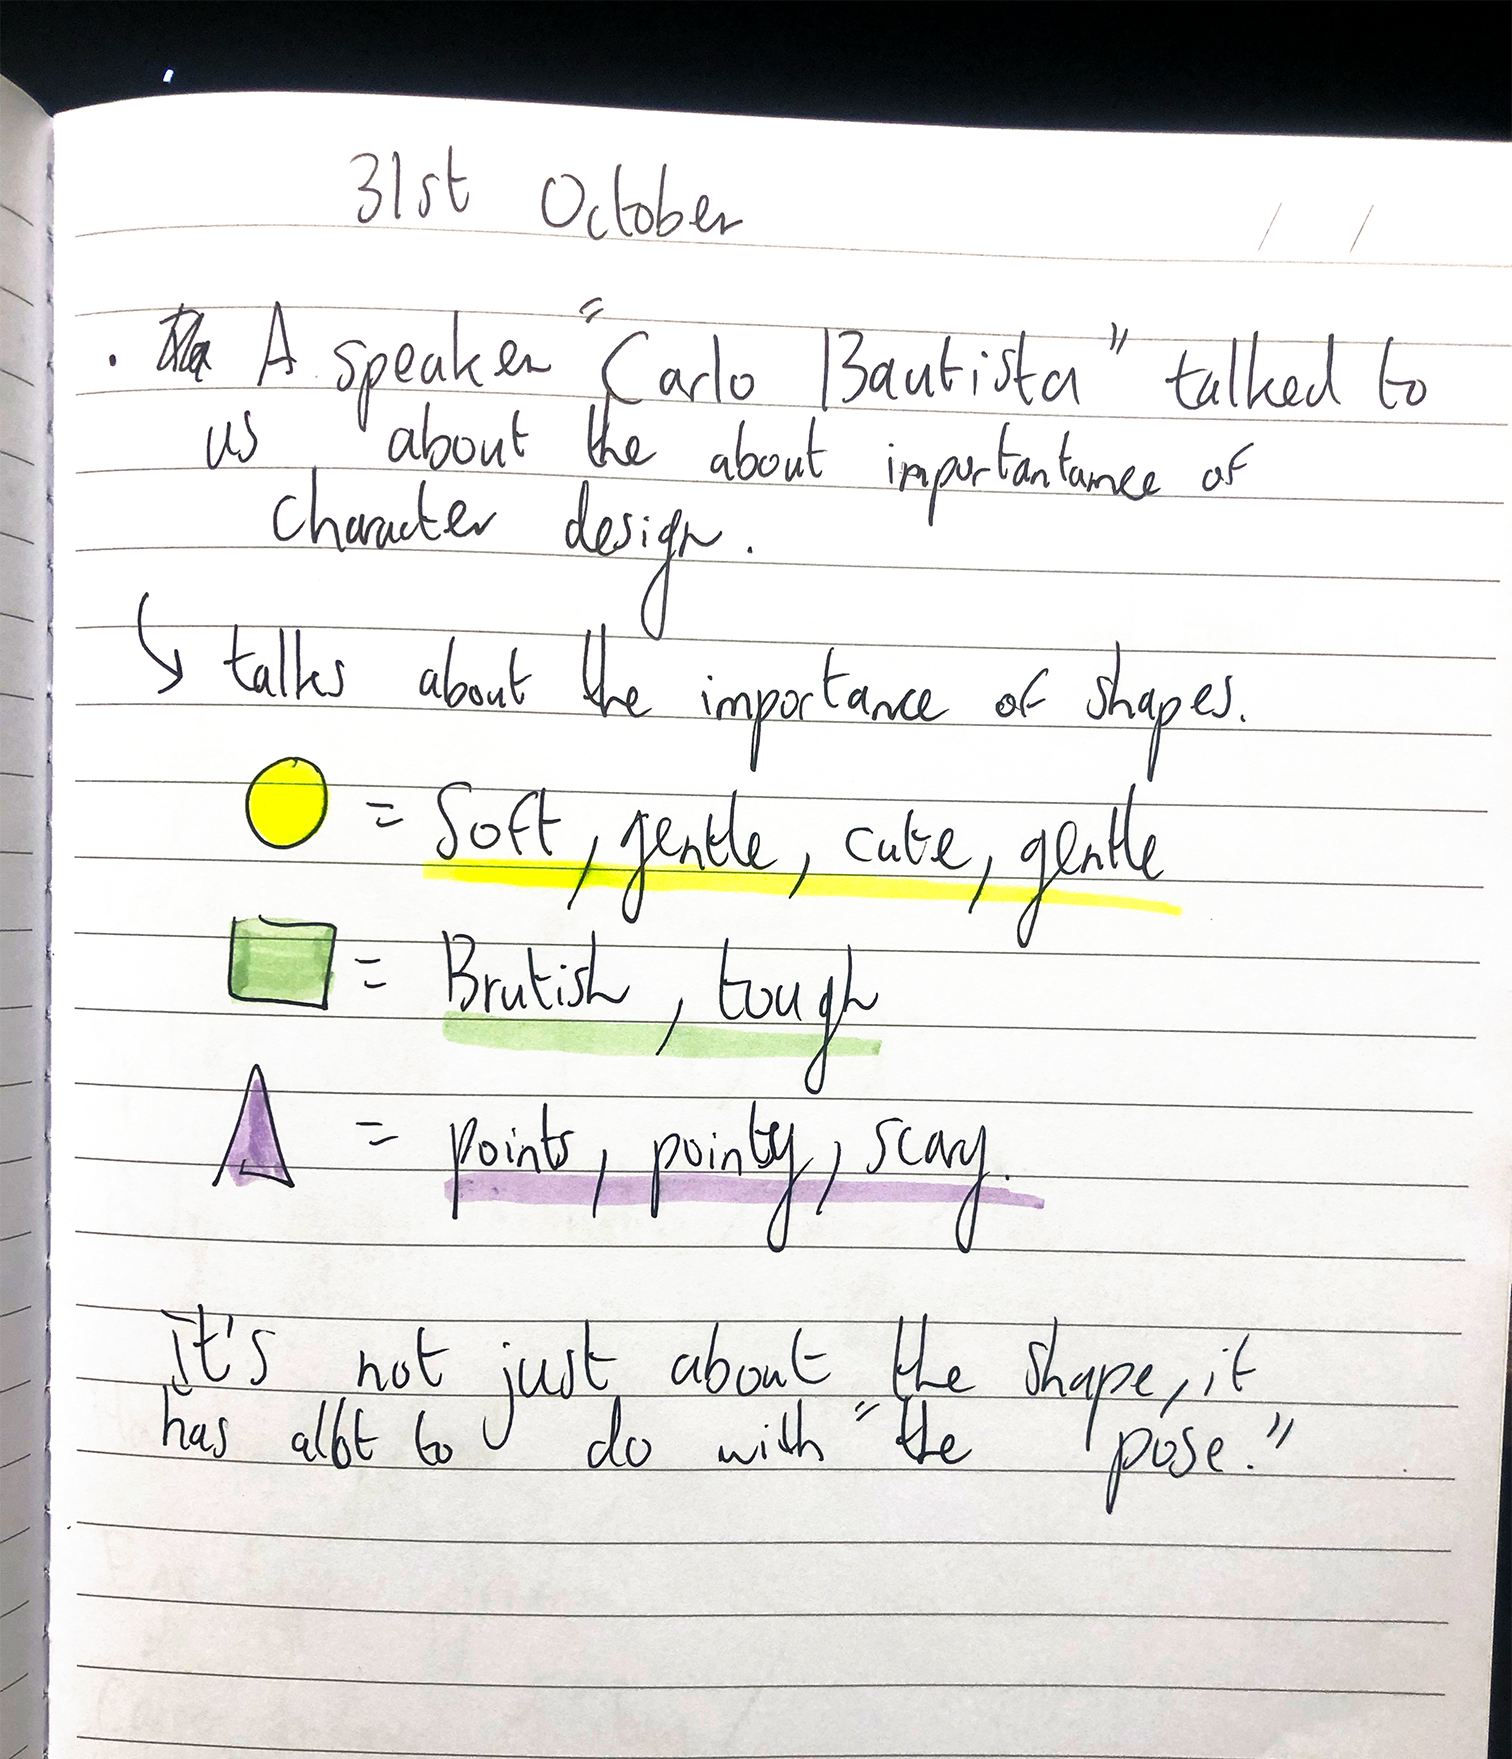
The image above displays some of my quick class notes that I recorded during our class lecture.
Class lecturer “Carlo” explained to us that many instances of a character’s personality can be deciphered through the use of simple shapes, for example:
Circleuar character / characteristics = A cute, soft, gentle and approachable personality
Square character / characteristics = Strong, tough, bulky, brutish
Triangular character / characteristics = Nimble, quick, intimidating, malicious
Artist Research / Reference sheet: PureRef
CREDIT - FIONA STAPLES - TRAN NGUYEN - AUDRA AUCLAIR - KISS KICKER - JOAO SOUSA - LITOS LOPEZ
Our first class exercise consisted of using PureRef to collect a range of character references to help inspire us during the creation of our own character.
This PureRef display board shown above displays a range of my favourite artists’ work, comic book collections, silhouette art inspiration and an example of a humanoid character blockout model (created in Zbrush).
When creating my own paintings I always prepare a list of favourite artists that I continuously use for inspiration, whether it be a a human figure, bird or mythical creature.
These artists I have selected (shown above) use extreme stylisation of the human form and facial features to portray the personalities of their own character designs. I find this choice to completely stylise a character to be very inspiring, as it offers artists the ability to step outside the boundaries of realistic human design and encourages them to make the overall design more interesting and unique.
“I thoroughly enjoyed collecting these references, as I have an endless list of favourite artists and illustrators”
My Sketches -
Week 4


My Harpy Silhouette -
Week 4

Credit - Anna McKee
Silhouettes, concepts and further planning - Personal sketches
After collecting my references and presenting them via Pureref, I then moved onto sketching a quick digital silhouette within Adobe Photoshop. We were advised as a class to keep this silhouette simple and ‘easy to recognise’ by our tutor “Carlo”.
For my chosen character design / silhouette I decided to create a Harpy, which is a mythological creature found in Greek + Roman mythology. The harpy is a half-human and half-bird personification of storm winds, references can also be linked to the Harpy within many video games, such as “The Witch 3: Wild Hunt”.
Within the concept art / 3D Character Creation Industry, it is common-place for an artist to create a silhouette before they move on to painting a more complex piece of artwork regarding their character. This is because the silhouette is meant to challenge the artist to create an ‘easy to recognise’ and memorable character, as there are only two contrasting colours used within a silhouette.
Self Critique:
If I were to use this ‘Silhouette’ method again, I feel that I would like to try and create a much larger quantity of designs within one digital panel. This is because I felt that I performed my silhouette sketch too slowly within class, therefore only leaving me with one final outcome instead of multiple.
Another point of self-critique is that I would have liked to create a more ‘dynamic’ pose for my character, as this final silhoutte idea could be viewed as very stiff / robotic. I feel that this issue could be rectified by posing the character in an expressive position, maybe mid-flight/ mid-battle, with their talons and claws being used as an offensive weapon.
Personally, I found that this method of working with a silhouette is a fantastic way to begin a character design, as I would usually jump straight ahead to creating colourful thumbnail sketches, therefore this exercise did push me out of my comfort zone in a positive way.

Conclusion:
Overall, I was pleased with the outcome of my digital silhouette sketch, although I did still find it quite challenging to create as I prefer to completely ‘Zone-In’ and become engrossed within a piece of artwork for hours-upon-hours, (and the goal of this exercise was to create a silhouette sketch quickly and not spend too much time on each design).
I have also come to the conclusion that to create a successful silhouette, the piece must not be dwelled upon and will retain a higher quality of linework if completed within a limited time-frame. This is because I believe that sometimes we create our best sketches when we are more relaxed and use bigger brush-stokes, instead of nervous, tiny ‘Chicken-Scratches’.
Conclusively, I feel that I have portrayed a nimble, athletic, yet aggressive / dangerous character of a Harpy. This is due to my use of sharp edges, contrasting thin lines and spiked feathers, which allow the viewer to take into consideration the overall personality and build of the character.
“Harpy” Silhouette, Concept Idea - Adobe Photoshop
Why a silhouette-
Week 4
The main reason behind creating a silhouette is to decifier if the character is still easily recognisable as a blank, colourless, empty space.
Although challenging, if done correctly this will create a character design that is easily recognizable to the viewer, which is a major goal within any film / game. This can also imply that the character is very unique, such as portraying strange / rare features that encourage individuality within the character creation process.
The silhouette is also important as it can help the artist to design a specific style of concept which depends on the chosen personality of type, age, mood, occupation, etc of the character.
week 4 - Examples of SUCCESSFUL character silhouettes -


Clueless, silly, clumsy, comedic = Round, soft edges, curved line work -
“Homer Simpson” - The Simpsons


Tough, strong character, loud, stoic = Square, in between soft and pointed, large stature -
“Stoick the Vast” - How To Train Your Dragon


Angry, malicious = Triangular, pointed shapes, sharp edges, claws
“Mojo Jojo” - Powerpuff Girls

What makes a good Silhouette?
Week 4 -
This illustration shown on the right portrays two examples of character silhouettes showing Disney star, “Jiminy Cricket”.
Image A: -
Silhouette is clear, defined and portrays a dynamic / expressive pose.
We can easily see who this character is, his hands are clearly posed (showing the character holding an umbrella and an ice cream)
Image B: -
Pose is less dynamic and more natural, although this makes the silhouette difficult to distinguish.
There is no definition within the arms or umbrella accessory.
We cannot tell that this character is consuming ice-cream, as the object is hidden within the silhouette.
Illustration shown above - Credit: Ward Kimball
Creating my Character - Harpy
Week 4

Credit - Anna McKee
Harpy - Zbrush Process
Week 4


Credit - My Zbrush screen and screenshots - Anna Mckee
This character is part of our internal Zbrush character design class (during weeks 4 - 5), and is not related to my final Organic project.
Stage 1: Height reference -
I began creating my Harpy character within Zbrush by adding in a height reference using 7.5 Polyspheres, which will then be used as an ‘Idealised’ female height reference for my character.
These Polyspheres were then ‘Merged Down’ in to one polygroup, which allowed for ease of movement using the 3D Gizmo Tool, (which also allows us to squash and stretch the mesh).
Stage 2: Blocking out the form / Mirroring -
I then added simple low-res Polyspheres and using the “Move” tool, then shaped the upper part of the skull, reminding myself to keep the forms simple and low-res.
Then I continued to add separate Polyspheres and mould them into the shape of the neck, ears, jaw, torso, arms, hands, shoulders etc.
During this point I also began using the “Mirror and Weld” function, as I wanted to create a perfectly symmetrical base mesh within this early blocking-out stage.
While adding in more Polyspheres and sculpting areas such as the “Collarbones” and “Infraspinatus Muscle”, I also made sure to add scientific labels to each of these SubTools.
Throughout this entire process so far I have only used the Move Tool, no other brush is needed within this ‘Blocking-Out’ stage.
Stage 3: Using reference / Spotlight -
After attending Richard’s Support Session on Wednesday 2nd of November 2022, I learned many new skills to apply within my Zbrush workflow process.
For example, adding a reference using the “Spotlight” function. The reference I decided to use (along with my previous PureRef artist collection photos) was my own character silhouette sketch.
I then lowered the ocacity and scaled down the size of the Spotlight image plane.
Stage 4: Polygroups -
During class time (including the Wednesday support sessions), we also revised over the benefits of using colour-coded Polygroups when blocking-out a character.
I then decided to apply this ‘Polygroup Workflow’ to my own sculpting process, as previously I had only used Subtools when creating a character piece, although I did want to experiment using a different type of workflow.
Stage 5: Scaling / adjusting and fininalising the block-out phase -
After merging all of my subtools down into one Subtool (and keeping the Polygroups separate), I then continued sculpting the legs, knees and bird feet of the character.
Finally I used the "Transpose Line” tool to scale-up the length / size of the character so that it matched my ‘Height reference’ Subtool.
Self- critique:
Personally, I wanted to progress further with this character blockout, as I was not able to complete the entirety of the ‘Blocking-Out’ stage, (as the feathers around the arms, head and neck were not added). I also feel that I could have created more ‘bird-like’ Polygroups when creating this character, such as a mesh to display evidence of Digitigrade legs, as this has not been applied within this mesh design so far).
Conclusion:
Overall I found this exercise to be extremely useful and I thoroughly enjoyed the challenge. I feel that it also helped to encourage to me plan and ‘block-out’ a character using completely different processes compared to my usual Zbrush workflow.
Two of the main points that I will apply to my future Organic sculpts is the process of creating a simple Silhouette via photoshop before starting any the sculpting process. This is because i feel that it would help me to visualise the style, mood and personality of the character before spending weeks and weeks sculpting a character that may need not fit your desired outcome.
The second point that I plan to use within my Zbrush workflow is the use of colour-coded Polygroups. Previously I had very little experience using designated polygroups when sculpting in Zbrush, although when I began using this method while "blocking out my Harpy character, I then realised that using the Polygroup method allowed me to move, scale, rorate, hide/unhide and mask/unmask all whilst staying in one Subtool. This made the overall process of sculpting much more efficiently as I my side-menu was not overloaded with excessive Subtools.
I also like how each Polygroup can be colour coded at the same time, whilst also being able to move around each polygroup easily with the “Move Topological Brush”.
My Zbrush Notebook-
Week 4


These images shown above portray my own “Zbrush” notebook. I started this book during the beginning of May 2022 and I continuously refer to it presently, while adding relevant class notes within.
Wednesday Support Session
- Zbrush
Week 4 -
Online - 10:00-12:00, 2nd November 2022
Topics covered within the support session:
ZPlugin > PreProcess
Decimation Master - Helpful when exporting to Maya
Adding reference - Image Plane / Spotlight
Recenter a mesh - Tools-> Geometry->position
Masking / Unmasking
Dynameshing, ZRemesher
Subdividing - Add more Polygons
Typical Zbrush workflow - organic character creation
Merging Subtools / Auto Groups
Changing mesh material
Brush tools, brush effects
02/11/2022 -
Today I participated within an online Support Session, curated by our Course Coordinator, Dr Richard Cunningham.
The session consisted of introductory tips and tricks within Zbrush, covering a wide range of topics all the way from accessing brushes, to using the “Decimation Master” button to reduce the ‘point count’ when exporting as an FBX.
Additional info: (Zbrush does not count Polygon faces like in Maya, instead it records the amount of Vertices you have active within a subtool. This Vertex number can be found within the top-middle/right of the Zbrush interface, titled “ActivePoints” and “TotalPoints”.)
In today’s session we covered many of the important basics and intermediate workflows within Zbrush.
On my dual monitor setup, I had my Zbrush file open (showing the current progress I have made with my “Harpy” character), which allowed me to follow-along with Richard’s advice, as my Microsoft Teams channel was opened as well (meaning that I could watch/listen to the Lecturer’s advice).
Although I have used Zbrush within the past (I would still classify myself as a beginner), I do find that I am continuously learning new tools/processes related to the programme. Within the support session we were encouraged to ask questions and speak-up if we are unsure regarding the related topic. I found this encouragement extremely helpful and reassuring as I felt that I struggled to ‘relearn’ many of the long-forgotten programme-specific utilities, (I feel this is due to a large amount of time spent recently learning Maya’s own interface).
Conclusion:
Overall I found that participating within this support session encouraged me to ask questions and push myself to re-learn the Zbrush Organic sculpting workflow / systems that I had not previously tackled before (or that I had lost familiarity with). I now feel more confident while sculpting in Zbrush, as I was given relevant advice regarding the processes of “PreProcess” and “Decimation”, which are tools that allow the user to lower the Vertex count of their mesh. This process can be extremely useful when transferring a mesh from Zbrush into Maya, (as Maya loses efficiency when displaying a high polycount).
Meeting with Personal Tutor -
Week 4 -
15:00-15:30, 2nd November 2022
Due to my increasing workload, falling behind schedule and overall struggle with time-management, I decided to be proactive and book an online “Office Hours”meeting with my Personal Tutor.
Although the meeting was brief, it presented itself as extremely invaluable and allowed me to gain a 3rd-person perspective on my own journey as an Illustrator navigating the ‘highs’ and ‘lows’ of learning any new software. I was also able to discuss the importance of time-management and how (when used effectively) it can help to regulate stressful situations and prevent overworking.
Conclusion:
Personally I feel that remotely meeting with my Personal Tutor was an insightful, reassuring and informative event. Conclusively, I am hoping that I should be able to stay more grounded, knowing that I am pushing myself and attempting to split my time accordingly between “Digital Studio Practice” and my “C17890 Assessment”.
Time management Update -
Studio Practice
Week 4 -
Thursday 3rd November 2022
Today I had scheduled a full day of group work for our “Studio Practice” class, beginning with an online meeting starting at 10:00am and finishing at 12:00pm.
After this team meeting was complete, our group then decided to collaborate in-person within the Town House Library from 2:00pm-6:00pm, this was directly followed alongside with an online class from 2:00pm-5:00pm.
Our team meeting today was very successful and our roles within the group were solidified, along with the overall aims of our presentation.
Although this was a positive group meet-up, I am slightly worried in regards to my time management skills, as I plan to dedicate the rest of my day (03/11/2022) to “Studio Practice” group work. Therefore I still feel that I am continuously falling further behind within my blog and the many tutorials that I need to complete. Overall this is quite worrying, although I have written a ‘to-do list’ to help record and motivate my workload.
Goals for the future:
My personal goal is to be able to keep ‘on-track’ within my group work for my Studio Practice project, whilst also completing further internal tutorials in regards to my “C17890” Assignment.
Sculpting Lips in zbrush -
Week 5

Credit list - TurboSquid, Anatomy for Sculptors, Pinterest, Shiffon, Gvaat’s Workshop, 3dtotal Publishing


07/11/2022 -
Today we were given one of my absolute favourite tasks to complete so far…Sculpting lips!
Stage 1: - Sculpting in the basic planes / flesh
I began creating these human lips by appending a low res Polysphere, then Dynameshing it, (still making sure to keep the resolution low at this stage). Afterwards, I began using the “Clay Brush” to slowly add the flesh of the upper and lower lip, keeping a front-facing view (switching occascily to side view to check if the lips were correlating with my Pureref collection).
Stage 2: - Dynameshing
Once the basic shapes of the lips were formed, the continued to Dynamesh the lips at a higher resolution each time. This allowed for further detail to be added, without the need to worry about clean topology yet.
Stage 3: - ZResmsher
When I reached “Stage 3” (as shown above within the progress screenshots), I then was ready to duplicate my lips Subtool, ZRemesh one subtool and then use the “Project” function to regain all of the details back in to the lips, (this is done by projecting all of the detail from the Dynameshed model on to the ZRemeshed model). ZRemeshing the mesh also creates more refined topology (although not perfect) and helps to lower the polycount.
Stage 4, 5 and 6: - Subdivide + Detail
The next stage was to Subdivide the ZRremeshed model, this allows for more refined detail to be added, such as the parting of the lips, smile lines and creases near the corners of the mouth.
I also decided to relax the mesh by using the Smooth-Brush on a low intensity, this allowed the lips to gain a more ‘naturalistic’ feel.
Self-critique:
After the completion of stage 6 I planned to add some Lip Alphas within Zbrush, although I found that I had to leave this project for now as I had group work commitments (Digital Studio Practice) to catch up on.
Although if I were to spend any more time on this project I would definitely add the Alphas on to the lips, as I think that this would give the lips a ‘finished’ look.
Conclusion:
In conclusion I thoroughly enjoyed creating this small project, as one of my personal favourite areas of study is Human Anatomy, (although there is ALWAYS room for improvement, especially within the human form, as it is so unforgiving).
Creating this project helped to reminded myself of my passion for sculpting organically, which may help to inspire further ideas of study / refinement within my final organic model.
Human Anatomy Study -
Week 5

These images shown above were collected as reference material for the purpose of the “Renaming the human muscle system and skeleton - Internal class workshop” tutorial.
Renaming the human muscle system and skeleton-
Internal class workshop - Week 5


07/11/2022 -
These screenshots shown above portray a task we were assigned to complete during class time on Monday 7th of November, 2022.
The goal behind this task was to rename each muscle / bone in the human body, as this would help us to understand the importance and relevance of human anatomy within 3D organic sculpting.
To complete this task we downloaded a “.FBX” model of the human skeleton / muscle system, this was then imported in to Maya and separated using the “Separate” function.
Although each of the bones / muscles were separated, it was still difficult to visualise each of the groups, therefore I continuously used the ‘Hide / unhide’ button (pressing “H” in the Outliner"), as hiding certain meshes would allow us to easily view the hidden muscles / bones behind.
Self-critique:
My own self critique regarding this exercise is that if I were to complete it again, I would have a goal of attempting to only label the bones / muscles that I am unfamiliar with. This is because I feel that there are too many bones / muscles within the human body to memorise, therefore it would be more feasible to study the areas that I am unsure of.
Conclusion:
In conclusion, I feel that this exercise was slightly useful, especially when exploring areas of the human tendon system that I am unfamiliar with, such as the “Posterosuperior Rotator Cuff”.
Although I feel that this exercise was interesting, in my opinion I still believe that if one wants to improve their human anatomical skills, they would need to participate within Life Drawing sessions, (which are extremely challenging, as there are time limits on each pose and little room for error. Although I feel that this challenging perspective within Life Drawing is the factor that helps improve the quality of linework / human anatomy sculpting skills).

Wednesday Support Session
- Zbrush
Week 5 -
Online - 10:00-12:00, 9th November 2022
Topics covered within the support session:
Polygroups revision
Brush Alphas - What are they, how are they used?
Decimation Master -
Exporter FBX
Adjusting Scale
Using the Transpose Line Tool as a measuring instrument
09/11/2022 -
Personally the main focus of this remote support session for me was the study of ‘exporting’ a mesh from Zbrush to Maya, (this is because I have little experience exporting meshes from Zbrush in to Maya).
One of the most interesting elements that I learned during this support session was the many uses of the “Transpose Line” tool, as I did not know that it can be used to accurately measure the length of a mesh.
As shown within this screenshot shown above, I have placed the Transpose Line tool over my character blockout. The overall length / measurement of the character is now shown within the top-left of Zbrushes’ interface. Recording this measurement can be extremely important when exporting meshes in to other 3D software, as Scale is a relevant factor.
Conclusion:
In conclusion I felt that the entire Wednesday morning support session was very helpful and informative, as it covered many areas within Zbrush that I was not comfortable with, (such as Decimation Master, Exporter FBX and Using the Transpose Line Tool as a measuring instrument).
Final Organic Character design Ideas -
Week 5


Credit - Anna McKee
After much research and study, I narrowed down my Organic Character Ideas to the two paintings shown above.
I created both of these painting traditionally on watercolour paper and I think that they really show my passion for using bright colour schemes, (which is an important element that I would like to portray within my future 3D sculpts).
Tutor feedback:
Once my tutor (Richard) and I had discussed these two conceptual ideas for the possibility of my character design, I was then advised that the “Organic Character Idea 1: - 3 Headed Swallow-Tailed Kite” would be extremely difficult to recreate as a 3D model.
I then took this constructive feedback into consideration and deduced that the bird idea was too complex for me, as I would still consider myself a beginner within the area of 3D sculpting.
I also received tutor feedback on my “Organic Character Idea 2: - Purple Woman” character idea, which encouraged me to push this idea forward with a little more awareness of stylisation, (as to not reach into the ‘Uncanny valley’ of human portraiture / design).
I was also advised by my tutor to take into consideration how to plan and proceed when creating the tattoos on the female character, as this could present an opportunity for a strong visual outcome for the viewer.
Conclusion:
Overall I was very pleased and motivated after receiving professional feedback from my tutor Richard. I really felt that this constructive advice helped me to narrow down my decision-making when it came to selecting a final Organic character Design.
In conclusion, I have decided to select the “Organic Character Idea 2: - Purple Woman” idea, as I really want to challenge myself to create a stylised human figure, along with beautiful tattoos and a gorgeous, traditional poncho.
I have also taken into consideration the feedback from my tutor, as sometimes it is easy to be blindsided by your own artwork, so it is very helpful to have another professional perspective on the matter.
Self Reflection
Weeks 4-5
Overall, both of these weeks (week 4-5) have been the most enjoyable and least stressful personally for me, as I was able to revisit one of my favourite 3D programs, Zbrush!
Although I am still quite new to Zbrush, I feel most comfortable with it compared to many other 3D softwares. This is because I adore the process of organic sculpting, although I do find it still very challenging, I feel that some of my traditional Illustrative skills can be utilised when creating a 3D organic sculpt.
One of my goals for the future is to be able to use Polypaint accurately within Zbrush and learn how to successfully export a decimated mesh into Maya for the process of retopologizing.