Week 8 - week 9

Exploring the Texturing and Baking processes within Substance Painter
Week 8 - Week 9
28th November 2022 - 11th December 2022
Render from Internal Tutorial - Esp “Substance Painter Understanding Layers” - Credit: Anna McKee
Introduction to Adobe Substance painter-
Week 8
28/11/2022 -
We bagan todays’ in-person class with a general discussion around the purpose of Substance Painter, its’ use within the 3D Production Pipeline, Baking and how to prepare our models for importing / exporting.
Our lecturer Richard Cunningham commenced explaining the very first steps we would need to proceed with if we wanted to successfully export a model from Maya into Substance Painter.
Many of these steps have been mentioned before during Blog Entry “Week 7”.
Steps we must take to successfully export a model from Maya to Substance Painter:
Manually Retopologize your Decimated mesh from Zbrush (High Poly mesh) in Maya using the Quad Draw tool
Create naming conventions
Such as “MESH_LP” for Low Poly mesh and “MESH_HP” for High Poly mesh
It is useful to create these during the start of the project, the earlier the better (as this will help keep your meshes organised)
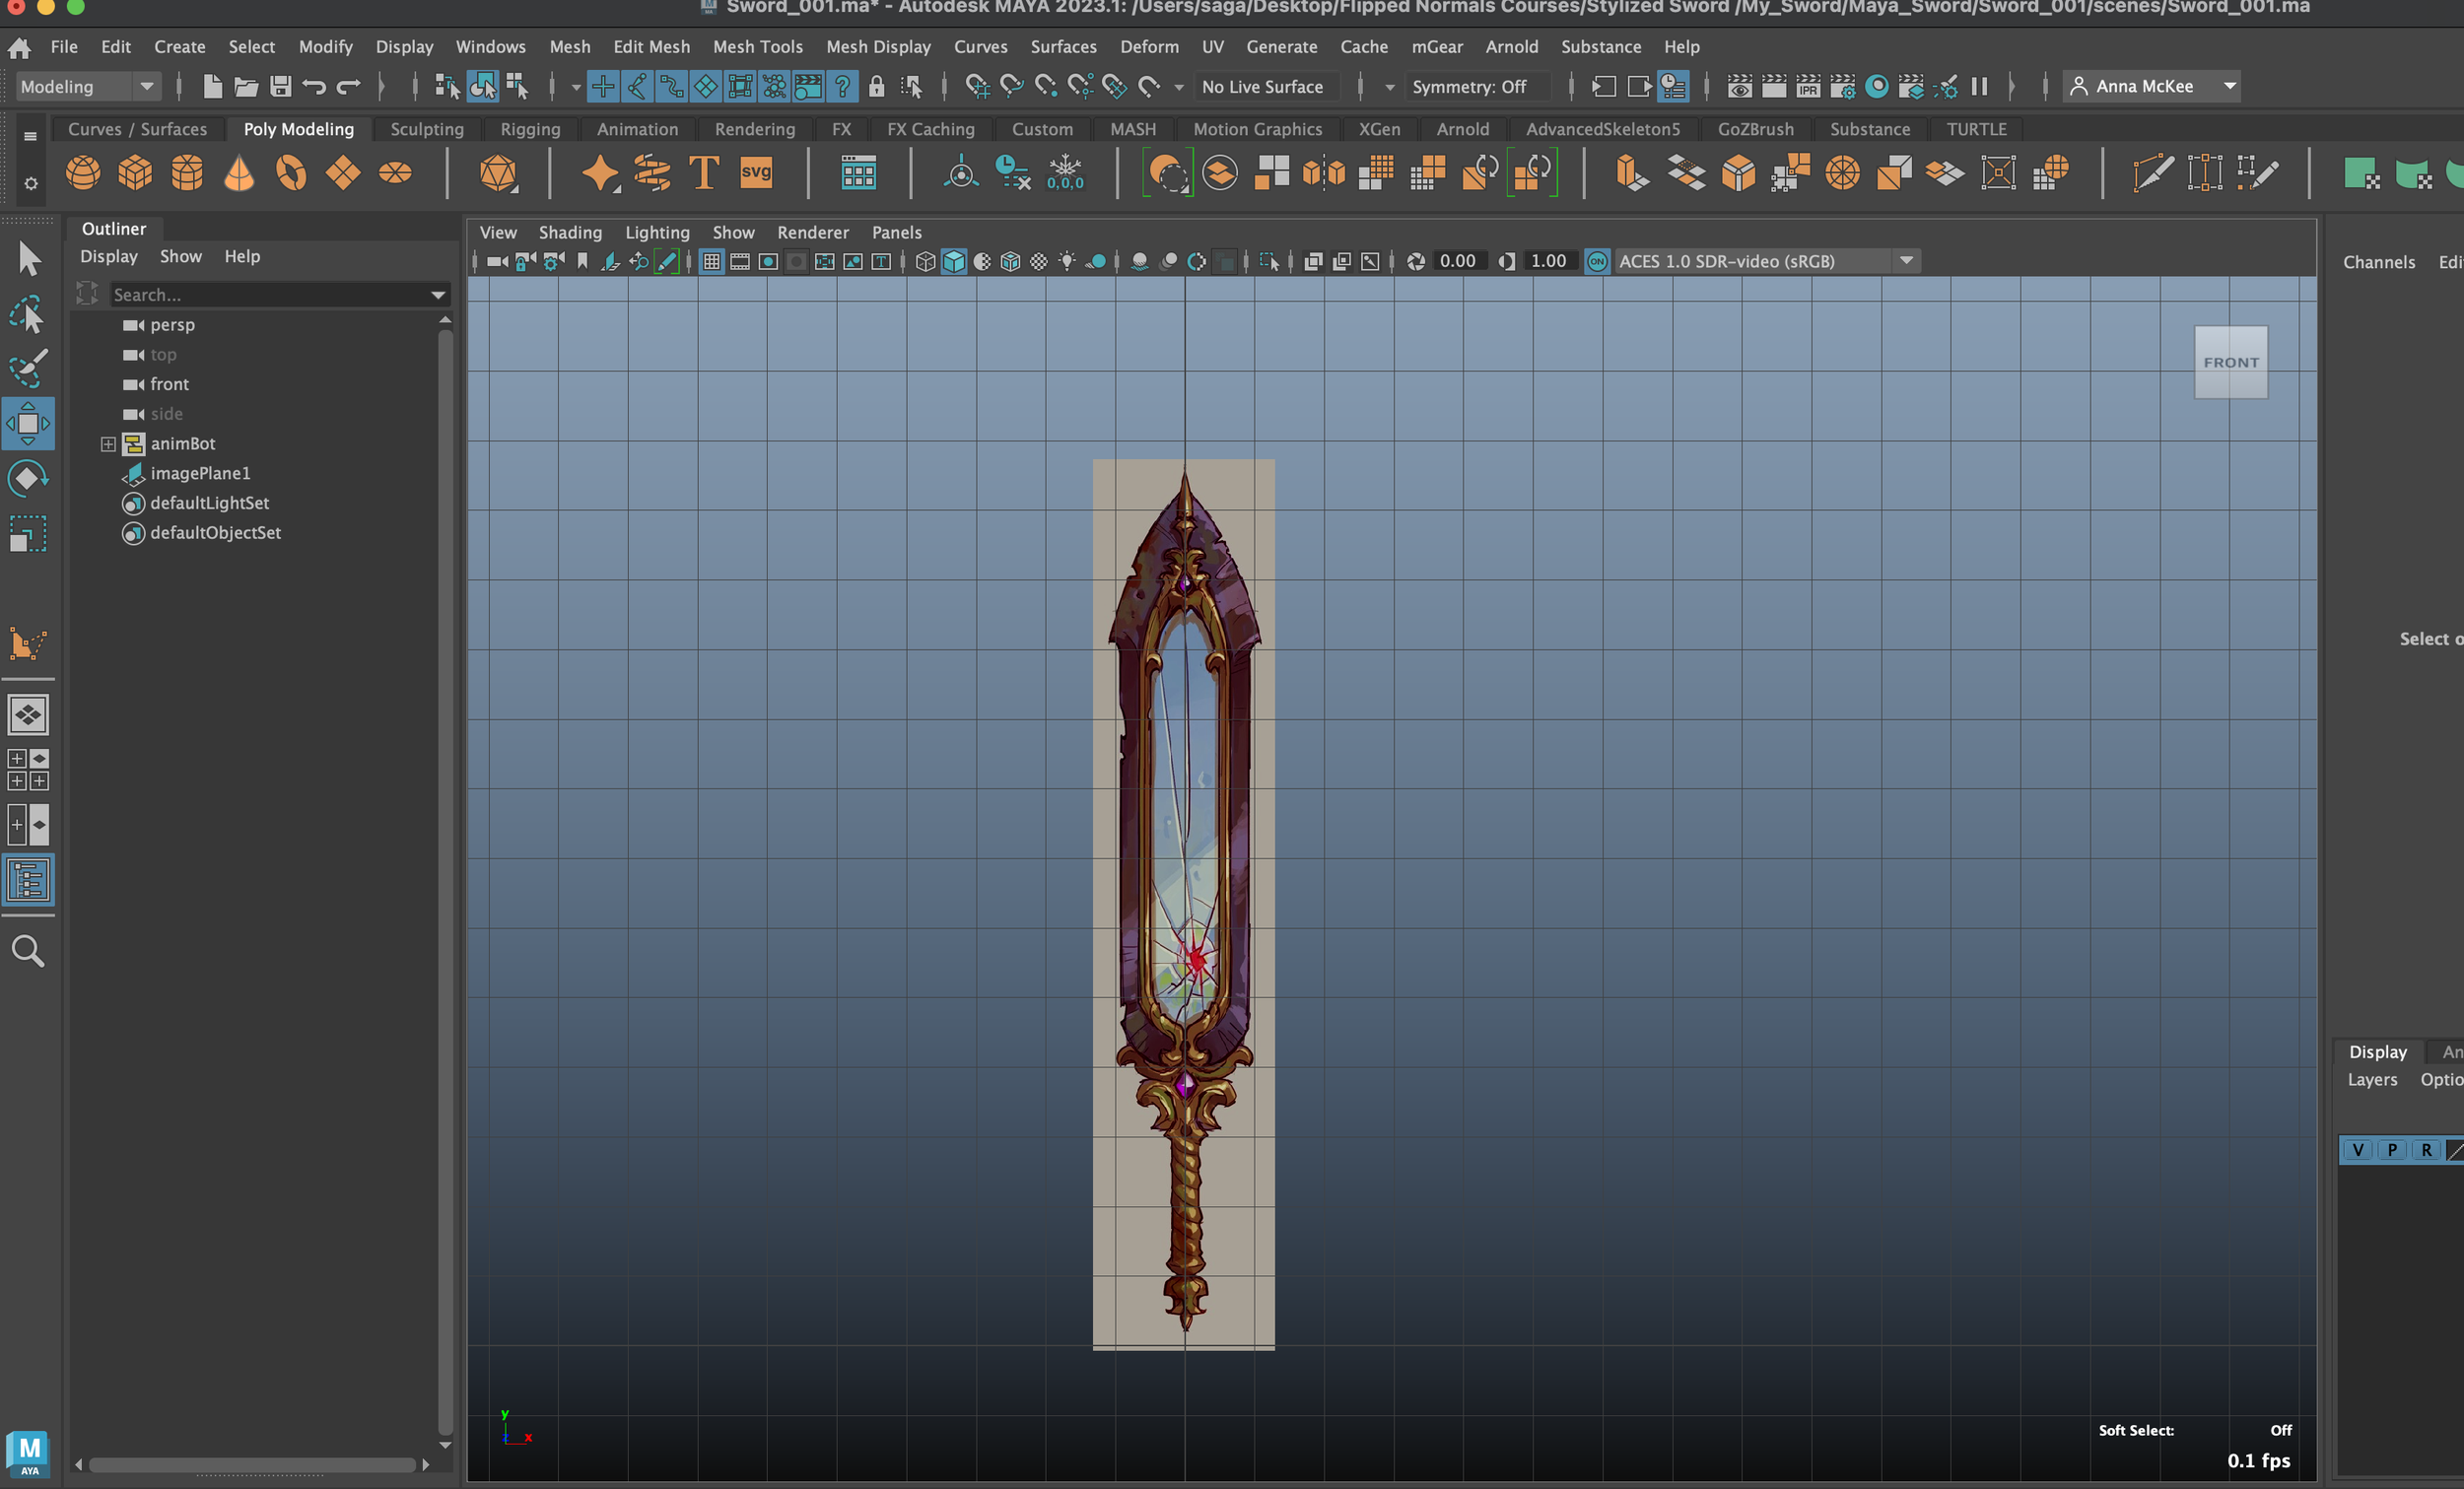
Manually UV Unwrap in Maya - Check UVs are facing the correct way:
Make sure to UV Unwrap the Low Poly, newly Retopologized mesh, (not the original High Poly mesh)
Red = Upside down (Incorrect), Blue = Facing up (correct)
No overlapping UVs
UV Islands have a large enough gap between them and the edge of the UV Tile
Check UV Texel density - Make sure that the ‘Checkerboard’ pattern is not skewed, stretched, blurred or pixelated
If using UDIMs, rename each UV Set for organisational purposes
Have both a copy of your new topology and another copy of your new topology but make sure it is smoothed (sundivided)
1 Low Poly manually retopologized mesh and 1 (smoothed) subdivided High Poly mesh
You can also use your original High Poly mesh straight from Zbrush, as long as you are using naming conventions eg, “Hair_HP” or “Figure_HP”.
Make sure these naming conventions match with the Low Poly mesh names on the model with the new retopology (High Poly Mesh), eg “Hair_HP” should match with “Hair_LP”.
Using these naming conventions will allow the user to Bake their detailed High Poly mesh onto the Low Poly mesh within Substance Painter. Creating beautiful details on a model that is suitable for animation / further work (as the polycount has been drastically lowered, so it is less likely to crash any 3D programmes, also increases efficiency).
Examples of ID Maps created in Maya -
DSP Project - Great Spotted Woodpecker


Screenshot credit: Anna McKee
Create ID Maps in Maya - This will help to streamline the texturing process within Substance Painter
Screenshot examples shown above of ID Maps used within my DSP Project
Assign a new shader to a selected part of the High Poly mesh
Make sure to rename this material according to the appropriate naming conventions
Select a saturated colour for the ID Map, as this will make it more easily visible within Substance Painter (which is what we want, as these saturated colours will be replaced)
EXAMPLES OF centring the mesh, deleting history and clean-up

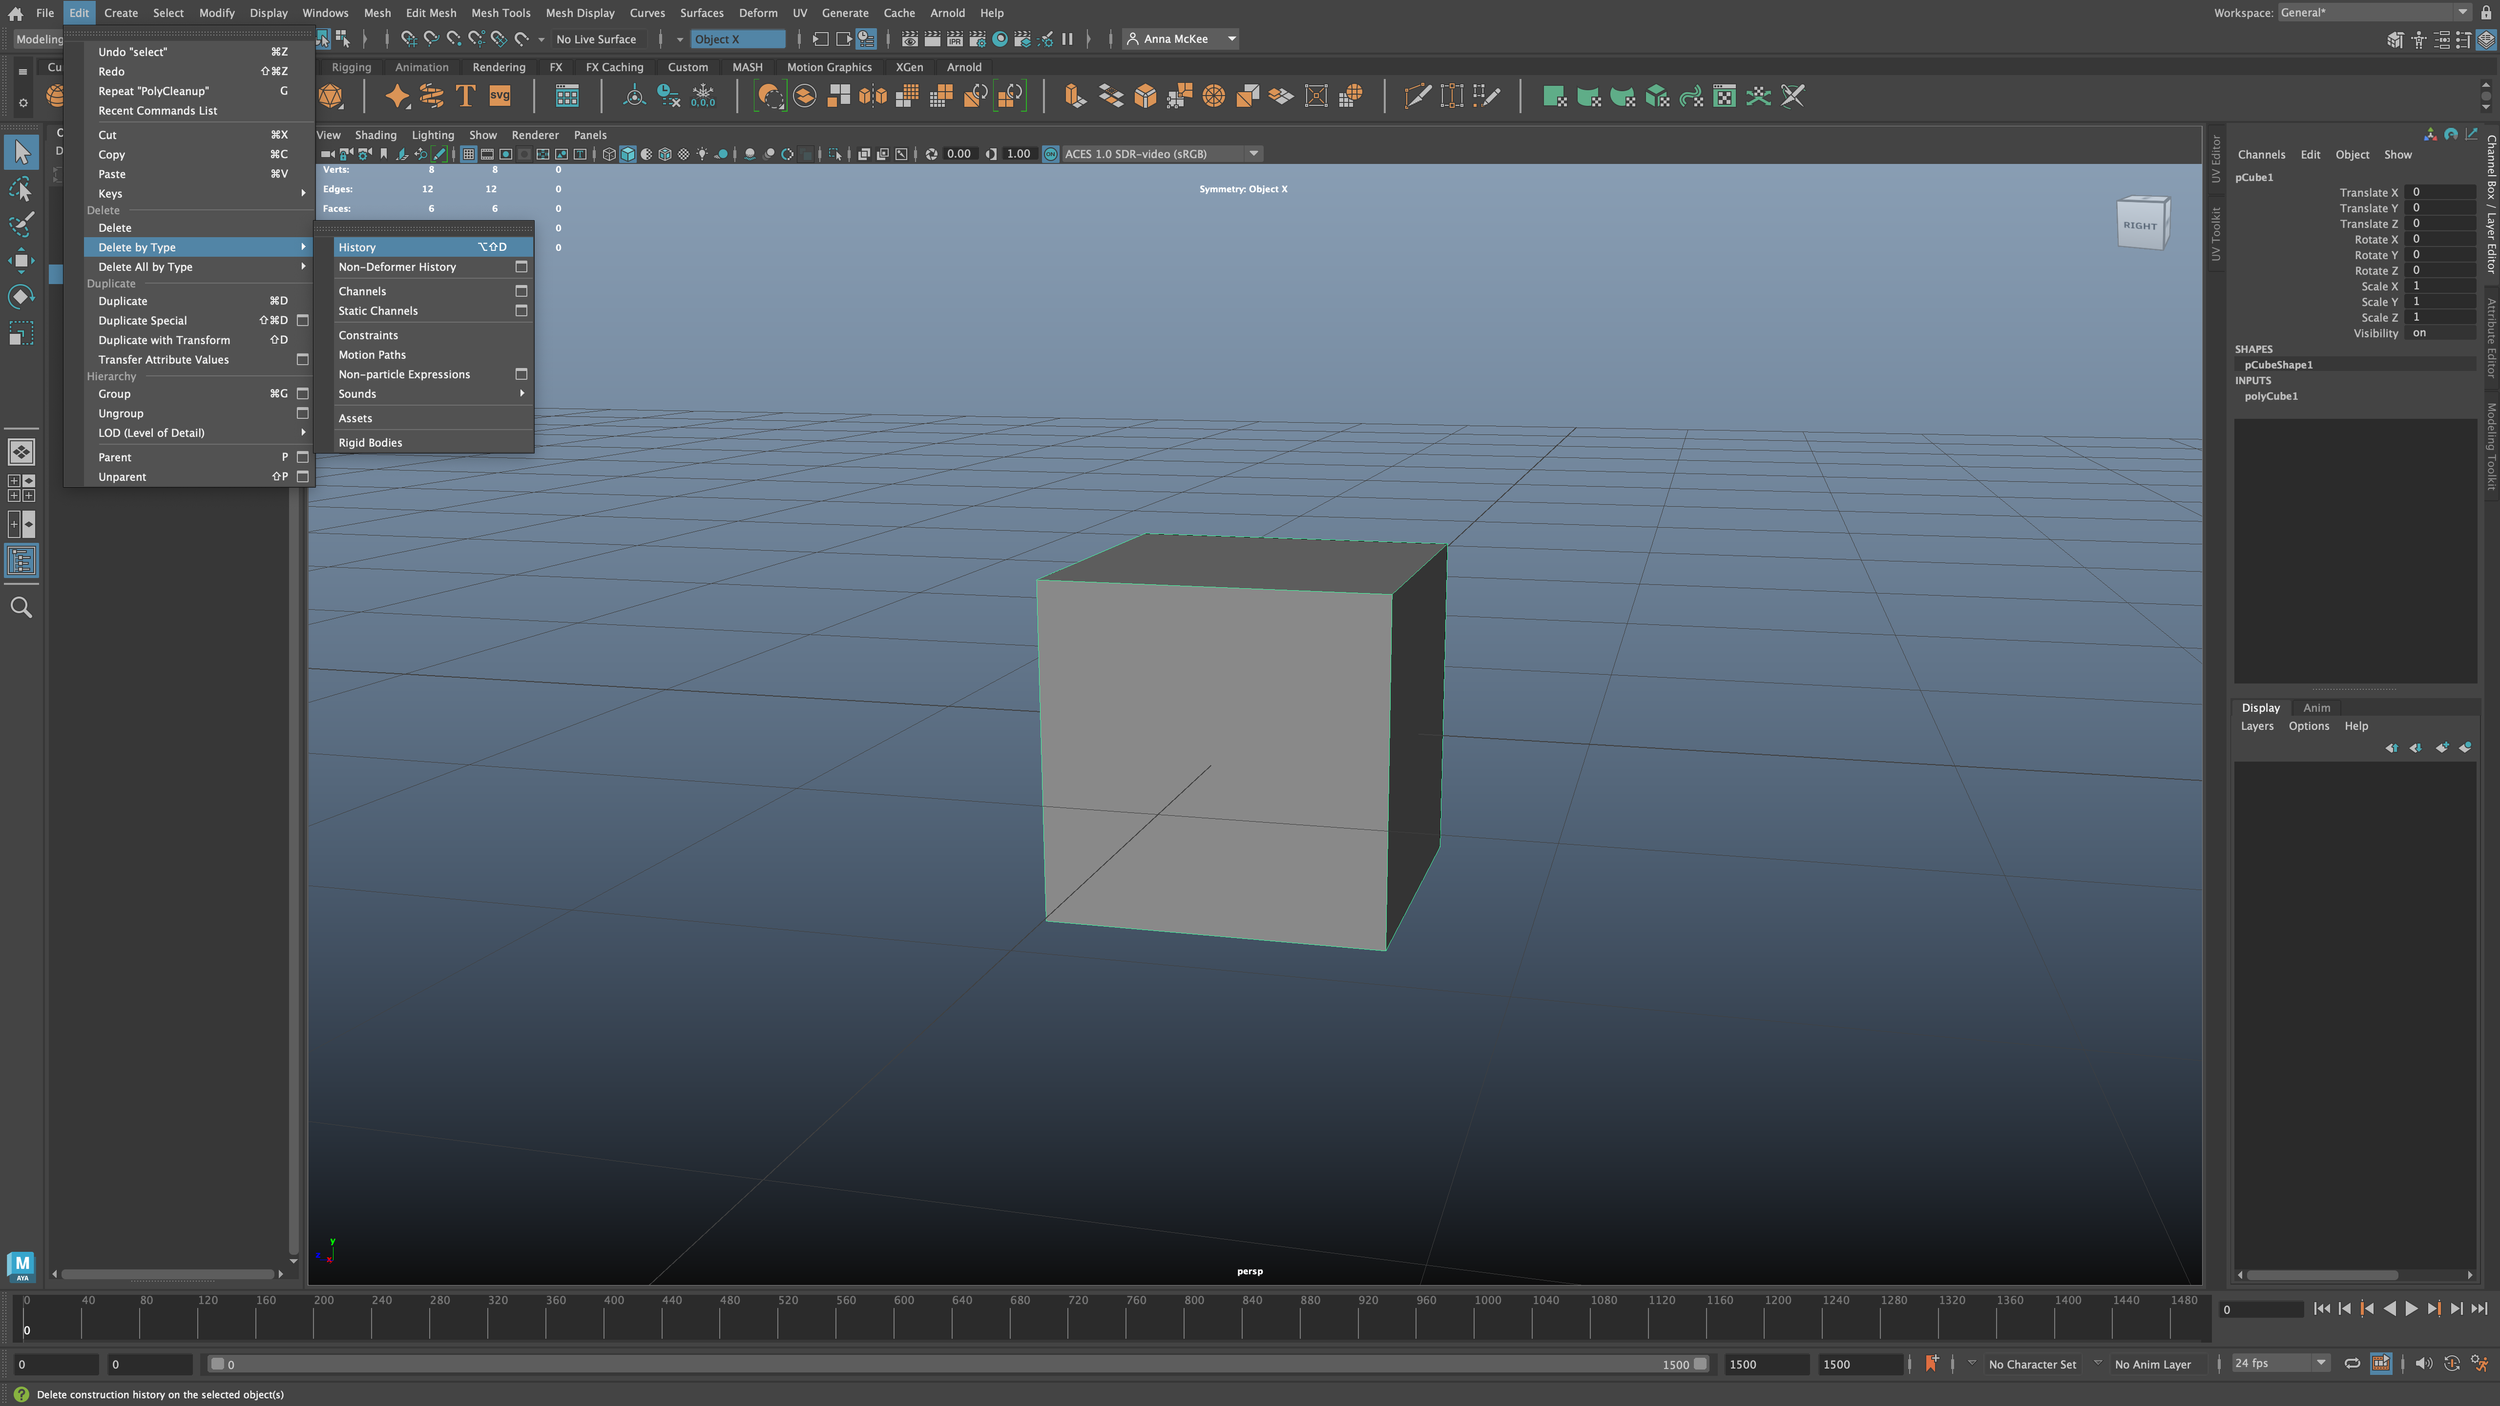

Screenshot credit: Anna McKee
Centre Meshes (both of the High Poly and Low Poly Mesh), allowing them to appear in the middle of your scene in Substance Painter
Create a new mesh (ie, cube)
Left click on finalised mesh you want to centre (make sure ‘Object’ mode is on)
Shift + left-click on new mesh (ie, cube)
Modify > Snap Align Objects > Select small ‘option’ box > Align objects option
Turn on “Mid”, “World X” and “World Y” > Apply > Align
Alternative method
Select mesh in ‘Object mode’
Channel Box / Layer Editor
Set Translate X, Y, Z to ‘0’
Delete History in Maya
Select mesh
File > Edit > Delete by Type > History
Delete Transforms as well
Clean-up Mesh in Maya
Select mesh you want to clean up
Mesh > Cleanup
Alternative method:
Select mesh
Alt / Option, Shift, D
EXAMPLES OF freezing transforms, deleting unused nodes in the hypershade


Screenshot Credit: Anna McKee
Freeze Transforms in Maya
Select mesh, (make sure all the mesh is selected)
Modify > Freeze Transformations
Alternative method: Select mesh
Left-click on “Freeze Transformations” blue icon in the “Shelf”
Consider Scale in Maya
Change working units:
Windows > Settings/Preferences > Preferences
Working Units > select preferred working unit
You can also measure the mesh > Create > Measure Tools > Distance Tools > Press “X” to snap to grid
Delete unused Nodes in Hypershade - This process will delete all nodes (within the Hypershade) that are not joined:
In Hypershade > Edit > Delete Unused Nodes
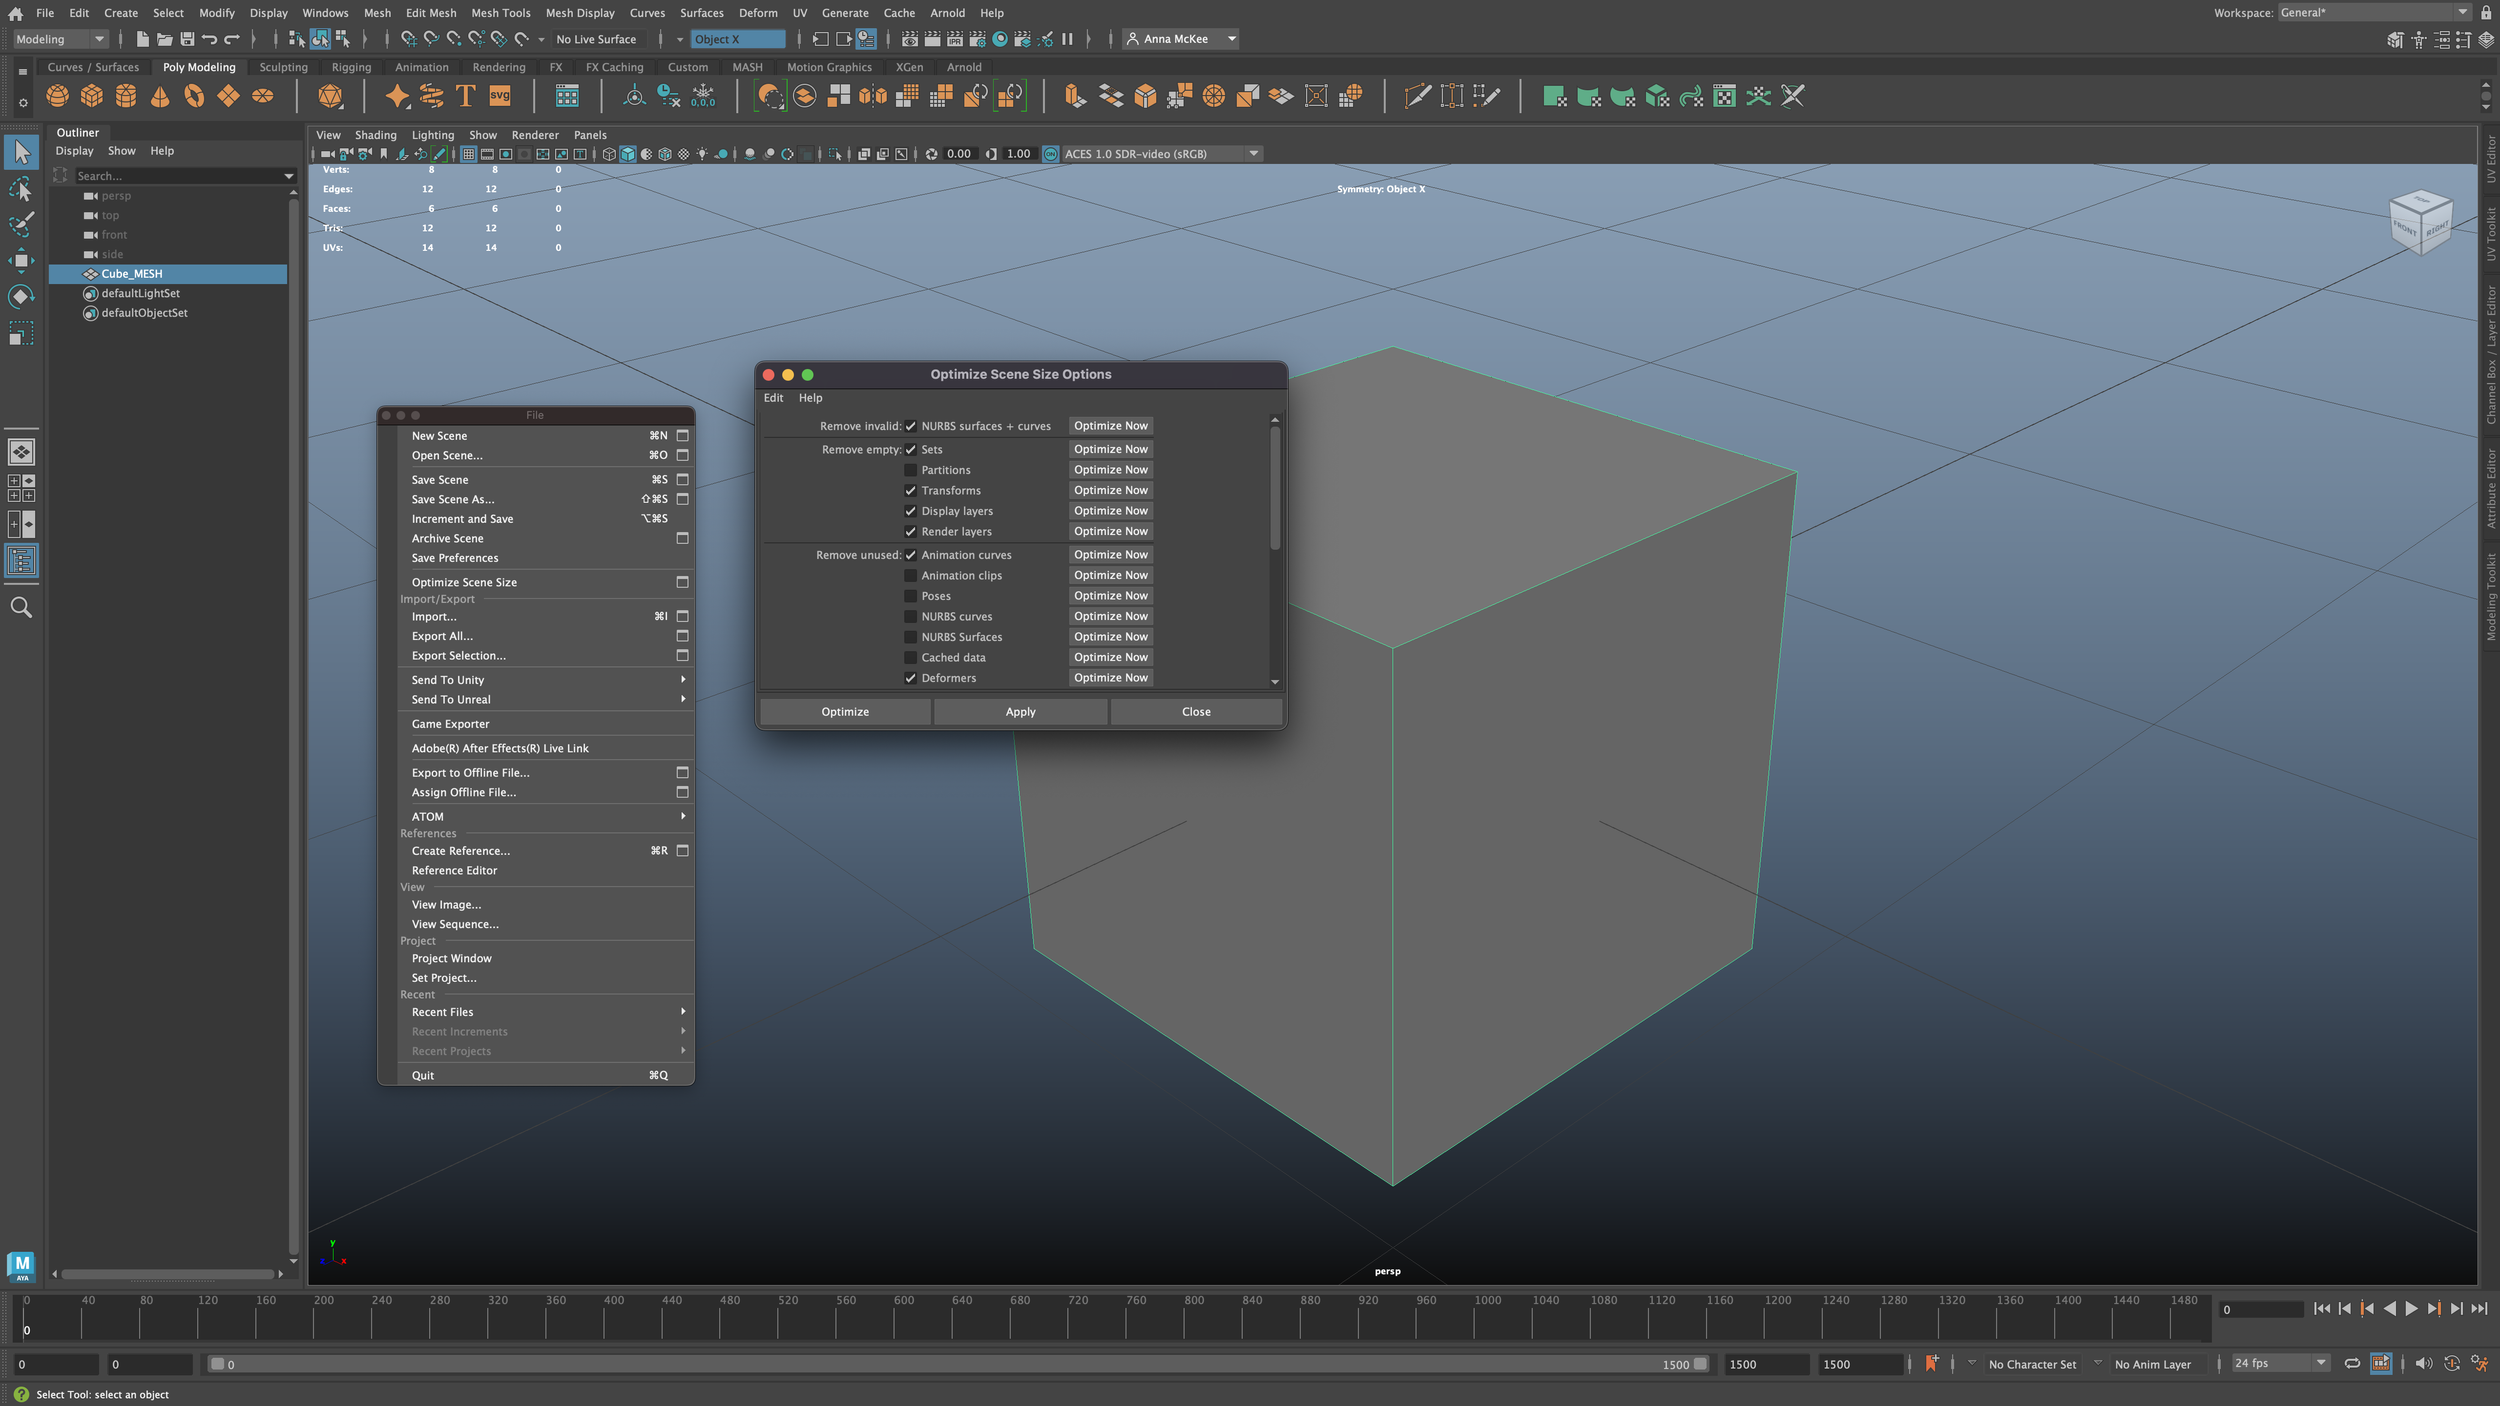
Optimise the Scene in Maya
File > Optimize Scene Size
Extra Info - Baking Height information
Subdivide the Low Poly Mesh TWICE, use this mesh to Bake the Height information within Substance Painter
Rename this mesh as “[Mesh Name]_LP_SubD”, then export to Substance painter
After this mesh has been exported, remove the Subdivisions within the Low Poly mesh
Create a cage
A cage in Substance Painter is a simplified 3D model that is used to bake detailed information from a high-resolution model onto a lower-resolution model.
The cage is placed around the high-resolution model and acts as a reference for the baking process. This can be useful for optimizing models for use in game engines or creating normal maps for real-time rendering.
Duplicate the Low Poly Mesh
Turn off “Camera Based Selection”
Vertex Select Mode > Select all vertices > Move Tool settings > enable axis orientation to “Normal”
Scale-up along the Normals of the Low Poly Mesh, this will create the Cage
Make sure the Cage does not allow the other meshes to peek through, (It can be helpful to assign a saturated colour to the cage, as this will help to visually separate the meshes)
Rename the Cage mesh to “[Mesh name]_Cage”
Delete History > Export selected Cage > Use the Cage to Bake AO Maps within Substance Painter (further personal research is needed regarding this topic)
Exporting from Maya to Substance Painter
Save both the High Poly and Low Poly in Maya as separate .fbx files - This would be in your ‘Export’ settings
To export a Maya file as an .fbx, go to File > Export All and choose .fbx from the file type options. Then, import the .fbx file into Substance Painter by going to File > Import.
Also if you have made a Cage and a Subdivided Low Poly Mesh for the Height information, make sure to save these now separately as .fbx files
Examples of Import settings, Low Poly Mesh + UDIMs in Substance Painter


Screenshot Credit: Anna McKee
Importing into Substance Painter
Open Substance painter > File > New
Select Template as: “PBR - Metallic Roughness Alpha-blend (Starter_assets)”
Set Document Resolution to chosen resolution eg, 1K - 4K
Set Normal Map Format to “OpenGL”
Make sure “Use UV Tile Workflow” is selected IF you are using UDIMs
Select “Preserve UV Tile layout per material and enable painting across tiles”
Make sure “Auto-unwrap” is TURNED OFF
Now you are ready to import your Low Poly Mesh > File > Select .fbx file with the suffix “[Meshname]_Low_Poly” > OK
The Low Poly model should now be visible within the 3D Viewport and it’s UVs / UDIMs should also seen in the 2D Viewport
Press “F” to Focus your 3D Model in the Viewport
We are now ready to import the High Poly .fbx model into Substance, this process is known as Baking
Examples of Baking process in Substance painter -


Screenshot Credit: Anna McKee
Baking the Mesh
Bake the High Poly Mesh onto the Low Poly Mesh in Substance Painter (This will utilise the naming conventions you have made)
Texture Set settings > scroll down > Bake Mesh Maps > Output size = 4K is preferable
Increase Dilation Width all the way up to 128
Add your HP Model to the “High Definition Meshes” section by selecting the paper icon to the right > Select your “[Meshname]_High_Poly” or your other chosen suffix eg, “[Meshname]_HP”
Scroll down > Make sure your Suffixes are correct > Low poly mesh suffix should be “_LP” IF your naming conventions are “[Meshname]_LP”, same with the the High poly mesh suffix, which should be “_HP” IF your naming conventions are “[Meshname]_HP”
Ambient Occlusion > Increase secondary rays all the way up until 256
Ambient Occlusion > Ignore Backface “Always”
Curvature > Increase Secondary rays all the way up until 256
Thickness > Increase Secondary rays all the way up until 256
Ensure “ID” is selected in the Mesh Maps, as this allows you to bring your ID Maps from Maya to Substance
Tip: Using the Cage > Common > Select the box, “Use Cage” > Select the paper icon over to the right > Select your Cage file which will have the suffix “[Mesh name]_Cage” > Cage is now ready
Further research needed: Regarding the process of separately baking the Height map with the suffix “[Mesh Name]_LP_SubD”. This could be done separately within another Bake after this initial HP Mesh Bake is complete.
Bake Selected Textures > The baking process will now begin > THIS MIGHT TAKE A WHILE!
Further research needed: It might be a better idea to Bake each map separately,as this will bring up any issues with the Bake in process more quickly, instead of waiting for all the maps to Bake at once
Once the Bake is complete, the mesh should have regained all of its original detail back and you are now ready to start the Texturing process
Examples of Texturing Process + Export settings in Substance Painter -
DSP Project - Great Spotted Woodpecker


Screenshot Credit: Anna McKee
Texturing in Substance painter
To begin texturing > Use a non-destructive workflow (involves using Fill Layers and Black Masks) > Layers > Click on the paint bucket tool named “Add fill layer”
Scroll down > Base Colour > Select base colour > Right-click on Fill Layer icon > Add Black Mask
Right-click on Black Mask > Add Paint > You can now paint directly on to the model using a non-destructive workflow
Remember: you can change the height, roughness etc of each paint stroke by clicking on the Fill Layer > Properties > Use the sliders to change the effect of the non-destructive brush strokes
Exporting Textures from Substance Painter to Maya
Although these steps shown below may look complicated and long, this link “Exporting UDIM Textures from Substance to Maya (Arnold)” will portray each of these steps shown within a video format
To have a backup of your Substance painter Mesh file > File > Export Mesh > without Triangulation > Export > Save to desktop > “[Meshname_Substance]” > Save as an .obj > Save
Open Maya > File > Import > Open “[Meshname_Substance.obj]” > Files of Type, set to .obj > Scroll down options > File type specific options > Select “Single Object” > Import
Your Baked Mesh without it’s textures should now appear in Maya > Open UV editor to check you have UVs > Check how many UDIM tiles you have
Mesh > Separate > This should separate the mesh into specific parts > Select the surface you want to texture now
Go to your desktop > Create a new folder called “[Meshname_Materials]”
Go back to Substance Painter > File > Export Textures > Output directory, select your new “[Meshname_Materials]” folder > Output template, select “Arnold (AiStandard)”
To check your naming conventions, go to DefaultMaterial > Output maps > check that the suffix at the end of the output maps ends in “.$udim”
Optional step, to make things more simple - Output Templates > to the left “Arnold (AiStandard)” > Output maps > Delete the clunky text, “$mesh_$textureset”, basically delete all text BEFORE the “_BaseColor(.$udim)” now just type in the name of your mesh instead here > For example, it should now look like, “[Meshname_BaseColor(.$udim)” > Repeat this step for all of the maps present > This just makes the title of each map shorter and easier to read
Settings > DefaultMaterial > Check how your naming conventions have become simplified > also scroll down and check that there are multiple UV tiles if needed > You can also turn off any maps that you don’t need
Global settings > File type > PNG
Ready to export maps! > Export > You should see your maps being created / exported now
Desktop > Open your “[Meshname_Materials]” folder > Your new maps should be in this folder now
Go back to Maya > Make sure that you Maya Project is set and the project folder is on your Desktop
On your Desktop, open your “[Meshname_Materials]” folder AND your Maya project folder > Copy and paste ALL of your newly made maps from your “[Meshname_Materials]” folder > Paste these maps into the SOURCEIMAGES folder in your Maya project folder > This means that your maps are now properly associated with your Maya project
Save you scene in Maya
Maya > Open Attribute Editor > Select all of your mesh > Hold right click > "Assign New Material” > Arnold > aistandardsurface > Attribute editor > Rename the shader “[Meshname_Material]” > Now we are ready to plug-in our textures
Attribute Editor > Colour, click the checkerboard box pattern > File > Click on folder icon in Attribute editor > Select “Meshname_BaseColor.1001.png” > Open
Press 6 to show texture, although it will not show correctly yet if you are using UDIMs > Attribute editor > UV Tiling Mode > UDIM (Mari) > Generate Preview
Click on the “Back” box in the Attribute Editor, to the left of the word “Presets” > Repeat the same step for Metalness
Next is roughness > Attribute Editor > Roughness > click the checkerboard box pattern > File > Click on folder icon in Attribute editor > Select the FIRST “Roughness” png file titled “Meshname_Roughness.1001.png” > Open
Colour space > Raw > Colour Balance > Alpha is Luminance should be selected > UV Tiling set to “UDIM (Mari)” > Generate Preview
Click on the “Back” box in the Attribute Editor, to the left of the word “Presets”
Geometry > Click on he checkerboard box pattern beside “Bump Mapping” > File > 2d Bump Attributes > Use as “Tangent Space Normals”
Click on the box with the triangle in it, beside the word “Bump Value” > Click on the file icon beside “Image Name” in the “File Attributes”
We are now ready to select the Normal Map > Select “Meshname_Normal.1001.png” > Open > UV Tiling Mode > “UDIM (Mari)” > Generate Preview
In the same attribute editor > Colour Space > Raw > Check “Alpha is Luminance” is on
Save your Maya scene
Arnold > Lights > Skydome Light > This is where you can place a unique HDRI image
Do a quick render to check if the Normal Map might be reversed > If you think the Normal Map is reversed, follow these steps below >
Select your Mesh > Hold right click > Material Attributes > Geometry > Click on the box with the triangle in it, beside the words “Bump Mapping”
Go to the top of your attribute editor and click on the ‘Back” box, beside the word “Presets”
Arnold > Turn off “Flip R Channel” and turn off “Flip G Channel”
Save your previous render image > now render out a new image > check both images now side-by-side > you should now be able to see what Normal Map is correct
Helpful External Resources -
These videos SAVED me during my DSP module (^_^)
Getting ID Maps from Maya to Substance -
“High to Low Poly Texture Baking with Substance Painter and UDIMs” - External Video - Credit: On Mars 3D
Preparing UVs + ID Maps effectively in Maya -
“Preparing Models for Substance 3D Painter in Maya” - External Video - Credit: Adobe Substance 3D
Creating ID Maps in Photoshop with a 0-1 UV Tile Space -
“Using ID Maps in Substance Painter” - External Video - Credit: Jonny Shields
Export + Baking process from Zbrush to Substance Painter -
“3D Modeling Pipeline: ZBrush, Substance Painter, and Maya” - External Video - Credit: Academic Phoenix Plus
Importing Mesh + Textures from Substance to Maya with UDIMS -
“Exporting UDIM Textures from Substance to Maya (Arnold)” - External Video - Credit: David Bittorf

What is Substance Painter + further info
Week 8
Photo credit: Flaticon
Adobe Substance is a set of software tools for 3D texturing and material creation, it allows us to create detailed, high-quality textures and materials
Includes a range of features and tools for creating and manipulating textures, including support for PBR (physically based rendering) workflows
Can be used in a variety of industries, including game development, film, architecture, and product design
Often used to create realistic-looking materials, such as metal, wood, and stone, as well as more complex, layered materials, such as Lava or a rocky footpath
The programme will allow the user to Bake a High Poly mesh onto the topology of a Low Poly mesh.
This preserves the detail within the mesh without creating an exceedingly high Poly Count, (which would be detrimental to animation and a successful workflow)
Substance painter Basics - Interface
Week 8

Credit: Anna McKee
This image shown above portrays a labelled and colour coded diagram of Substance Painter’s interface.
I created this image using a screenshot from my computer device, then opening the image within Canva, adding text and simple colours.
Developing this diagram allowed me to easily decipher the somewhat complex layout of Substance Painter. This is because the programme is still quite new to me, therefore creating a quick colour diagram allows me to easily view and differentiate the sections within the interface.
Interface breakdown:
Tools + Plugins Toolbar - Tools and Plugins that allow the user to edit, paint, mask and speed up their workflow
Asset Panel - Painting resources that include Smart Materials, Materials, Smart Masks, Filters, Brushes, Alphas, Textures, Environments and a search bar.
3D Viewport - Shows your model within a 3D setting. This viewport can be zoomed in and out, panned, rotated, direction of light can be moved as well
2D Viewport / UV Islands - Displays the mesh UVs. This could be either one UV island or multiple UDIMs
Main Menu + Contextual Toolbar - User can Create, open and save projects. Contextual Toolbar modifies your current brush + controls display of viewports
Texture Set List - Displays all material IDs of a 3D mesh. Each material ID is represented as a separate texture set in the texture set list panel. You can switch between texture sets or toggle their visibility in the list.
Layer Stack + Texture Set Settings - Layer stack = Manage, change visibility, move and organise painting layers. This will directly affect the textures on your model.
Dock Toolbar - Allows access to additional windows, such as Display Settings, Shader Settings, History and Log
Properties - The Properties window lets you adjust the properties of your brush, tool, or layer.
Much of my research regarding Substance Painter’s interface was found via the official “Interface Overview” on Adobe’s website
Class notes - Substance Painter
Week 8


Credit: Anna McKee
28/11/2022 -
These images shown directly above portray my notes that I recorded during class time, Monday 28th November 2022.
Although the class discussion with fast-paced, I managed to create these quick notes within a limited time-frame.
I personally feel that recording these notes are an important learning factor for me, as I have already began to revise and ‘check-back’ on my notes throughout the progression of further work within the Internal (Substance painter) tutorials.
Tutor-led class presentation - ID Maps
Week 8

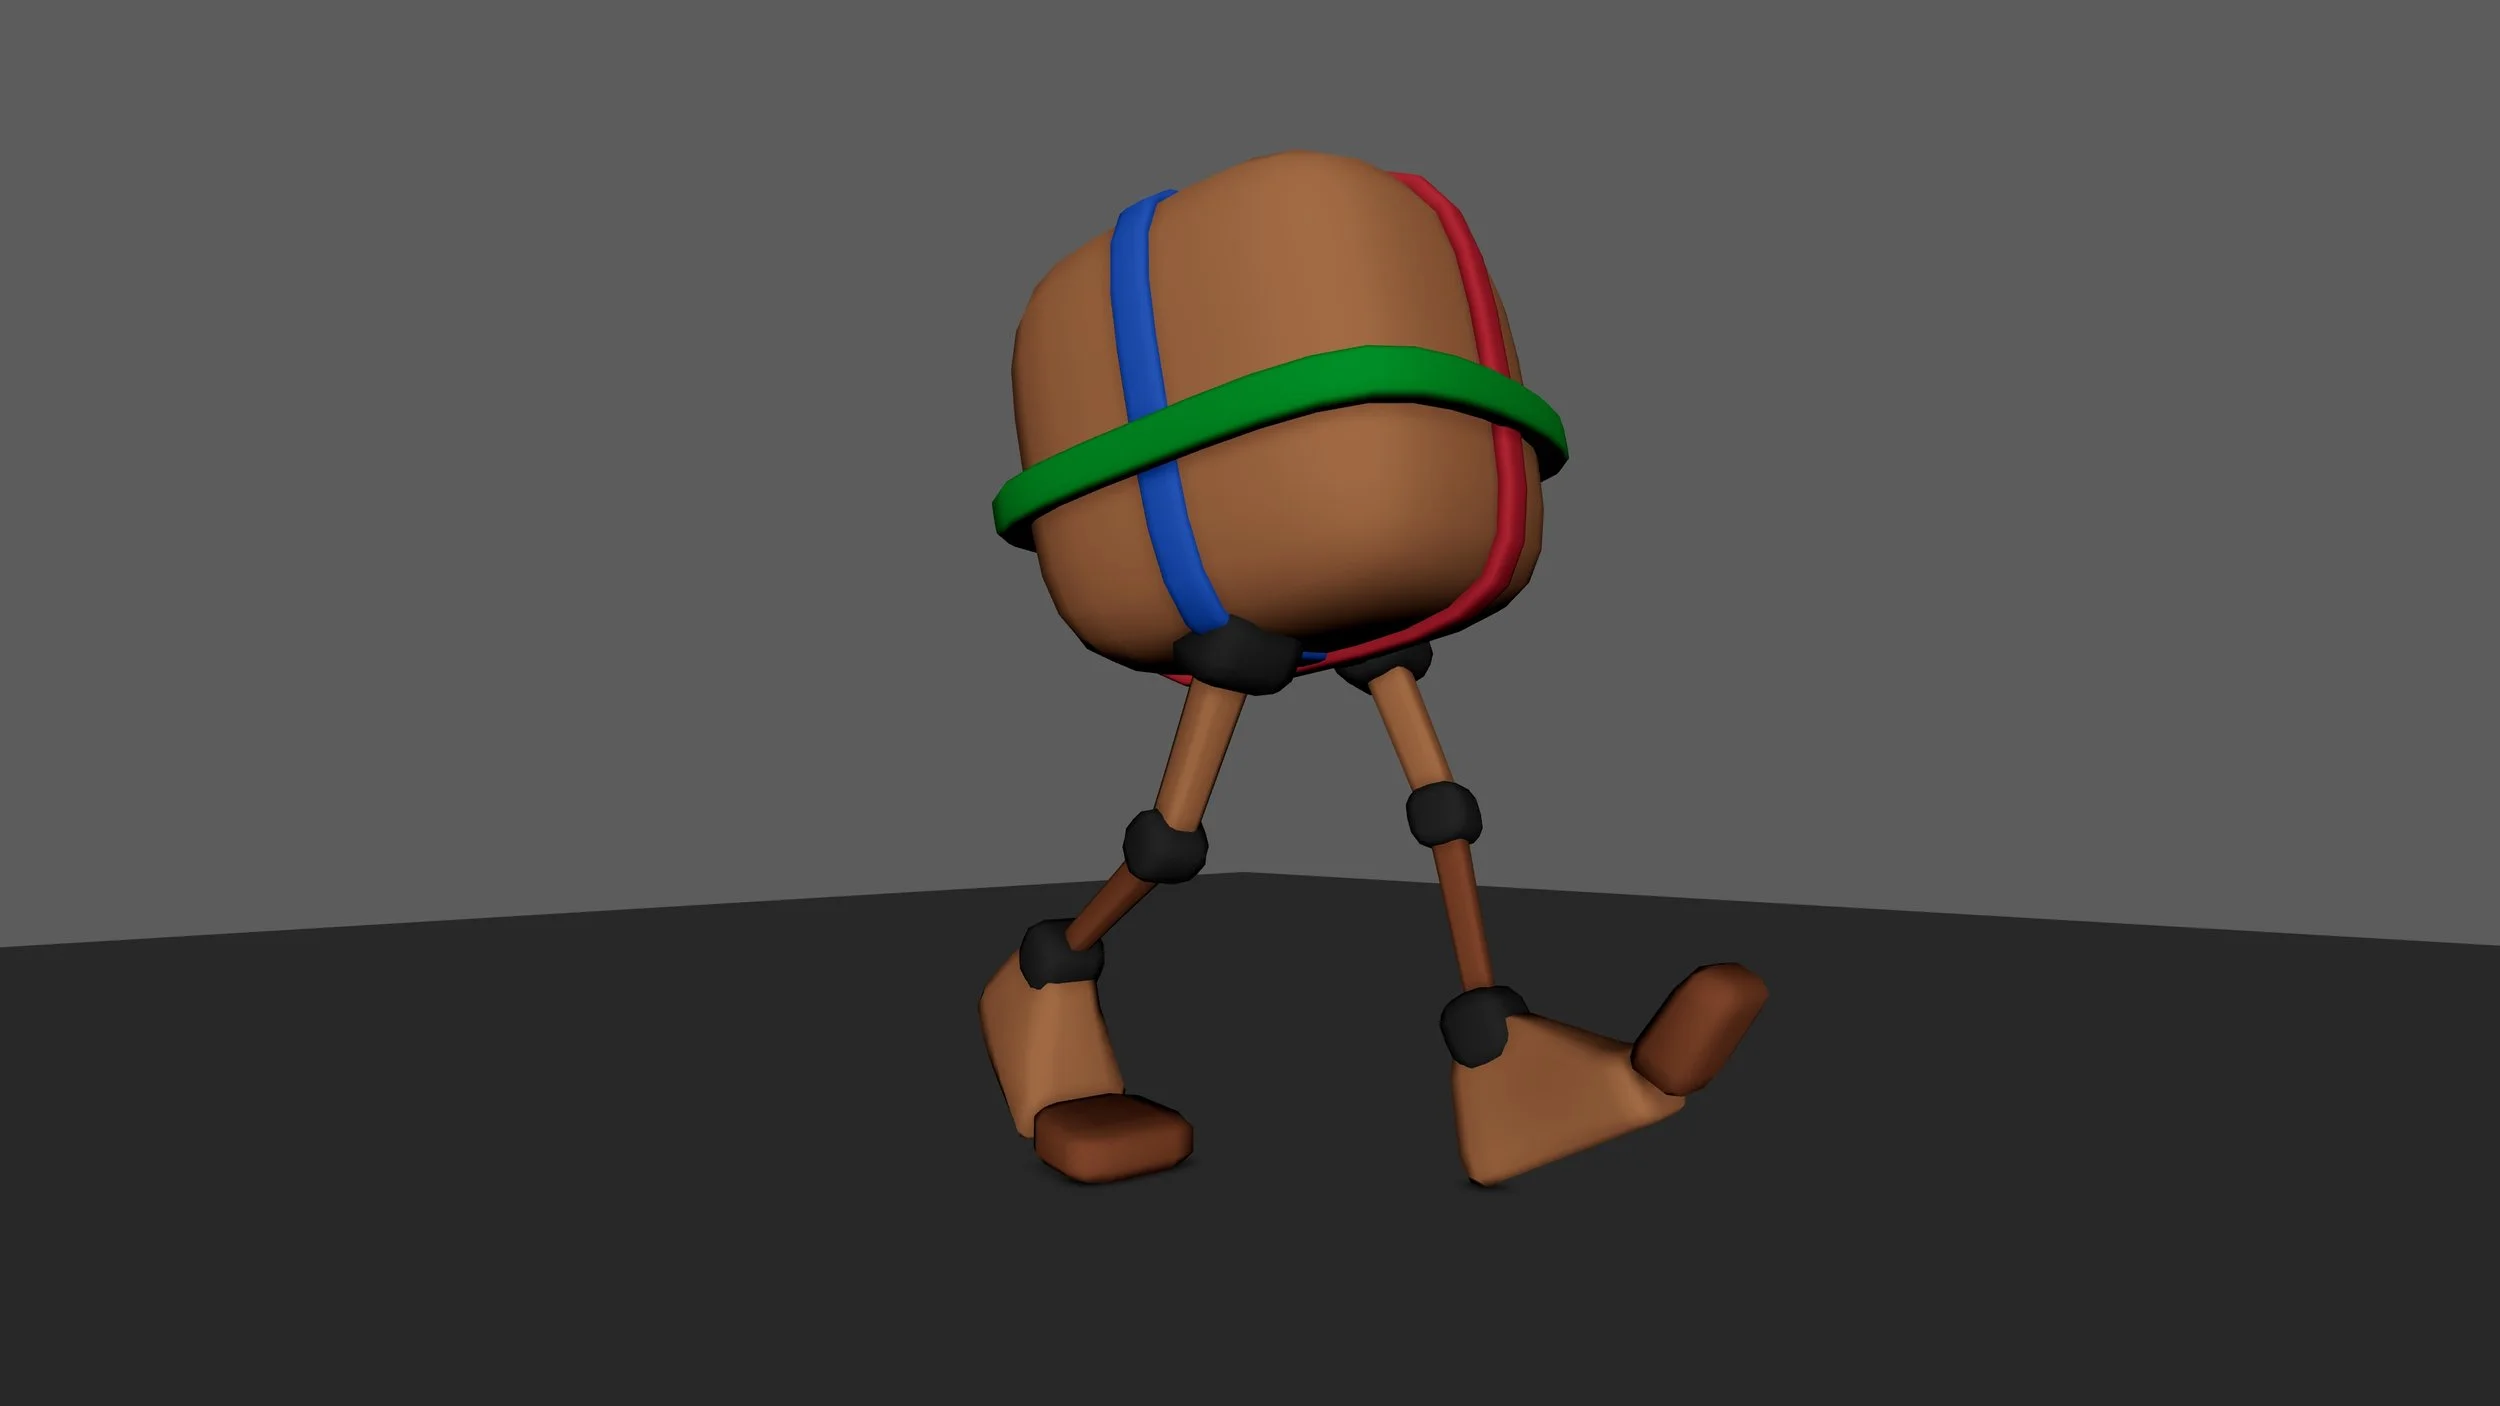
FBX model download provided by Kingston University, Render Credit: Anna McKee
This render image shown directly above portrays an example of ID Maps being created and used appropriately within Maya.
Creating these ID Maps compromised of following-along an in-class 'Tutor-Led’ presentation, which involved the tutor of the class presenting simplified examples of how to create ID Maps and how they can be used within the Texturing Stage.
This FBX model named “MeetMap” allowed the class to study / follow-along an example of the creation of an ID Map. This is because the model was simple, just being comprised of 3 separate parts: the head, body and base.
What is an ID Map:
An ID Map is an optional (but extremely useful) method of separating your mesh by using different materials. These materials are colour coded by overly-saturated colours, which then help to distinguish the ID Maps from each other within Maya and Substance Painter.
ID Maps are also given unique naming conventions, as this also helps to identify each part.
The ID Map, (also know as a Colour ID), assigns a unique color to each area of the mesh, allowing you to easily isolate and select specific surface types, such as wood, metal, or rubber.
ID maps are often used in high to low resolution workflows and can be very useful for masking different parts of the mesh.
The more ‘thought-out’ / planned you ID Maps are, the simpler the texturing stage will be, as each ID Map will create a barrier between themselves, which can help when wanting to add specific details to only one part of the mesh.
A great example of this is the “Meet Map” Tutor-led class presentation image shown directly above.
We can see that the model has been given 3 unique ID Maps:
Head = Blue
Body = Green
Red = Base
These ID Maps will also be visible within Substance Painter, which will then allow the user to edit / paint on the selected ID Map.
Although this class example differs, ID Maps are generally only created for the High Poly Model.
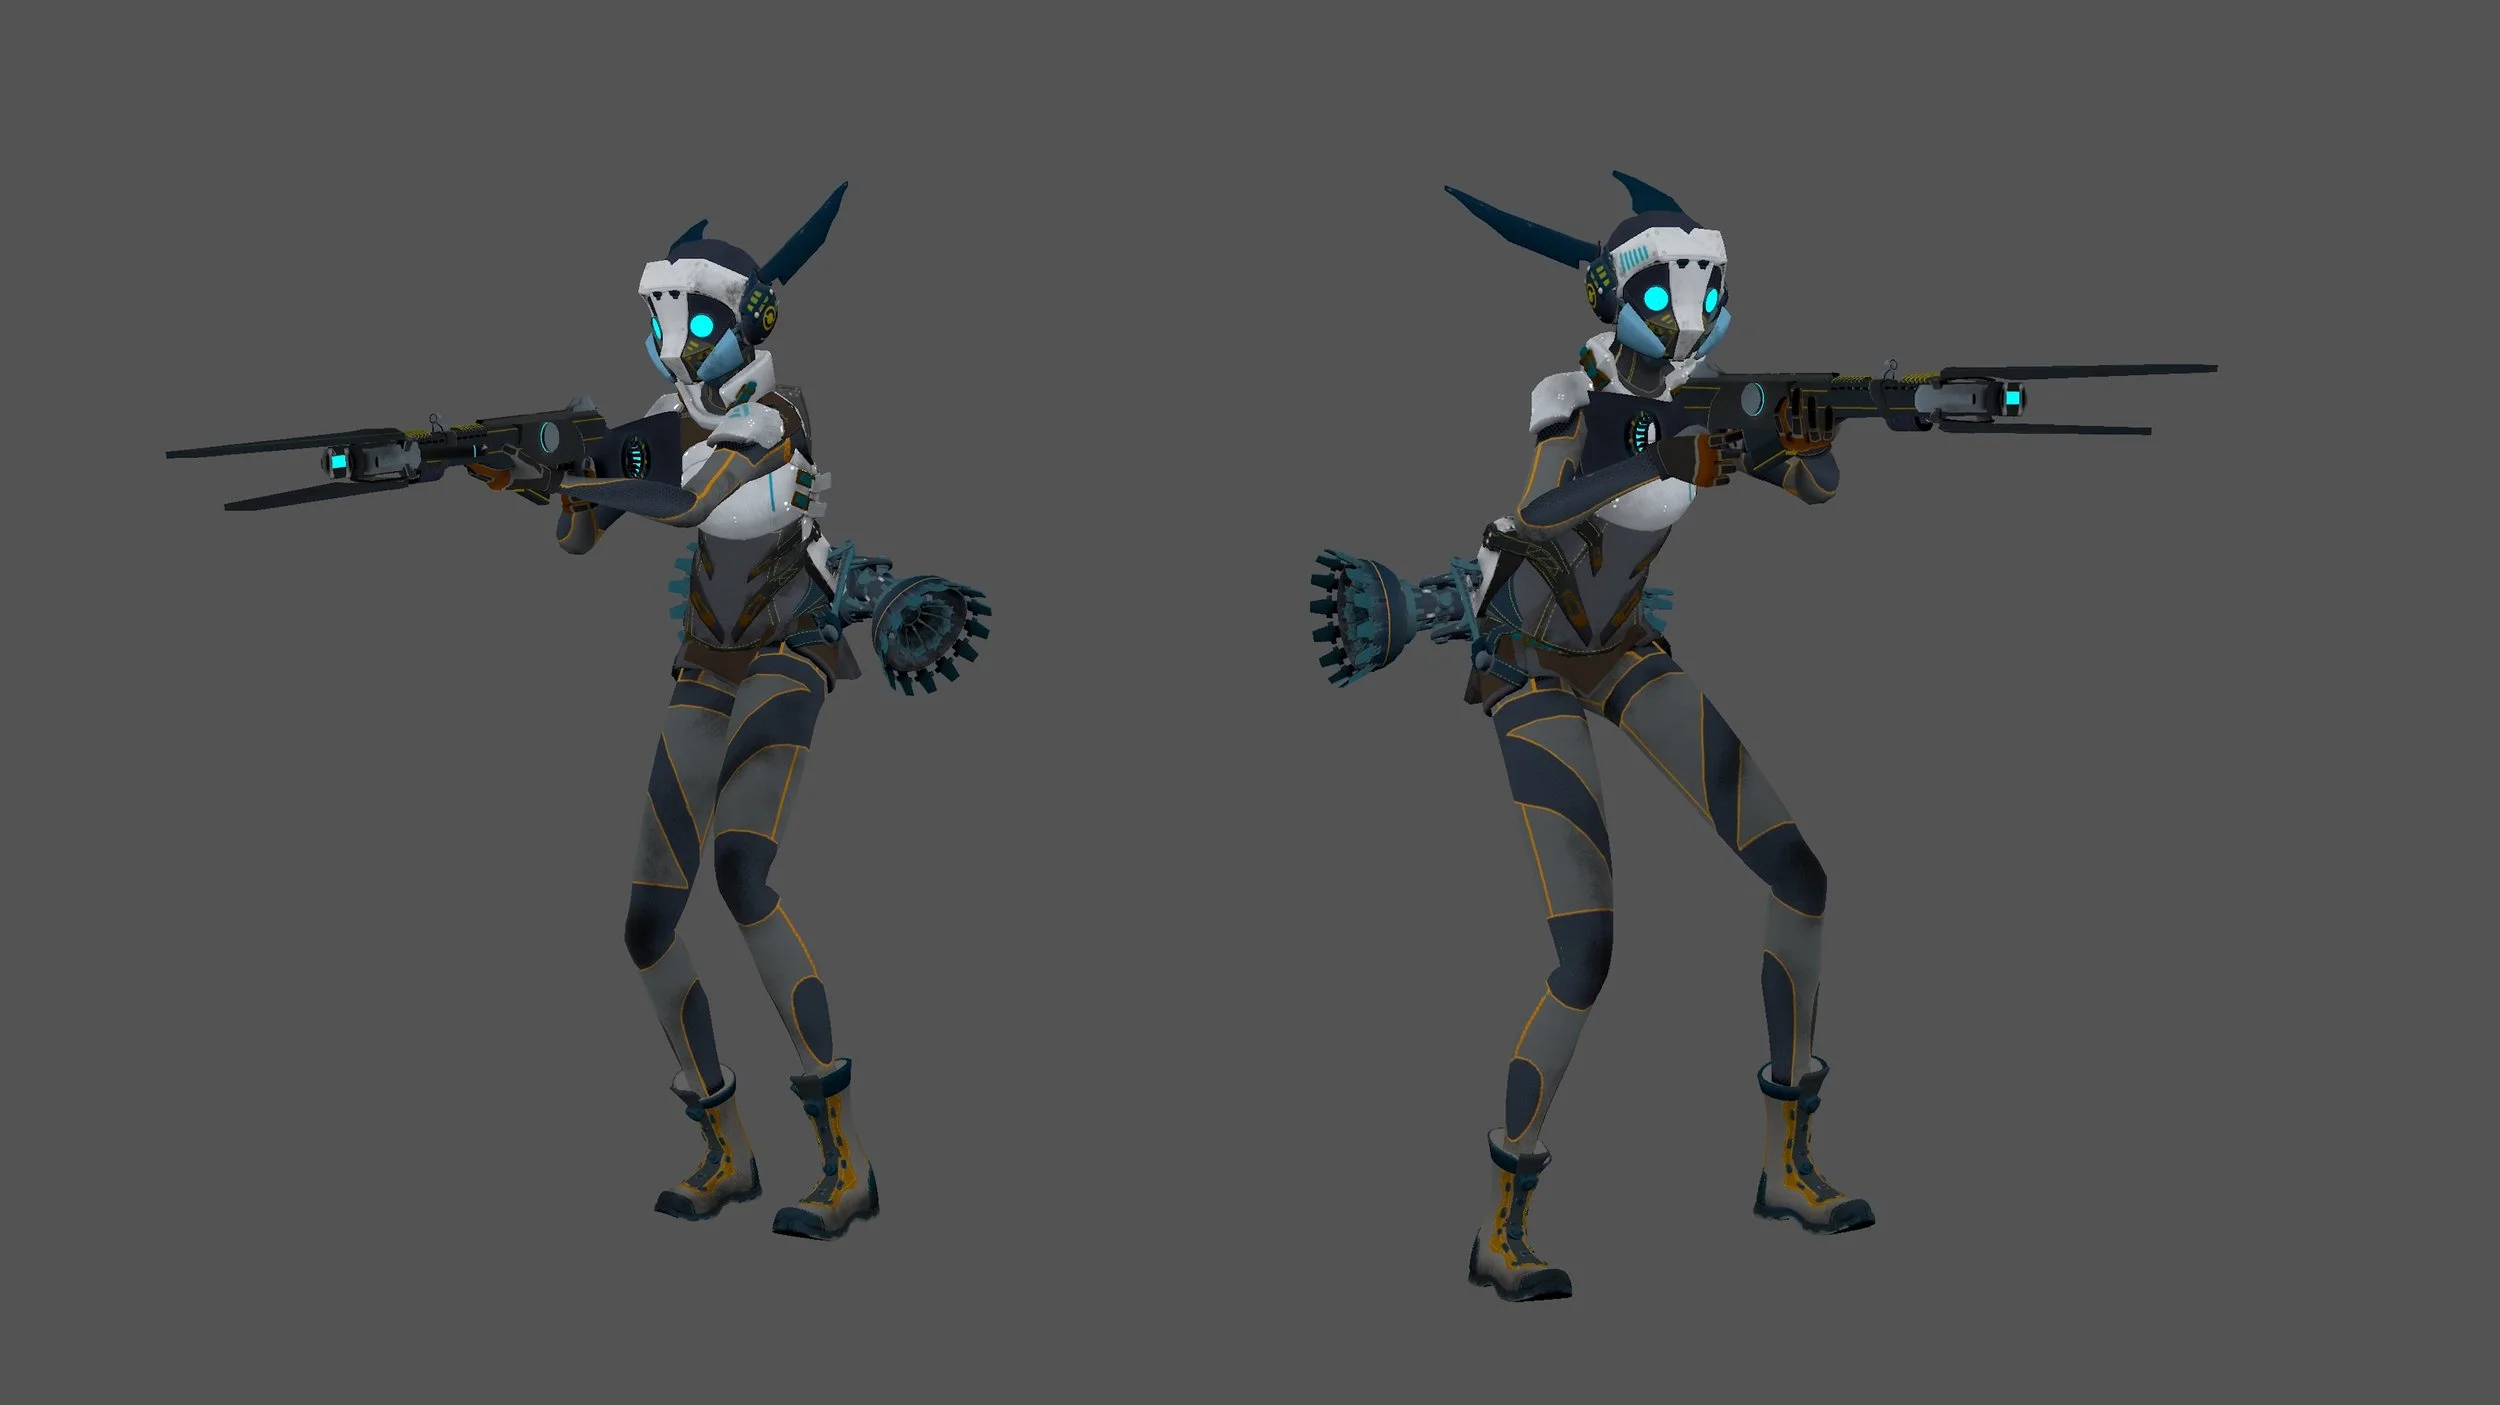
Wireframe Renders - Low Poly + High Poly Models


FBX model download provided by Kingston University, Wireframe Render Credit: Anna McKee
Images shown above display one Low Poly mesh (Left Model) and one High Poly Mesh (Right Model).
The set-up of these models is a great example of the preparation that is needed to take place before exporting from Maya to Substance painter.
As previously referenced beforehand, before exporting it is important to have:
A Low Poly model
This would be a newly retopologized model, with clean topology
No ID Maps Needed
UV Maps created for this model, UDIMs if needed
Proper naming conventions applicable = “[Meshname]_LP”
A ‘twice Subdivided’ Low Poly model would then be created, and exported with the suffix, “[Mesh Name]_LP_SubD” - This will be used in Substance Painter to help Bake Height Information into the Low Poly Mesh
Low Poly Mesh duplicated, then a ‘Cage’ would be created, its Normals then scaled-up until it just covers it’s original duplicate model beneath it
A High Poly model
Either a subdivided model from the newly retopologized mesh - (This works great for hard Surface)
‘OR’
The original High Poly mesh from Zbrush
ID Maps created with naming conventions
No UV Maps created
Proper naming conventions applicable = “[Meshname]_HP”


Screenshot Credit: Anna McKee
How to Create ID Maps:
Select High poly Mesh
Split the mesh up into parts using the “Separate” Tool (if needed), remember to adhere to naming conventions
Select a section of the mesh that you want to make into a separate ID map
Assign a new shader to a selected part of the High Poly mesh
Make sure to rename this material according to the appropriate naming conventions
Select a saturated colour for the ID Map, as this will make it more easily visible within Substance Painter (which is what we want, as these saturated colours will be replaced)
Repeat for each ID Map within the High Poly Model


Screenshot Credit: Anna McKee


Screenshot Credit: Anna McKee
Conclusion and Self Critique:
Overall I felt that this in-class Tutor-Led tutorial was very helpful and detail-oriented.
Personally I found that learning each of these important steps (ID Maps, High Poly + Low Poly Meshes, etc) to be extremely difficult to grasp and understand, especially in combination with creating UDIMs / finilasing export settings to Substance Painter.
This is something that I know I will need to work at + practice, due to the extreme importance of each of these subjects as they can ‘make or break’ the 3D Production Pipeline Workflow.
Quick reflection upon previous ID Mapping work, what have I learned:
With much further practice and research, ID Mapping has been made easier through my own work within the DSP Module.
For example, when I created the WoodPecker 3D model:
(This process could be related to any High to Low Poly Texturing workflow)
I was able to create specific ID Maps within my High Poly Model in Maya
These ID Maps were then exported along with the High Poly mesh into Substance Painter
The High Poly Mesh was baked onto the Low Poly Mesh in Substance Painter
I could now use ID Maps as a way of adding paint + Fill layers to selected parts of the model, such as the Primary feathers, claws and beak
(This resulted in more control when Texturing the model)
My own personal self-critique is that I feel that due to this process being so complex and topic-heavy, I still feel that it will take much further practice within this area until I become accustomed and relaxed with the process.
This is still a worry for me, due to the deadlines of the final models being so close, although I will always try my best and luckily the internet and Canvas always have an overflowing amount of useful information.
One of my personal self-critiques that I would like to reflect upon is, not having enough specified ID Maps for my DSP WoodPecker model.
The reason why I am mentioning this model, is because it was my very first attempt at creating ID Maps and utilising the professional workflow from maya to Substance painter. Therefore this difficult process allowed me to challenge my skills and reflect upon how self-improvement could be made.
Throughout the texturing process, although many ID Maps have been created, I still felt that it was ‘not enough’, as there were feathers that I wanted the paint to adhere to and close-by feathers that I did not want to paint to appear upon.
Conclusively, one of the main learning lessons that I have realised is that it is ok to have MANY ID maps, especially when creating complex characters / objects.
Screenshot Credit: Anna McKee
Internal Tutorials - Texturing
Week 8
Internal Tutorial 1 - Substance Painter, Understanding Layers

FBX model download provided by Kingston University, Render Credit: Anna McKee
Software used: Adobe Substance Painter
Personal Difficulty Level: 7/10
28/11/2022 -
This Internal Tutorial titled, “Understanding Layers” was aimed at showing the viewer the basics of using layers within Substance painter.
The video also delved into how different brush strokes could be applied and the diverse range of effects created by using height, roughness etc within the ‘Properties’ toolbar. Creating layer masks and their effects were also shown.

Brush Library -
Shown over to the right is the “Brush Library” toolbar.
Within this Brush Library there are many different types of brushes, from artistic / traditional paint brushes, to brushes in the shape of footprints + handprints.
Using these brushes within Substance Painter is a great way to add Height detail within the mesh, instead of importing the model back to Zbrush and adding Alphas there.
Many of these brushes have similarities to Photoshop brushes and can be downloaded from the internet, offering an endless supply of unique effects within your 3D model.
Screenshot Credit: Anna McKee


Screenshot Credit: Anna McKee
Conclusion:
Within this introductory internal tutorial we learned a basic overview of the simple tools within Substance Painter.
Personally I found this tutorial video to be informative and yet simple-enough to understand.
I also felt that Substance painter was not as intimidating when compared to other 3D programs. This is because it has a lot of similarities to Adobe Photoshop, such as within the brushes and Layer panel.
The element of “Masking” is also another common procedure found within the iPad application known as “Procreate”, which is a digital painting software that I am somewhat comfortable with.
Concluding this tutorial I do feel slightly more comfortable when using Substance Painter, although I do know that much more work and study will need to be undertaken in relation to grasping common concepts such as the “Fill” and “Black mask” functions.
INTERNAL TUTORIAL 2 - Substance Painter, Paint Vs Fill Layers


FBX model download provided by Kingston University, Render Credit: Anna McKee
Software used: Adobe Substance Painter
Personal Difficulty Level: 6/10
28/11/2022 -
Throughout this internal tutorial / workshop, one of the main methodologies that was continuously repeated (I would personally say the most important), was the use of a “non-destivitive workflow” Vs a “destructive / linear workflow”.
Non-destructive workflow:
Involves using layers and masks to make changes to the texture map.
Allows you to make changes without directly altering the pixels on the map.
More time-consuming, but gives you more control and flexibility.
Changes can be easily adjusted or removed.
Work can be saved as a set of layered files that can be edited later on.
Destructive workflow / Linear Workflow:
Involves directly editing the pixels on the texture map.
Changes are permanent and cannot be undone.
Quick and easy to work with, but can be risky.
The tutorial also covered areas such as using Filters, such as the HSL Perceptive filter. This filter allows the user to slightly alter the colour of their destructive paint layer, although it is less reliable compared to more non-destructive techniques.


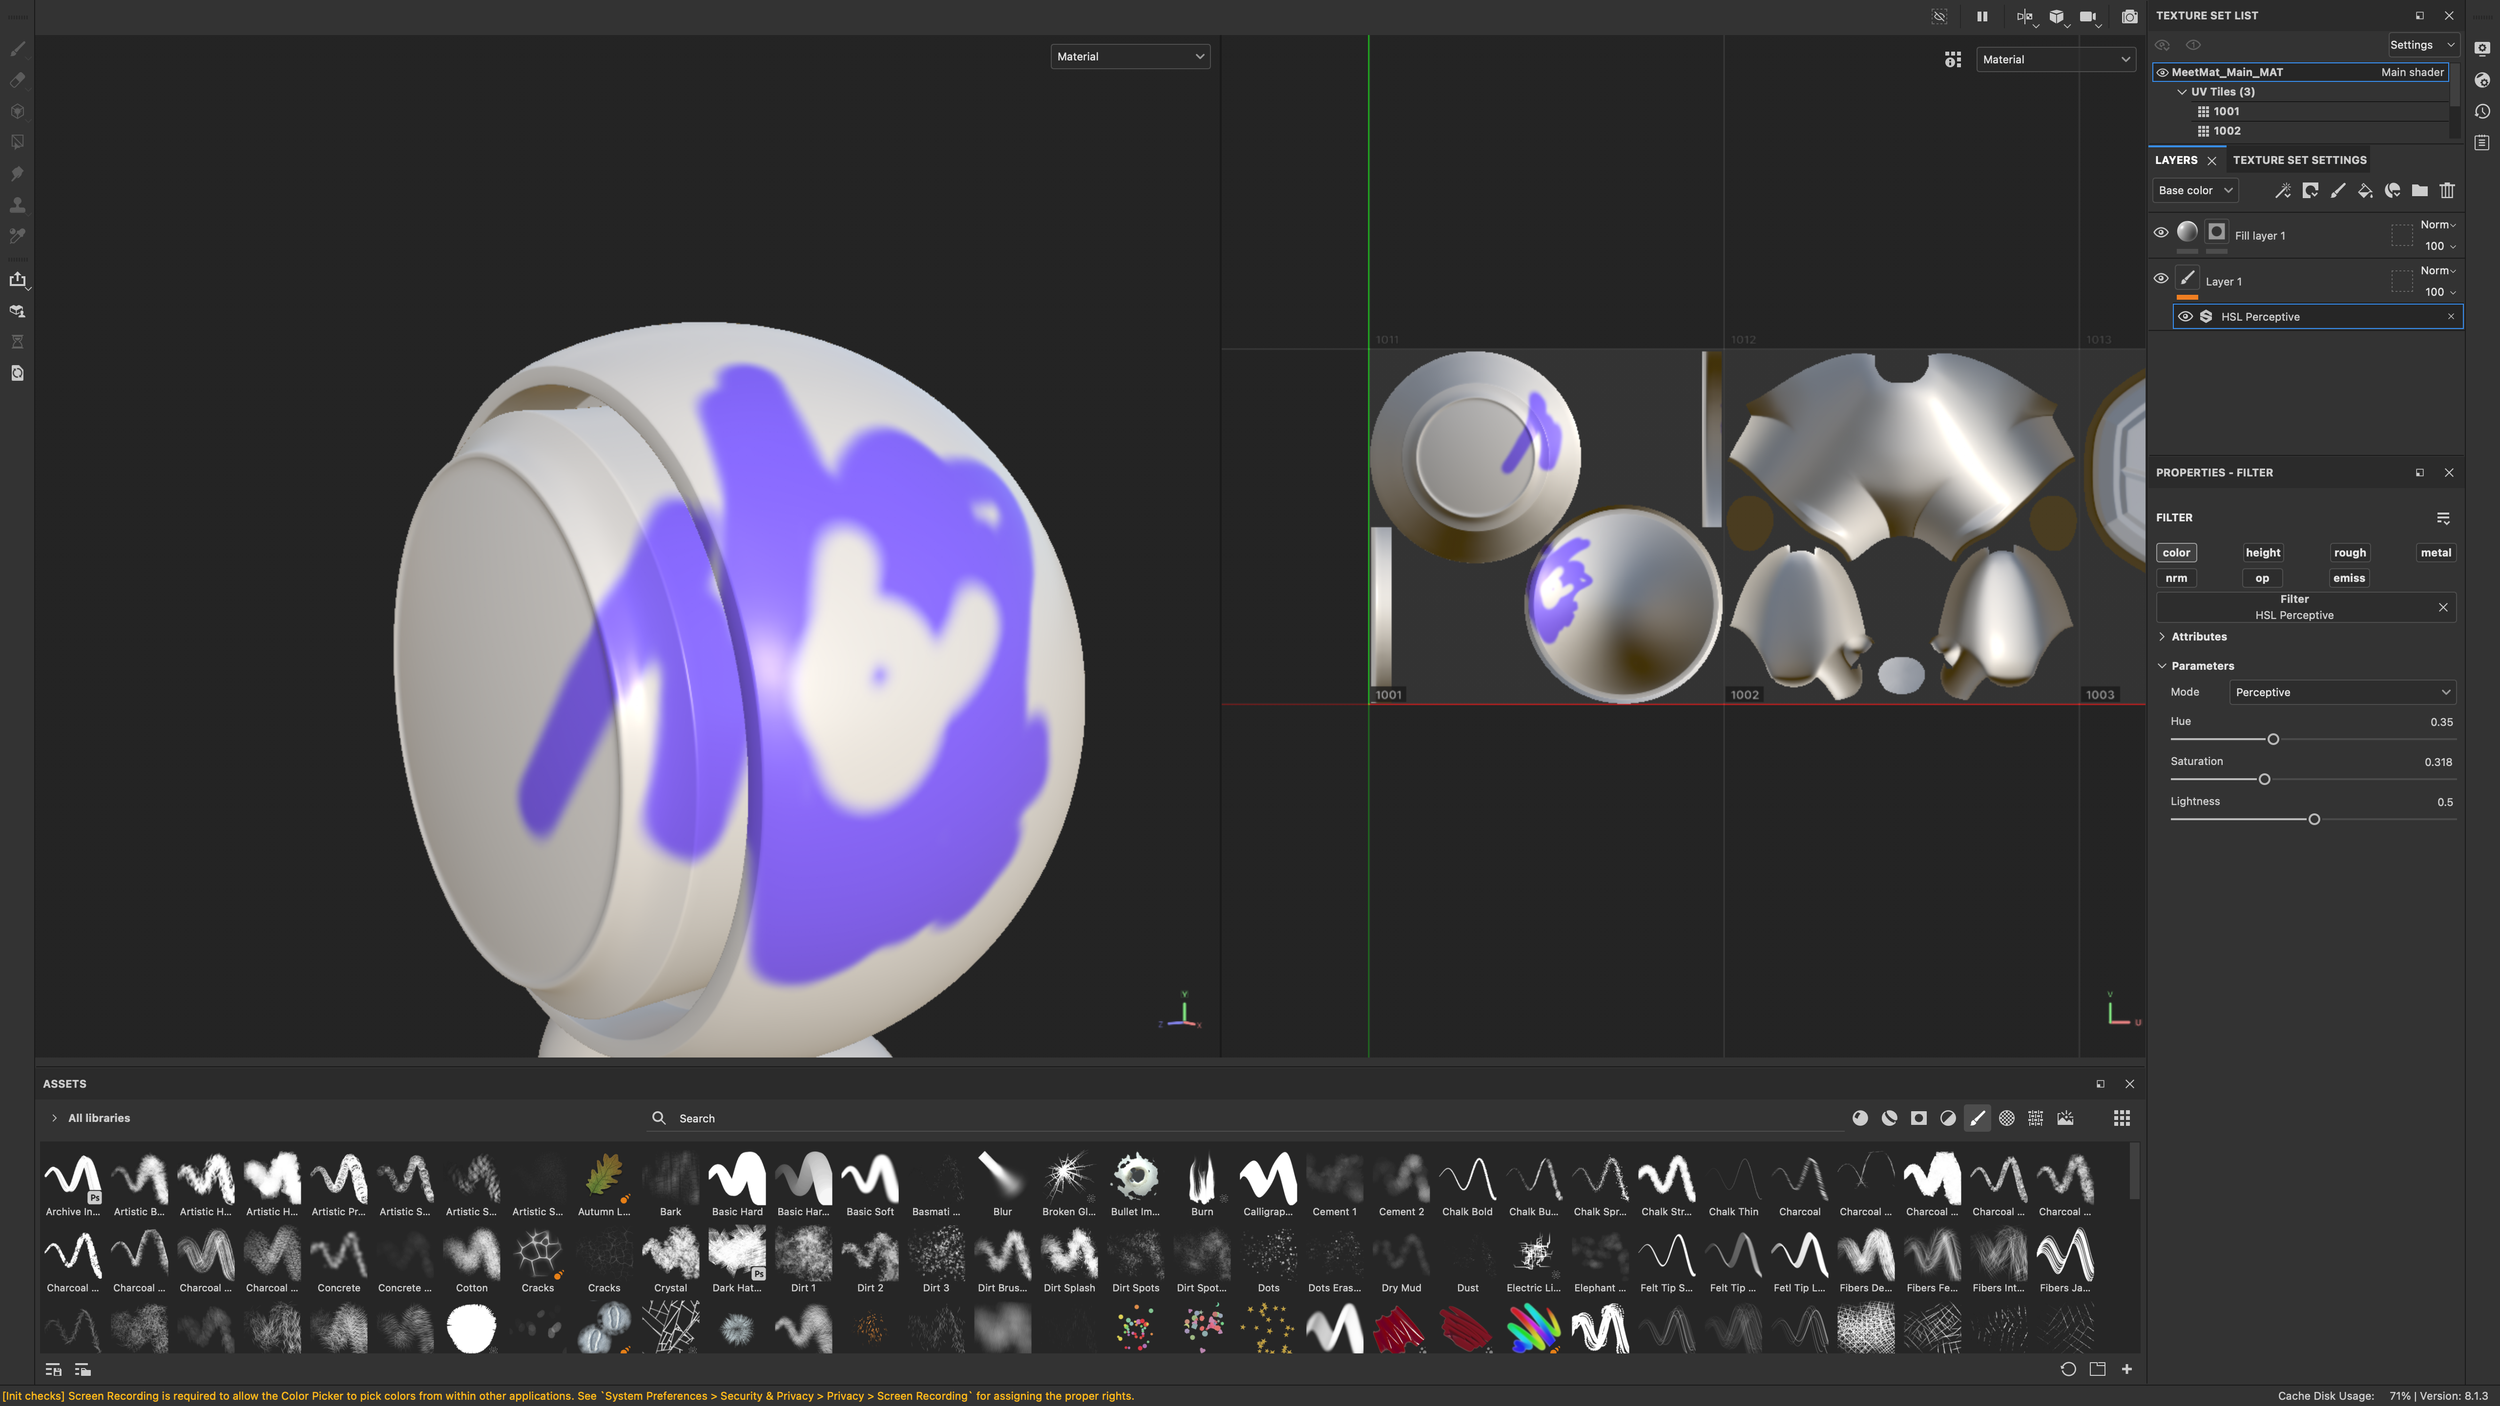


Screenshot Credit: Anna McKee
Conclusion:
Overall I felt that this Internal tutorial covered the most important, yet simple workflow functions within Substance Painter, which is using a Non-Destructive workflow Vs a Destructive workflow.
Following-along with the video, I also discovered the benefits of using a non-destructive workflow, such as using the “Fill” and “Black Mask” tools.
The Fill tool creates a solid ‘fill’ colour on the selected mesh. The colour of this Fill layer can also be easily changed and edited throughout the texturing process, which is why it is more recommended to use a Fill layer to add colour, instead of paint layer (as it is more difficult to change the colour of a paint layer, although this is possible with an added “HSL Perceptive” Filter added).
The Black Mask used in conjunction with the Fill Layer also helps to create a useful, non-destructive workflow. This means that we can create paint-like effects in a non-destructive matter. Although it is a common workflow to use fill layers during the initial + middle stages of the texturing process, then switch to a paint layer (destructive workflow) during the final detailed stages of texturing, as this can offer a more hand-painted, unique effect.
Conclusively this tutorial has helped to expand my understanding of these tools and their importance, especially when trying to achieve multi-layered, complex textures (such as a texture with Height, colour, AO, etc) within Substance.

WEDNESDAY SUPPORT SESSION
-
Substance Painter
Week 8 -
Online - 10:00am - 12:00pm, 30th November 2022
Topics covered within the support session:
Further exploration regarding tools that will help us to achieve a “non-destructive workflow” - Using Fill Layers instead of relying on Paint layers
The power and flexibility of using ‘masks’ - allows us to add effects/paint on selected parts of the mesh, this is a non-destructive method
Alternatives to using ID Maps - we can use SubTool naming conventions instead
Secondary Rays - Make sure to turn this up to its highest point, it will increase quality
Creating groups - Control + G (This is the same as Maya)
Adding swatches via the Eyedropper Tool
Disable mesh - Shift + click
Max Frontal Distance = Increase this to capture more detail within parts of the mesh that are ‘sticking out’
Max Rear Distance = Increase this to capture surfaces ‘poking inwards’
Exporting - Output Templates = Use “Arnold Ai Standard”
Generators - These use your mesh maps to create a mask/material
Use OpenGL when exporting Normal Maps in Substance Painter
Note credit: Anna McKee
Conclusion:
Overall I found this support session to be absolutely fantastic, as all of my questions were answered thoroughly and we were provided with extremely useful information regarding a plug-in (within Maya) that will help us proceed more quickly/efficiently when exporting from Substance Painter to Maya. Personally, I am just extremely happy that there is an alternative to using ID Maps (use subtool naming conventions instead), although I would need to participate within further study regarding this topic.
Although there is still so much work for me to do, I definitely feel that participating within this support session allowed me to gain an understanding of the importance of Masks, Generators, export settings, Secondary Rays and much more!
Self reflection
Week 8
Overall, I have found week 8 to be a complex week filled with learning a brand-new 3D program, Substance painter. Despite the initial learning curve, I have made significant progress in understanding the various tools and features offered by the software.
One of the most challenging aspects for me was getting accustomed to the Destructive versus Non-Destructive texturing techniques. However, as I continued to work with it, I found it to be a powerful and flexible way to create detailed textures.
I also spent time experimenting with the various brushes and masking techniques, which allowed me to add fine details and variations to my textures.
Personally I felt that I was able to improve my own understanding of the programme due to the completion of internal tutorials and texturing my Woodpecker model (DSP) from start to finish. This was a challenge as it was the first time that I had ever used Substance Painter to texture my own model, following the official 3D production pipeline. Although there were many ‘bumps’ along the way, in the end I was able to produce a final model of the bird with assorted and scientifically specific textures on it.
In conclusion I am pleased with the progress I have made in learning Substance painter and am excited to continue exploring its capabilities in the coming weeks.
Reflective thoughts regarding UV Mapping in relation to Week 3
During Week 3 of my blog entry, I began covering the current class topic of “UV Mapping”.
Whilst completing the beginning of each of these internal UV Mapping tutorials, my progress was halted due to my attention needing to be turned swiftly to the Digital Studio Practice Group work. Due to this group work being extremely intense, fast paced and deadline-heavy, I was unable to complete these initial internal UV Mapping tutorials.
This resulted with me falling-behind and ‘lacking’ in regard to the significant progress/understanding of UV Mapping.
Due to the recent completion of this 3D Bird model from my DSP Module, I have now gained the skills to completely sculpt a model from scratch, Retopologize, UV Map, Bake, Texture and Render. Although learning these steps were difficult, due to many time constraints, I feel that it is important now to share my thoughts understanding of UV mapping within this blog.
I do realise that the DSP model is not significant to this blog, although I wanted to show these screenshots of my UV Mapping process as proof of understanding the Pipeline process.
Shown below these DSP screenshots, I have also attached screenshots from my participation within an external tutorial video regarding UV Mapping.
This external video was conducted by “Flipped Normals”.


Screenshot Credit: Anna McKee
External Tutorial: Flipped Normals
Introduction to Maya - UV Mapping
Week 8


Screenshot Credit: Anna McKee
External Tutorial: Flipped Normals, Intro to Maya
Conclusion:
To grasp a stronger understanding of UV mapping, I undertook this external UV Mapping tutorial by Flipped Normals.
Although it was a simple shape to UV unwrap (some sort of cylindrical shape), completing this tutorial helped me to gain a heightened understanding of how the basic processes of Projecting, cutting and sewing that could be applied to almost any shape.
These steps are also applicable to more complex shapes, as the same process can be reapplied over and over again, (although maybe with the added steps of ‘smoothing’ the UVs and even going back into Object mode to delete any unnecessary Polygons that we are not going to see within the final model, this will also help to lower the polycount).
CLASS NOTES - Texturing -
WEEK 9


Credit: Anna McKee
05/12/2022 -
Week 9
During our week 9 in-class session, we focused on tools that could further our understanding of complex texture-making within Substance Painter.
Areas discussed: (These points apply to Substance Painter unless stated otherwise)
How to effectively use non-destructive and destructive tools within your texturing workflow
The importance of Texture Sets within Substance Painter
Rename your layers and create folders to help visually organise your workflow
How to colour by selecting UV shells
Generators - their use and importance
Creating a straight line in Substance - Left mouse button + Shift
Export settings - Change Normal Map to “6 bit”
Export settings - Change output to “Arnold (aistandard)”
Revision over the “Barrel” internal tutorial, the use of a Cage and how it can be created in Maya and used within Substance Painter
How to get your textures to become visible within Maya from Substance Painter
The importance of a an Arnold Skydome light when first viewing your textures on your model in Maya
Self Reflection
Week 9
In conclusion of Week 9, I felt that it was a crucial week in regards to revising over the importance of export settings from Substance Painter to Maya.
This is because there were many complex settings and adjustments that needed to be understood / altered during the ‘plug-in’ process (being able to visibly see your textures within Maya).